> ## Documentation Index
> Fetch the complete documentation index at: https://docs.lightdash.com/llms.txt
> Use this file to discover all available pages before exploring further.
# Custom Roles
> Build granular permission sets by picking exactly which scopes a role grants
**Custom roles are only available on Lightdash Enterprise plans.**
For more information on our plans, visit our [pricing page](https://www.lightdash.com/pricing).
## Overview
Lightdash provides two types of roles:
* **System roles**: Pre-defined roles (like Admin, Developer, and Viewer) that come with a standard set of scopes. For more on what each one can do, check our [default system roles permission matrix](/workspace-admin/roles#roles-in-your-lightdash-instance).
* **Custom roles**: Roles you define yourself by picking the exact scopes you need.
One important thing about system roles: they behave differently depending on where they're assigned.
Take the **Admin** role as an example. Assigned at the **organization level**, it lets you administer the entire Lightdash instance — org settings plus every project inside it. Assigned at the **project level**, it gives you admin permissions for that one project only, limited to what can be managed at the project level. Org-wide settings stay in the hands of org admins.
The **Developer** role works the same way. At the org level, you're a developer across all projects. At the project level, you're a developer for just that project.
For a fuller breakdown of how organization and project roles differ, see [Organization vs. project roles](/workspace-admin/roles#organization-vs-project-roles).
Every custom role is applied either at the **Lightdash organization level** or at a **Lightdash project level** — not both. When creating a new custom role, you choose where it will be assigned, and that choice determines which scopes (individual permissions) you can add to the role:
* **Organization-level custom roles** can include both organization-only scopes and project scopes, so an org-level custom role can mirror the built-in system org roles and apply project permissions across every project in the organization.
* **Project-level custom roles** can only include project scopes — organization-only scopes cannot be added to a role that is applied to a project.
```
Project-level custom role -> project scopes only
Organization-level custom role -> organization-only scopes + project scopes
```
**Custom roles can only add permissions, not remove them.** Lightdash uses an additive permission model. If a user already has a permission granted through their organization-level role, a custom project role cannot take it away. Toggling off a scope in a custom role has no effect for users who already have that scope from their org role.
A role's type is fixed once chosen, too. To apply the same permissions at the other level, create a second role.
Enterprise organizations can also hold more than one role at the same level — a system role plus one or more custom roles, or several custom roles — as a single *role set*. See [Assigning multiple roles](#assigning-multiple-roles-role-sets) below.
### How additive permissions work
Custom roles can be created at either the **project level** or the **organization level**, but permissions are always **additive**. If a user has permissions granted at the organization level, those permissions combine with any permissions granted by a custom role at the project level — they cannot restrict or override each other.
For example, Organization Editors, Developers, and Interactive Viewers all have the "Manage Google Sheets" permission by default. If you create a custom project role with "Manage Google Sheets" toggled off, users with any of those org roles will still be able to export to Google Sheets because the permission comes from their org-level assignment.
### Restricting permissions with custom roles
To use custom roles to restrict what users can do in a specific project, you need to start from a lower org-level role:
1. **Downgrade users to Organization Viewer or Organization Member.** Neither of these roles includes permissions like Google Sheets export, explore access, or scheduled deliveries.
2. **Create a custom project role** with only the specific permissions you want to grant (e.g., explore data, view dashboards, schedule Slack/email deliveries).
3. **Assign the custom role** to those users or groups at the project level.
This approach gives you precise control over what users can do in each project without granting broad permissions through the org role.
Check the [organization roles permission matrix](/workspace-admin/roles#organization-roles-and-permissions) to see which permissions each org role includes. Choose the lowest org role that meets your baseline needs, then use custom project roles to layer on additional access.
## Creating Custom Roles
### Access Custom Roles Settings
1. Navigate to **Settings** → **General Settings** → **Custom Roles**
2. You'll see a list of existing custom roles in your organization
### Create a New Role
1. Click **Create New Role**
2. Select the **role type** — **Organization** or **Project**. This determines whether the role will be applied to a user or user group at the organization level or the project level. If you select **Organization**, both organization-only scopes and project scopes will be available. If you select **Project**, only project scopes will be available — organization-only scopes cannot be added to a project role. Once a role type has been selected, it cannot be changed — you'll need to create a new role if you want a different type.
3. Choose a **Preset** that matches the role's purpose, or select **Start from scratch**. The preset list only shows options compatible with the selected role type.
4. Review and edit the **Role Name**, optional **Description**, and selected **scopes**. Choosing a preset fills in these fields and automatically selects any scope dependencies.
5. If you start from scratch, select the specific **scopes** (permissions) you want to include:
* **View permissions**: Allow users to see content (dashboards, charts, spaces)
* **Create permissions**: Allow users to create new content
* **Manage permissions**: Allow users to edit, delete, or administer content
6. Click **Save** to create the role
### Role presets
Presets provide a starting point for common permission sets. Every populated field remains editable, and the saved custom role is independent of the preset. Changes to a preset in a future Lightdash release do not update roles created from it.
| Preset | Role type | Purpose | Direct scopes |
| -------------------- | ------------ | ----------------------------------------------------------------------------------------------------------------- | ---------------------------------------------------------------------------------------------------------------------- |
| **Roadmap viewer** | Organization | View the organization's enterprise roadmap without organization administration permissions. | `view:Roadmap` |
| **SQL Runner user** | Project | Run warehouse SQL through SQL Runner, AI agents, and MCP without project deployment or SQL-authoring permissions. | `manage:SqlRunner` |
| **SQL author** | Project | Run warehouse SQL and author SQL charts, custom SQL dimensions, and SQL table calculations. | `manage:SqlRunner`, `manage:CustomSql`, `manage:CustomFields`, `manage:CustomSqlTableCalculations`, `view:CompiledSql` |
| **Data App builder** | Project | Create Data Apps and manage the apps you build, including in production projects. | `create:DataApp` |
| **AI agent manager** | Project | Create and manage all AI agents and their knowledge documents in assigned projects. | `manage:AiAgent`, `manage:AiAgentDocument` |
The table lists the scopes defined directly by each preset. Lightdash also selects their required dependencies, so the role builder can show additional scopes after you choose a preset. If you change the role type and the selected preset is not compatible with the new type, the picker returns to **Start from scratch**.
### Scope dependencies
Many scopes depend on other scopes to work correctly — for example, most project scopes require `view:Project`. When building or editing a role, the role builder shows each scope's dependency status:
* **Green check mark** — all dependencies are met.
* **Orange triangle** — some dependencies are met. The scope will still function, but certain aspects of the permission will not work.
* **Red circle** — none of the dependencies are met.
A summary in the bottom-left of the role builder shows how many selected scopes have all, some, or none of their dependencies met.
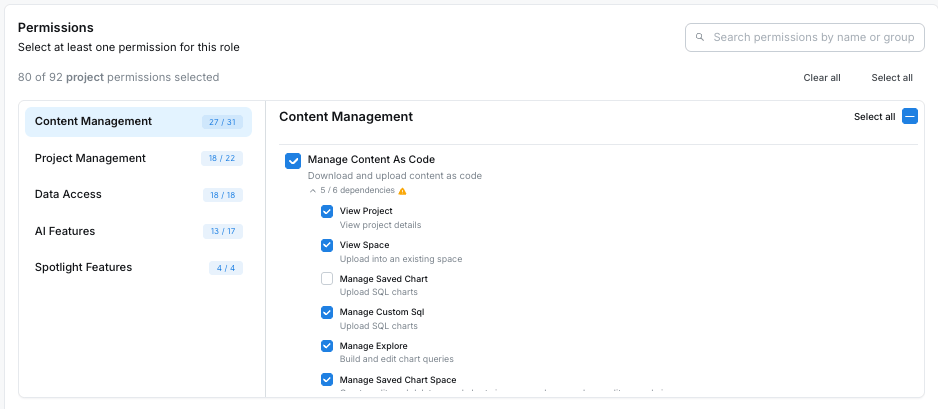 A couple of things worth knowing:
* Selecting a scope automatically selects its required dependencies.
* *Deselecting* a scope does **not** auto-deselect its dependencies. Many scopes (like `view:Project`) are required by lots of other scopes, so Lightdash leaves them in place to avoid silently breaking other selected scopes.
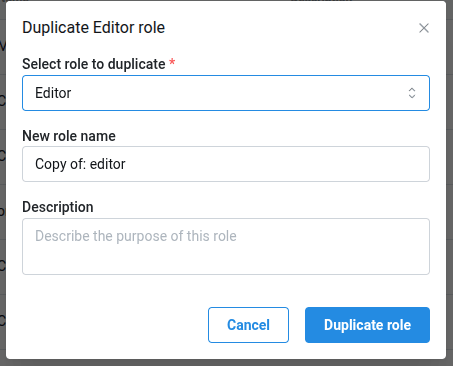
### Duplicate an Existing Role
If you want to create a role similar to an existing one:
1. Find the role you want to duplicate (system role or custom role)
2. Click the **⋯** menu next to the role
3. Select **Duplicate Role**
4. Select the **role type** — **Organization** or **Project**. This determines whether the duplicated role will be applied at the organization level or the project level, and which scopes are available. Once selected, the role type cannot be changed.
5. Enter a new name for the duplicated role
6. Modify the scopes as needed
7. Click **Save**
This is particularly useful when you want to create a role similar to a system role but with some modifications.
A couple of things worth knowing:
* Selecting a scope automatically selects its required dependencies.
* *Deselecting* a scope does **not** auto-deselect its dependencies. Many scopes (like `view:Project`) are required by lots of other scopes, so Lightdash leaves them in place to avoid silently breaking other selected scopes.
### Duplicate an Existing Role
If you want to create a role similar to an existing one:
1. Find the role you want to duplicate (system role or custom role)
2. Click the **⋯** menu next to the role
3. Select **Duplicate Role**
4. Select the **role type** — **Organization** or **Project**. This determines whether the duplicated role will be applied at the organization level or the project level, and which scopes are available. Once selected, the role type cannot be changed.
5. Enter a new name for the duplicated role
6. Modify the scopes as needed
7. Click **Save**
This is particularly useful when you want to create a role similar to a system role but with some modifications.
 ## Assigning Custom Roles
Custom roles are assigned at the project level to provide granular access control:
### Assign to Users
1. Go to **Project Settings** → **Access**
2. Find the user you want to assign a role to
3. Select the custom role from the dropdown
4. The user will now have the permissions defined in that custom role for this project
### Assign to Groups
1. Go to **Project Settings** → **Access**
2. Find the group you want to assign a role to
3. Select the custom role from the dropdown
4. All members of the group will inherit the custom role permissions for this project
## Assigning multiple roles (role sets)
By default every user or group holds **one** role per level: one organization role, and at most one role per project. On Enterprise plans with custom roles, each of those single roles becomes a **role set**:
* **at most one system role** — the base (`viewer`, `editor`, `admin`, …), or none;
* **any number of custom roles** of the matching level (organization or project), added on top.
Permissions are the **union** of every role in the set. Identical roles are de-duplicated, and a set can never be empty.
```text theme={null}
Organization role set: [ Viewer ] + [ Roadmap viewer ] + [ SQL runner ]
Project role set: [ Editor ] + [ Finance exports ]
Restrictive set: [ Report reader ] (custom only, no base)
```
Because permissions only add up, a system base is never narrowed by the custom roles next to it. To build a *restrictive* profile, leave the system role out and use a custom-only set (the same "start from Viewer or Member" approach described in [Restricting permissions with custom roles](#restricting-permissions-with-custom-roles)).
### Eligibility
Multiple roles are part of **custom roles**: they are available on any Lightdash **Enterprise** plan with custom roles enabled — no separate enablement is needed.
Without custom roles, the role pickers, API endpoints and provisioning integrations behave exactly as before, with one role per level. Any extra roles that were assigned while custom roles were enabled stay effective if custom roles are later switched off — only the ability to *manage* sets is gated.
### In the UI
Once enabled, the single role dropdown becomes a role picker on:
* **Settings → Users & groups → Users** — the organization role set of each member;
* **Project settings → Project access → Users** — a member's direct project role set;
* **Project settings → Project access → Groups** — a group's project role set.
The picker shows one pill per role. Choosing a system role replaces the current system role; choosing a custom role adds it. Removing the last pill is not allowed — use the remove-access action to drop direct access instead. Rows that inherit their access ("Inherits Editor", "No project access") work as before: picking a role creates a direct assignment.
Invitations and the "add access" dialogs still assign a single role; add more roles from the table afterwards.
### Via the API
Three `v2` endpoints read and replace a whole set atomically. They return `403` when custom roles are not enabled for the organization.
| Level | Endpoint |
| ------------------- | ------------------------------------------------------------------------------------ |
| Organization member | `GET` / `PUT /api/v2/orgs/{orgUuid}/roles/assignments/user/{userUuid}/set` |
| Project member | `GET` / `PUT /api/v2/projects/{projectUuid}/roles/assignments/user/{userUuid}/set` |
| Project group | `GET` / `PUT /api/v2/projects/{projectUuid}/roles/assignments/group/{groupUuid}/set` |
The body and the response share one shape — `systemRole` is a system role name or `null`, `customRoleUuids` lists custom roles of the matching level:
```bash theme={null}
curl -X PUT \
-H "Authorization: ApiKey $LIGHTDASH_API_KEY" \
-H "Content-Type: application/json" \
"$LIGHTDASH_URL/api/v2/projects/3675b69e-8324-4110-bdca-059031aa8da3/roles/assignments/user/e0dd2003-c291-4e14-b977-7a03b7edc842/set" \
-d '{
"systemRole": "editor",
"customRoleUuids": ["11df7b19-1db7-44f3-aa48-54f8bbd6c89a"]
}'
```
```json theme={null}
{
"status": "ok",
"results": {
"systemRole": "editor",
"customRoleUuids": ["11df7b19-1db7-44f3-aa48-54f8bbd6c89a"]
}
}
```
A `PUT` **replaces** the whole set: roles you leave out are removed. Requests are rejected with `400` when the set is empty or contains a role of the wrong level, and with `403` when a role belongs to another organization, when the caller could not grant one of the requested roles themselves, or when the change would leave the organization without an active admin.
The existing single-role endpoints keep working. Their responses report the **primary** role of the set (the system role, or the first custom role when there is no system role) plus a `hasMultipleRoles: true` flag when the assignment holds more roles, and a **single-role write replaces the whole set** with that one role — so an older client or script that assigns a role clears any extras. Use the `…/set` endpoints from clients that need to keep sets intact.
### SCIM and users as code
* **SCIM** represents every role in a set as one entry of the standard `roles` array — see [User Role Provisioning](/workspace-admin/sso/scim#user-role-provisioning).
* **Users as code** carries extra organization custom roles in an `additionalRoles` list — see [Users as code](/workflow/content-as-code#users-as-code).
### Troubleshooting multiple roles
* **`403 Custom roles are not enabled`** on the `…/set` endpoints — custom roles are not enabled for the organization; single-role behaviour applies.
* **`400 A role set must contain at least one role`** — send at least one system or custom role, or use the remove-access endpoint / trash action to drop the assignment.
* **A user lost their extra roles** — a single-role write (an older client, script, or IdP payload) replaced the set. Re-assign the extras with the picker or the `…/set` endpoint.
* **A custom role in the set does not seem to restrict anything** — sets are additive; check whether a system role sits in the same set or at the organization level. See [How additive permissions work](#how-additive-permissions-work).
* **Changes not visible yet** — the affected user may need to refresh; permissions rebuild on their next request.
## Scope reference
### Content-as-code scopes
Four scopes control access to [content as code](/workflow/content-as-code), the CLI workflow for managing charts and dashboards as YAML files. They form a read → narrow-write → write → manage ladder.
**Download content as code** (`view:ContentAsCode`) lets a user pull existing charts and dashboards as YAML via `lightdash download`. It does not allow pushing changes back. This is the common "let people pull templates" grant.
**Upload content as code to own previews** (`manage:ContentAsCode@self`) is a narrow upload right: users can run `lightdash upload` only against preview projects they created themselves. This is the intended day-to-day scope for non-Developer users in CI/CD-style workflows where they need to validate their own preview but shouldn't push to shared projects. Pair it with `view:ContentAsCode` so they can still pull from shared projects.
**Upload content as code** (`create:ContentAsCode`) grants chart, dashboard, and SQL-chart uploads across any project the role applies to, without the broader scheduled-delivery, alert, and Google Sheets upload rights that `manage:ContentAsCode` includes. This is the scope built-in **Editors** hold — it unlocks `lightdash upload` for charts and dashboards (and the AI agent / MCP content tools that create or edit the same content) while still enforcing the same space-level access checks that the UI applies. Writing SQL charts still requires `manage:CustomSql`; adding or changing custom SQL dimensions still requires `manage:CustomFields`; adding or changing custom SQL table calculations still requires `manage:CustomSqlTableCalculations`. Custom SQL is diffed against the persisted chart, so re-uploading a chart whose SQL hasn't changed passes without those extra scopes.
**Download and upload content as code** (`manage:ContentAsCode`) grants everything in `create:ContentAsCode` plus the ability to upload scheduled deliveries, alerts, Google Sheets uploads, and space/permission mutations via content as code. This is the scope built-in **Developers** and **Admins** hold. It implies `view:ContentAsCode`, `create:ContentAsCode`, and the `@self` upload right.
Use **download-only** to let a user pull production YAML for local development, diffing, or inspection without giving them the ability to overwrite production content. Combine with a controlled promotion path (e.g., CI/CD running with a service account that holds the manage scope) so writes only land via the pipeline.
#### Restrict developers to preview uploads (agentic development workflow)
A common pattern for agentic development of dashboards and content as code is to let developers iterate freely on their own preview projects while preventing direct `lightdash upload` to production. Promotion to production then happens through a reviewed CI/CD pipeline instead of an individual's CLI, or through [promoting content](/explore/promote-content) in the UI.
To set this up:
1. **Clone the built-in Developer role** to create a custom role (for example, `Developer (no prod upload)`).
2. **Remove** the **Download and upload content as code** (`manage:ContentAsCode`) scope from the cloned role.
3. **Add** the **Download content as code** (`view:ContentAsCode`) and **Upload content as code to own previews** (`manage:ContentAsCode@self`) scopes.
4. **Assign the custom role to the user at the project level** on the production project.
Custom project roles can only narrow scopes the user would otherwise inherit. If the user is an **Organization Admin** or **Organization Developer**, they will inherit `manage:ContentAsCode` from their org role and the project-level custom role will not block them. For this pattern to work, the user's organization role must be **Viewer**, **Interactive Viewer**, or **Member**.
With this setup, the user can:
* Run `lightdash download` against the production project to pull YAML for local editing.
* Run `lightdash preview` and `lightdash upload` against their own preview projects to validate changes.
* Receive a `403` when attempting `lightdash upload` against the production project — production writes must go through the promotion pipeline.
### Preview-edit scopes
Four `@self` scopes let a user edit content **only inside [preview projects](/workflow/preview-projects) they created themselves**, without granting any edit rights in production:
* **Manage dashboards in own previews** (`manage:Dashboard@self`)
* **Manage saved charts in own previews** (`manage:SavedChart@self`)
* **Manage spaces in own previews** (`manage:Space@self`)
* **Explore and query data in own previews** (`manage:Explore@self`)
Use these to enable a governed self-serve workflow for non-analyst builders:
1. The user is view-only in the production project.
2. They create a preview project from production — content and access are copied across.
3. Inside their own preview they can freely create, edit, and delete dashboards, charts, and spaces, and use the Explorer to build new charts.
4. A reviewer with the appropriate rights [promotes the changes](/explore/promote-content) back to production.
Without the `@self` modifier, granting `manage:Dashboard` (or the chart/space/explore equivalents) would also grant those rights in the production project. With `@self`, the rule only takes effect when both conditions hold:
* The project is a preview project.
* The current user is the user who created that preview.
In any other project — production, a teammate's preview, an org-level role assignment with no project context — the scope contributes nothing. The four scopes are included in the built-in Developer role by default; you only need to add them explicitly when building a custom role for users whose org role is Viewer, Interactive Viewer, or Member.
These scopes still respect space access. A `manage:Dashboard@self` or `manage:SavedChart@self` grant only applies inside spaces the user can already see (public spaces, or private spaces they're a member of). `manage:Space@self` lets the user create new spaces and manage spaces they can see, but does not expose private spaces they weren't a member of in production. `manage:Explore@self` is project-wide inside the preview, matching how Explore works elsewhere.
#### Let view-only users build in their own previews
To set up the "view-only in production, edit freely in own preview" workflow:
1. **Downgrade the user's org role** to Viewer, Interactive Viewer, or Member so production rights come from the project-level role.
2. **Create a custom role** (for example, `Preview Builder`) with:
* The view scopes the user needs in production (e.g. `view:Dashboard`, `view:SavedChart`, `view:Space`, `view:Project`).
* `create:Project` so they can create preview projects.
* All four preview-edit scopes: `manage:Dashboard@self`, `manage:SavedChart@self`, `manage:Space@self`, `manage:Explore@self`.
3. **Assign the custom role** to the user at the production project level.
With this setup, the user can browse production read-only, spin up a preview from production, edit dashboards/charts/spaces and run the Explorer inside that preview, and request promotion back to production. They cannot edit production content directly, and they cannot edit content in previews created by other users.
Promoting content from a preview back to production still requires promote (or editor) rights on the destination project. The preview-edit scopes do not grant promotion. These scopes are designed to be used in tandem with an "approve and promote" role.
### Data app scopes
Three scopes control [data app](/data-apps/download-data-apps-as-code) creation and iteration. They cover both the in-product app builder and `lightdash upload --apps` from the CLI — the check is the same in both surfaces.
**Create data apps** (`create:DataApp`) lets a user create new data apps in any project the role applies to, including production. This is the scope built-in **Editors**, **Developers**, and **Admins** hold. It also grants the "own personal apps" rights (`view:DataApp@self`, `manage:DataApp@self`) so users can iterate on apps they created.
**Create data apps in own previews** (`create:DataApp@preview`) is the preview-only counterpart. It lets a user create data apps **only inside [preview projects](/workflow/preview-projects) they created themselves** — not in production, and not in previews created by teammates. Pair it with `create:Project@preview` so the user can spin up the preview in the first place, and with `manage:DataApp@preview` so they can iterate on the apps they uploaded.
**Manage data apps in own previews** (`manage:DataApp@preview`) lets a user edit and delete data apps inside preview projects they created themselves. Included alongside `create:DataApp@preview` in the built-in Developer role.
Without the `@preview` modifier, granting `create:DataApp` also grants app creation in production. With `@preview`, the rule only takes effect when both conditions hold:
* The project is a preview project.
* The current user is the user who created that preview.
In any other project — production, a teammate's preview, an org-level role assignment with no project context — the scope contributes nothing. A user with only `create:DataApp@preview` attempting `lightdash upload --apps` against production (or a colleague's preview) receives a `403`.
#### Restrict data app uploads to previews (agentic development workflow)
To let developers build and iterate on data apps in their own previews via the CLI without allowing direct `lightdash upload --apps` to production:
1. **Clone the built-in Developer role** to create a custom role (for example, `Developer (no prod data app upload)`).
2. **Remove** the **Create data apps** (`create:DataApp`) scope from the cloned role.
3. **Keep** the **Create data apps in own previews** (`create:DataApp@preview`) and **Manage data apps in own previews** (`manage:DataApp@preview`) scopes — the built-in Developer role already includes them.
4. **Assign the custom role to the user at the project level** on the production project.
Custom project roles can only narrow scopes the user would otherwise inherit. If the user is an **Organization Admin**, **Organization Developer**, or **Organization Editor**, they will inherit `create:DataApp` from their org role and the project-level custom role will not block them. For this pattern to work, the user's organization role must be **Viewer**, **Interactive Viewer**, or **Member**.
With this setup, the user can:
* Run `lightdash preview` to spin up their own preview from production.
* Run `lightdash upload --apps` against their own preview to iterate on data apps.
* Receive a `403` when attempting `lightdash upload --apps` against the production project or a teammate's preview — production data app changes must go through the promotion pipeline.
Combine this with the [content-as-code preview restriction](#restrict-developers-to-preview-uploads-agentic-development-workflow) to lock down both charts/dashboards and data apps for the same user.
### SQL-related scopes
Three scopes control different SQL-authoring features. They are independent — granting one does not grant the others.
**Manage Sql Runner** controls access to the [SQL Runner](/explore/sql-runner), which lets users write and run ad-hoc SQL queries directly against your data warehouse. It also controls the ability to create [virtual views](/semantic-layer/virtual-views) and [write back dbt models](/integrations/dbt/write-back) from SQL Runner queries.
**Manage Custom Sql** (description: *Save SQL charts*) controls the ability to save the output of a SQL Runner query as a saved chart. Users with this scope can save SQL charts; without it, they can still run queries in SQL Runner but cannot persist the output. This scope does **not** grant access to custom SQL dimensions in Explore.
**Manage Custom Fields** (description: *Create and edit custom dimensions*) controls the ability to create and edit [custom SQL dimensions](/explore/create-custom-fields#custom-sql) inside the Explore view. Custom SQL dimensions let users add calculated fields to an existing table using raw SQL. This scope does **not** grant access to the SQL Runner.
If you want a user to query tables that include custom SQL dimensions created by others, they don't need any of these scopes. Any user with access to the Explore view can **use** existing custom SQL dimensions in their queries — these scopes only control who can **author** them.
## Managing custom roles as code
Custom roles can be downloaded from and uploaded to a Lightdash instance as YAML files via the CLI, alongside charts, dashboards, and other content as code. This is useful for version-controlling your organization's roles, reviewing changes in pull requests, or copying a role between instances.
Unlike most content as code (which is project-scoped), custom roles are **organization-scoped**. Downloads and uploads use the `--organization` mode of the CLI and require **organization admin** permissions.
### Download roles
Run the download in organization mode from your working directory:
```bash theme={null}
lightdash download --organization
```
This writes every user-defined role in your organization to `lightdash/custom-roles/*.yml`. System roles are not included.
### Upload roles
Edit or add YAML files under `lightdash/custom-roles/`, then run:
```bash theme={null}
lightdash upload --organization
```
Each file is upserted by role name — the backend creates a new role if the name is unused, updates the role's description and scopes if they've drifted, or reports no change if the file already matches the server. Uploads never delete roles; remove unwanted roles in the UI.
### YAML format
```yaml theme={null}
version: 1
name: analytics-viewer
description: Read-only access to analytics content
level: organization
scopes:
- view:Dashboard
- view:SavedChart
- view:Space
```
| Field | Description |
| ------------- | ----------------------------------------------------------------------------------------------------------------------------------------------------------------------------- |
| `version` | Format version. Currently always `1`. |
| `name` | The role's display name. Used as the portable identity — a role is matched to an existing role by exact name. |
| `description` | Optional description. Set to `null` to clear an existing description. |
| `level` | Either `organization` or `project`. Determines which scopes are allowed and is immutable after the role is created. |
| `scopes` | List of scope grants. See the [scope reference](#scope-reference) above for available scopes and note that organization-only scopes cannot appear on a `level: project` role. |
Malformed files, unknown scopes, and scopes that aren't allowed at the role's level are rejected per file with the file path and error message; other files continue to process. The CLI exits with a non-zero status if any file fails validation.
For the full workflow, including examples and CI/CD integration alongside charts and dashboards, see [Custom roles as code](/workflow/content-as-code#custom-roles-as-code).
## Troubleshooting
### Custom role doesn't restrict a permission (e.g., Google Sheets export)
Custom roles can only **add** permissions—they cannot remove permissions granted by the user's organization role. If you toggled off a scope in a custom role but the user still has access, their org role is granting that permission.
**To fix this:** Downgrade the user's org role to Viewer or Member, then use a custom project role to grant only the specific permissions they need. See [Restricting permissions with custom roles](#restricting-permissions-with-custom-roles) above.
### Users can't see expected content
* Verify the custom role includes the necessary view scopes
* Check that the role is assigned at the project level where the content exists
* Remember that organization-level permissions may override custom role limitations
### Role Changes Not Taking Effect
* Users may need to refresh the page for role changes to take effect
* Verify the role was saved successfully and assigned to the correct users/groups
## Managing Existing Custom Roles
### Edit a Custom Role
1. Go to **Settings** → **General Settings** → **Custom Roles**
2. Click on the role you want to edit
3. Modify the name, description, or scopes
4. Click **Save** - changes will apply to all users and groups assigned this role
### Delete a Custom Role
1. First, ensure no users or groups are assigned this role
2. Go to **Settings** → **General Settings** → **Custom Roles**
3. Click the **trash icon** next to the role
4. Confirm the deletion
**Deleting Roles**: Once deleted, a custom role cannot be recovered. You can't remove a role that is currently assinged to users or groups.
Custom roles provide powerful flexibility in managing access to your Lightdash organization. By carefully designing roles that match your team's responsibilities and workflows, you can ensure users have exactly the permissions they need while maintaining security and organization.
## Assigning Custom Roles
Custom roles are assigned at the project level to provide granular access control:
### Assign to Users
1. Go to **Project Settings** → **Access**
2. Find the user you want to assign a role to
3. Select the custom role from the dropdown
4. The user will now have the permissions defined in that custom role for this project
### Assign to Groups
1. Go to **Project Settings** → **Access**
2. Find the group you want to assign a role to
3. Select the custom role from the dropdown
4. All members of the group will inherit the custom role permissions for this project
## Assigning multiple roles (role sets)
By default every user or group holds **one** role per level: one organization role, and at most one role per project. On Enterprise plans with custom roles, each of those single roles becomes a **role set**:
* **at most one system role** — the base (`viewer`, `editor`, `admin`, …), or none;
* **any number of custom roles** of the matching level (organization or project), added on top.
Permissions are the **union** of every role in the set. Identical roles are de-duplicated, and a set can never be empty.
```text theme={null}
Organization role set: [ Viewer ] + [ Roadmap viewer ] + [ SQL runner ]
Project role set: [ Editor ] + [ Finance exports ]
Restrictive set: [ Report reader ] (custom only, no base)
```
Because permissions only add up, a system base is never narrowed by the custom roles next to it. To build a *restrictive* profile, leave the system role out and use a custom-only set (the same "start from Viewer or Member" approach described in [Restricting permissions with custom roles](#restricting-permissions-with-custom-roles)).
### Eligibility
Multiple roles are part of **custom roles**: they are available on any Lightdash **Enterprise** plan with custom roles enabled — no separate enablement is needed.
Without custom roles, the role pickers, API endpoints and provisioning integrations behave exactly as before, with one role per level. Any extra roles that were assigned while custom roles were enabled stay effective if custom roles are later switched off — only the ability to *manage* sets is gated.
### In the UI
Once enabled, the single role dropdown becomes a role picker on:
* **Settings → Users & groups → Users** — the organization role set of each member;
* **Project settings → Project access → Users** — a member's direct project role set;
* **Project settings → Project access → Groups** — a group's project role set.
The picker shows one pill per role. Choosing a system role replaces the current system role; choosing a custom role adds it. Removing the last pill is not allowed — use the remove-access action to drop direct access instead. Rows that inherit their access ("Inherits Editor", "No project access") work as before: picking a role creates a direct assignment.
Invitations and the "add access" dialogs still assign a single role; add more roles from the table afterwards.
### Via the API
Three `v2` endpoints read and replace a whole set atomically. They return `403` when custom roles are not enabled for the organization.
| Level | Endpoint |
| ------------------- | ------------------------------------------------------------------------------------ |
| Organization member | `GET` / `PUT /api/v2/orgs/{orgUuid}/roles/assignments/user/{userUuid}/set` |
| Project member | `GET` / `PUT /api/v2/projects/{projectUuid}/roles/assignments/user/{userUuid}/set` |
| Project group | `GET` / `PUT /api/v2/projects/{projectUuid}/roles/assignments/group/{groupUuid}/set` |
The body and the response share one shape — `systemRole` is a system role name or `null`, `customRoleUuids` lists custom roles of the matching level:
```bash theme={null}
curl -X PUT \
-H "Authorization: ApiKey $LIGHTDASH_API_KEY" \
-H "Content-Type: application/json" \
"$LIGHTDASH_URL/api/v2/projects/3675b69e-8324-4110-bdca-059031aa8da3/roles/assignments/user/e0dd2003-c291-4e14-b977-7a03b7edc842/set" \
-d '{
"systemRole": "editor",
"customRoleUuids": ["11df7b19-1db7-44f3-aa48-54f8bbd6c89a"]
}'
```
```json theme={null}
{
"status": "ok",
"results": {
"systemRole": "editor",
"customRoleUuids": ["11df7b19-1db7-44f3-aa48-54f8bbd6c89a"]
}
}
```
A `PUT` **replaces** the whole set: roles you leave out are removed. Requests are rejected with `400` when the set is empty or contains a role of the wrong level, and with `403` when a role belongs to another organization, when the caller could not grant one of the requested roles themselves, or when the change would leave the organization without an active admin.
The existing single-role endpoints keep working. Their responses report the **primary** role of the set (the system role, or the first custom role when there is no system role) plus a `hasMultipleRoles: true` flag when the assignment holds more roles, and a **single-role write replaces the whole set** with that one role — so an older client or script that assigns a role clears any extras. Use the `…/set` endpoints from clients that need to keep sets intact.
### SCIM and users as code
* **SCIM** represents every role in a set as one entry of the standard `roles` array — see [User Role Provisioning](/workspace-admin/sso/scim#user-role-provisioning).
* **Users as code** carries extra organization custom roles in an `additionalRoles` list — see [Users as code](/workflow/content-as-code#users-as-code).
### Troubleshooting multiple roles
* **`403 Custom roles are not enabled`** on the `…/set` endpoints — custom roles are not enabled for the organization; single-role behaviour applies.
* **`400 A role set must contain at least one role`** — send at least one system or custom role, or use the remove-access endpoint / trash action to drop the assignment.
* **A user lost their extra roles** — a single-role write (an older client, script, or IdP payload) replaced the set. Re-assign the extras with the picker or the `…/set` endpoint.
* **A custom role in the set does not seem to restrict anything** — sets are additive; check whether a system role sits in the same set or at the organization level. See [How additive permissions work](#how-additive-permissions-work).
* **Changes not visible yet** — the affected user may need to refresh; permissions rebuild on their next request.
## Scope reference
### Content-as-code scopes
Four scopes control access to [content as code](/workflow/content-as-code), the CLI workflow for managing charts and dashboards as YAML files. They form a read → narrow-write → write → manage ladder.
**Download content as code** (`view:ContentAsCode`) lets a user pull existing charts and dashboards as YAML via `lightdash download`. It does not allow pushing changes back. This is the common "let people pull templates" grant.
**Upload content as code to own previews** (`manage:ContentAsCode@self`) is a narrow upload right: users can run `lightdash upload` only against preview projects they created themselves. This is the intended day-to-day scope for non-Developer users in CI/CD-style workflows where they need to validate their own preview but shouldn't push to shared projects. Pair it with `view:ContentAsCode` so they can still pull from shared projects.
**Upload content as code** (`create:ContentAsCode`) grants chart, dashboard, and SQL-chart uploads across any project the role applies to, without the broader scheduled-delivery, alert, and Google Sheets upload rights that `manage:ContentAsCode` includes. This is the scope built-in **Editors** hold — it unlocks `lightdash upload` for charts and dashboards (and the AI agent / MCP content tools that create or edit the same content) while still enforcing the same space-level access checks that the UI applies. Writing SQL charts still requires `manage:CustomSql`; adding or changing custom SQL dimensions still requires `manage:CustomFields`; adding or changing custom SQL table calculations still requires `manage:CustomSqlTableCalculations`. Custom SQL is diffed against the persisted chart, so re-uploading a chart whose SQL hasn't changed passes without those extra scopes.
**Download and upload content as code** (`manage:ContentAsCode`) grants everything in `create:ContentAsCode` plus the ability to upload scheduled deliveries, alerts, Google Sheets uploads, and space/permission mutations via content as code. This is the scope built-in **Developers** and **Admins** hold. It implies `view:ContentAsCode`, `create:ContentAsCode`, and the `@self` upload right.
Use **download-only** to let a user pull production YAML for local development, diffing, or inspection without giving them the ability to overwrite production content. Combine with a controlled promotion path (e.g., CI/CD running with a service account that holds the manage scope) so writes only land via the pipeline.
#### Restrict developers to preview uploads (agentic development workflow)
A common pattern for agentic development of dashboards and content as code is to let developers iterate freely on their own preview projects while preventing direct `lightdash upload` to production. Promotion to production then happens through a reviewed CI/CD pipeline instead of an individual's CLI, or through [promoting content](/explore/promote-content) in the UI.
To set this up:
1. **Clone the built-in Developer role** to create a custom role (for example, `Developer (no prod upload)`).
2. **Remove** the **Download and upload content as code** (`manage:ContentAsCode`) scope from the cloned role.
3. **Add** the **Download content as code** (`view:ContentAsCode`) and **Upload content as code to own previews** (`manage:ContentAsCode@self`) scopes.
4. **Assign the custom role to the user at the project level** on the production project.
Custom project roles can only narrow scopes the user would otherwise inherit. If the user is an **Organization Admin** or **Organization Developer**, they will inherit `manage:ContentAsCode` from their org role and the project-level custom role will not block them. For this pattern to work, the user's organization role must be **Viewer**, **Interactive Viewer**, or **Member**.
With this setup, the user can:
* Run `lightdash download` against the production project to pull YAML for local editing.
* Run `lightdash preview` and `lightdash upload` against their own preview projects to validate changes.
* Receive a `403` when attempting `lightdash upload` against the production project — production writes must go through the promotion pipeline.
### Preview-edit scopes
Four `@self` scopes let a user edit content **only inside [preview projects](/workflow/preview-projects) they created themselves**, without granting any edit rights in production:
* **Manage dashboards in own previews** (`manage:Dashboard@self`)
* **Manage saved charts in own previews** (`manage:SavedChart@self`)
* **Manage spaces in own previews** (`manage:Space@self`)
* **Explore and query data in own previews** (`manage:Explore@self`)
Use these to enable a governed self-serve workflow for non-analyst builders:
1. The user is view-only in the production project.
2. They create a preview project from production — content and access are copied across.
3. Inside their own preview they can freely create, edit, and delete dashboards, charts, and spaces, and use the Explorer to build new charts.
4. A reviewer with the appropriate rights [promotes the changes](/explore/promote-content) back to production.
Without the `@self` modifier, granting `manage:Dashboard` (or the chart/space/explore equivalents) would also grant those rights in the production project. With `@self`, the rule only takes effect when both conditions hold:
* The project is a preview project.
* The current user is the user who created that preview.
In any other project — production, a teammate's preview, an org-level role assignment with no project context — the scope contributes nothing. The four scopes are included in the built-in Developer role by default; you only need to add them explicitly when building a custom role for users whose org role is Viewer, Interactive Viewer, or Member.
These scopes still respect space access. A `manage:Dashboard@self` or `manage:SavedChart@self` grant only applies inside spaces the user can already see (public spaces, or private spaces they're a member of). `manage:Space@self` lets the user create new spaces and manage spaces they can see, but does not expose private spaces they weren't a member of in production. `manage:Explore@self` is project-wide inside the preview, matching how Explore works elsewhere.
#### Let view-only users build in their own previews
To set up the "view-only in production, edit freely in own preview" workflow:
1. **Downgrade the user's org role** to Viewer, Interactive Viewer, or Member so production rights come from the project-level role.
2. **Create a custom role** (for example, `Preview Builder`) with:
* The view scopes the user needs in production (e.g. `view:Dashboard`, `view:SavedChart`, `view:Space`, `view:Project`).
* `create:Project` so they can create preview projects.
* All four preview-edit scopes: `manage:Dashboard@self`, `manage:SavedChart@self`, `manage:Space@self`, `manage:Explore@self`.
3. **Assign the custom role** to the user at the production project level.
With this setup, the user can browse production read-only, spin up a preview from production, edit dashboards/charts/spaces and run the Explorer inside that preview, and request promotion back to production. They cannot edit production content directly, and they cannot edit content in previews created by other users.
Promoting content from a preview back to production still requires promote (or editor) rights on the destination project. The preview-edit scopes do not grant promotion. These scopes are designed to be used in tandem with an "approve and promote" role.
### Data app scopes
Three scopes control [data app](/data-apps/download-data-apps-as-code) creation and iteration. They cover both the in-product app builder and `lightdash upload --apps` from the CLI — the check is the same in both surfaces.
**Create data apps** (`create:DataApp`) lets a user create new data apps in any project the role applies to, including production. This is the scope built-in **Editors**, **Developers**, and **Admins** hold. It also grants the "own personal apps" rights (`view:DataApp@self`, `manage:DataApp@self`) so users can iterate on apps they created.
**Create data apps in own previews** (`create:DataApp@preview`) is the preview-only counterpart. It lets a user create data apps **only inside [preview projects](/workflow/preview-projects) they created themselves** — not in production, and not in previews created by teammates. Pair it with `create:Project@preview` so the user can spin up the preview in the first place, and with `manage:DataApp@preview` so they can iterate on the apps they uploaded.
**Manage data apps in own previews** (`manage:DataApp@preview`) lets a user edit and delete data apps inside preview projects they created themselves. Included alongside `create:DataApp@preview` in the built-in Developer role.
Without the `@preview` modifier, granting `create:DataApp` also grants app creation in production. With `@preview`, the rule only takes effect when both conditions hold:
* The project is a preview project.
* The current user is the user who created that preview.
In any other project — production, a teammate's preview, an org-level role assignment with no project context — the scope contributes nothing. A user with only `create:DataApp@preview` attempting `lightdash upload --apps` against production (or a colleague's preview) receives a `403`.
#### Restrict data app uploads to previews (agentic development workflow)
To let developers build and iterate on data apps in their own previews via the CLI without allowing direct `lightdash upload --apps` to production:
1. **Clone the built-in Developer role** to create a custom role (for example, `Developer (no prod data app upload)`).
2. **Remove** the **Create data apps** (`create:DataApp`) scope from the cloned role.
3. **Keep** the **Create data apps in own previews** (`create:DataApp@preview`) and **Manage data apps in own previews** (`manage:DataApp@preview`) scopes — the built-in Developer role already includes them.
4. **Assign the custom role to the user at the project level** on the production project.
Custom project roles can only narrow scopes the user would otherwise inherit. If the user is an **Organization Admin**, **Organization Developer**, or **Organization Editor**, they will inherit `create:DataApp` from their org role and the project-level custom role will not block them. For this pattern to work, the user's organization role must be **Viewer**, **Interactive Viewer**, or **Member**.
With this setup, the user can:
* Run `lightdash preview` to spin up their own preview from production.
* Run `lightdash upload --apps` against their own preview to iterate on data apps.
* Receive a `403` when attempting `lightdash upload --apps` against the production project or a teammate's preview — production data app changes must go through the promotion pipeline.
Combine this with the [content-as-code preview restriction](#restrict-developers-to-preview-uploads-agentic-development-workflow) to lock down both charts/dashboards and data apps for the same user.
### SQL-related scopes
Three scopes control different SQL-authoring features. They are independent — granting one does not grant the others.
**Manage Sql Runner** controls access to the [SQL Runner](/explore/sql-runner), which lets users write and run ad-hoc SQL queries directly against your data warehouse. It also controls the ability to create [virtual views](/semantic-layer/virtual-views) and [write back dbt models](/integrations/dbt/write-back) from SQL Runner queries.
**Manage Custom Sql** (description: *Save SQL charts*) controls the ability to save the output of a SQL Runner query as a saved chart. Users with this scope can save SQL charts; without it, they can still run queries in SQL Runner but cannot persist the output. This scope does **not** grant access to custom SQL dimensions in Explore.
**Manage Custom Fields** (description: *Create and edit custom dimensions*) controls the ability to create and edit [custom SQL dimensions](/explore/create-custom-fields#custom-sql) inside the Explore view. Custom SQL dimensions let users add calculated fields to an existing table using raw SQL. This scope does **not** grant access to the SQL Runner.
If you want a user to query tables that include custom SQL dimensions created by others, they don't need any of these scopes. Any user with access to the Explore view can **use** existing custom SQL dimensions in their queries — these scopes only control who can **author** them.
## Managing custom roles as code
Custom roles can be downloaded from and uploaded to a Lightdash instance as YAML files via the CLI, alongside charts, dashboards, and other content as code. This is useful for version-controlling your organization's roles, reviewing changes in pull requests, or copying a role between instances.
Unlike most content as code (which is project-scoped), custom roles are **organization-scoped**. Downloads and uploads use the `--organization` mode of the CLI and require **organization admin** permissions.
### Download roles
Run the download in organization mode from your working directory:
```bash theme={null}
lightdash download --organization
```
This writes every user-defined role in your organization to `lightdash/custom-roles/*.yml`. System roles are not included.
### Upload roles
Edit or add YAML files under `lightdash/custom-roles/`, then run:
```bash theme={null}
lightdash upload --organization
```
Each file is upserted by role name — the backend creates a new role if the name is unused, updates the role's description and scopes if they've drifted, or reports no change if the file already matches the server. Uploads never delete roles; remove unwanted roles in the UI.
### YAML format
```yaml theme={null}
version: 1
name: analytics-viewer
description: Read-only access to analytics content
level: organization
scopes:
- view:Dashboard
- view:SavedChart
- view:Space
```
| Field | Description |
| ------------- | ----------------------------------------------------------------------------------------------------------------------------------------------------------------------------- |
| `version` | Format version. Currently always `1`. |
| `name` | The role's display name. Used as the portable identity — a role is matched to an existing role by exact name. |
| `description` | Optional description. Set to `null` to clear an existing description. |
| `level` | Either `organization` or `project`. Determines which scopes are allowed and is immutable after the role is created. |
| `scopes` | List of scope grants. See the [scope reference](#scope-reference) above for available scopes and note that organization-only scopes cannot appear on a `level: project` role. |
Malformed files, unknown scopes, and scopes that aren't allowed at the role's level are rejected per file with the file path and error message; other files continue to process. The CLI exits with a non-zero status if any file fails validation.
For the full workflow, including examples and CI/CD integration alongside charts and dashboards, see [Custom roles as code](/workflow/content-as-code#custom-roles-as-code).
## Troubleshooting
### Custom role doesn't restrict a permission (e.g., Google Sheets export)
Custom roles can only **add** permissions—they cannot remove permissions granted by the user's organization role. If you toggled off a scope in a custom role but the user still has access, their org role is granting that permission.
**To fix this:** Downgrade the user's org role to Viewer or Member, then use a custom project role to grant only the specific permissions they need. See [Restricting permissions with custom roles](#restricting-permissions-with-custom-roles) above.
### Users can't see expected content
* Verify the custom role includes the necessary view scopes
* Check that the role is assigned at the project level where the content exists
* Remember that organization-level permissions may override custom role limitations
### Role Changes Not Taking Effect
* Users may need to refresh the page for role changes to take effect
* Verify the role was saved successfully and assigned to the correct users/groups
## Managing Existing Custom Roles
### Edit a Custom Role
1. Go to **Settings** → **General Settings** → **Custom Roles**
2. Click on the role you want to edit
3. Modify the name, description, or scopes
4. Click **Save** - changes will apply to all users and groups assigned this role
### Delete a Custom Role
1. First, ensure no users or groups are assigned this role
2. Go to **Settings** → **General Settings** → **Custom Roles**
3. Click the **trash icon** next to the role
4. Confirm the deletion
**Deleting Roles**: Once deleted, a custom role cannot be recovered. You can't remove a role that is currently assinged to users or groups.
Custom roles provide powerful flexibility in managing access to your Lightdash organization. By carefully designing roles that match your team's responsibilities and workflows, you can ensure users have exactly the permissions they need while maintaining security and organization.