

1
Enable AI features (Admin)
An organization admin enables AI features and chooses the models users can access. Enable AI features.
2
Plan your agent
Define who the agent is for, the questions it should answer, and the data and workflows it needs. Plan your agent.
3
Create and configure the agent
Add its instructions, context, reusable skills, access controls, and optional tools. Create your first agent.
4
Test and improve its answers
Ask representative questions, review the results, and refine the agent before rolling it out. See Effective analytics with agents.
5
Share it with your team (optional)
Control who can use the agent and connect it to team workflows such as Slack.
Plan your agent
Start with the smallest useful scope: one audience, one area of the business, and a clear set of questions. A focused agent is easier to configure, test, and trust than one expected to answer everything. Start with these agent-level configuration choices:
You do not need to configure every option at once. Start with the agent’s instructions and access scope, test it with questions from its intended users, then add context, skills, or tools when you identify a specific gap.
These are the choices you make on the agent itself. The semantic layer and project context can also guide answers across agents. See Choose where guidance belongs for the complete comparison.
Enable AI features
Before users can see the Ask AI button and interact with AI agents, an organization admin must enable AI features. By default, AI features may not be visible to users until this step is completed.This step requires Organization Admin permissions. If you’re not an admin, ask your organization admin to enable AI features.
How to enable AI features
- Go to Settings → Ask AI → General
- Find the toggle labeled Enable AI features for users
- Turn on the toggle to make AI features visible across your organization
- The Ask AI button appears on the homepage and in the navbar
- Users can interact with AI Agents
- Admins get visibility into agent activity
Free trial available: New organizations may see a “Free trial” badge next to this toggle, allowing you to try AI features before committing to a paid plan.
Set an organization default AI model
Admins can choose the default model (and reasoning behavior) used for new AI agent chats across the organization.- Go to Organization settings → Ask AI → General.
- Under Default AI model, pick a model from the dropdown. Leave it empty to fall back to the system default.
- If the selected model supports reasoning, toggle High reasoning by default to start new chats with high reasoning enabled.
Bring your own AI providers and models
Instead of using the instance-wide Anthropic and OpenAI keys configured by your Lightdash administrator, org admins can store their organization’s own provider API keys and control which models are exposed to users. When a key is set, Ask AI routes that provider’s model calls through your org’s account — including agent chats, thread-title generation, the Slack agent path, agent readiness checks, doc summarization, the AI router, ambient AI, data-app clarification and sandbox generation, and other agent utility calls. Both the API keys and the per-provider model availability controls live in one card: AI providers & models on the Ask AI → General settings page.This card is only visible when the
org-ai-provider-api-keys feature flag is enabled for your organization. If you don’t see it under Ask AI → Settings → General, contact Lightdash support to have it turned on.How to set a provider key
- Go to Organization settings → Ask AI → General.
- In the AI providers & models card, find the block for Anthropic or OpenAI.
- Paste your provider API key into the input and click Set key. The key is sent once and encrypted at rest — it is never returned by the API again.
- Once saved, the block shows an Active badge (with a key icon) and the input placeholder switches to a partially-redacted hint (e.g.
sk-ant-api03-R2D...igAAfor Anthropic,sk-...j3klfor OpenAI), similar to Anthropic’s and OpenAI’s own dashboards. - To rotate a key, paste a new value and click Update. To remove a key, click Remove — the provider falls back to the instance-wide key (if configured).
- When every user-selectable provider is running on an org key, a success callout appears: “All AI interactions use your organization’s API key(s)”.
- When a provider is available to users but doesn’t have an org key set, its block shows guidance that those models still run on Lightdash’s instance default key — add a key for that provider to route it through your own account.
Behavior
- Setting a key routes that provider’s model calls through the org key. Removing the key falls back to the instance-wide configuration.
- Providers that are not keyed at the org level continue to use the instance configuration, so you can BYO one provider without touching the other.
- An org-level Anthropic key cannot be combined with an instance-wide
ANTHROPIC_BASE_URL. Remove the org key to use the corporate gateway, or remove the gateway URL to keep routing through the org’s Anthropic account. - The Default AI model dropdown includes models for any provider your org has keyed, even when the instance itself has no key configured for that provider. For example, an org that stores its own OpenAI key sees OpenAI models in the dropdown even on an Anthropic-only instance.
- Provider availability at the org level is validated against each provider’s public models API on save (with a short timeout). If the check fails, the provider fails closed — models that require the check remain hidden until it succeeds.
Control which models users can pick
Once at least one BYO provider key is set, each provider block gains two controls:- Available to users — toggle a provider off to hide all of its models from the model picker across your org. Existing agents that already reference a hidden model keep working; new selections are blocked.
- Allowed models — a multi-select that restricts which of the provider’s models users can pick when creating or editing an agent. Leaving it empty allows every model the provider exposes.
When an org stores only an Anthropic key (no OpenAI key), OpenAI is automatically hidden — Lightdash will not silently fall back to the instance’s OpenAI key. Store an OpenAI key too if you want OpenAI models available.
Key-gated models
Some models are hidden by default and only become selectable once your BYO key can access them. Currently this applies to Claude Opus 4.8 — after you save an Anthropic key, Lightdash verifies access against Anthropic’s models API and unlocks the preset automatically.Security
- Keys are encrypted at rest using the instance’s
LIGHTDASH_SECRET. - The settings API never returns the raw key after it’s been set. Reads only expose a
providerApiKeysSetboolean per provider and the partially-redactedproviderApiKeyHint. - Sending
nullfor a provider removes its key. - Provider keys and model visibility must be updated in separate requests — the “at least one model available” check would otherwise read a stale key.
Scope (v1)
The org key is used for chat and agent utility calls only. The following continue to use the instance-wide keys:- Embeddings
- The evaluation judge
- AI writeback
Create your first AI agent
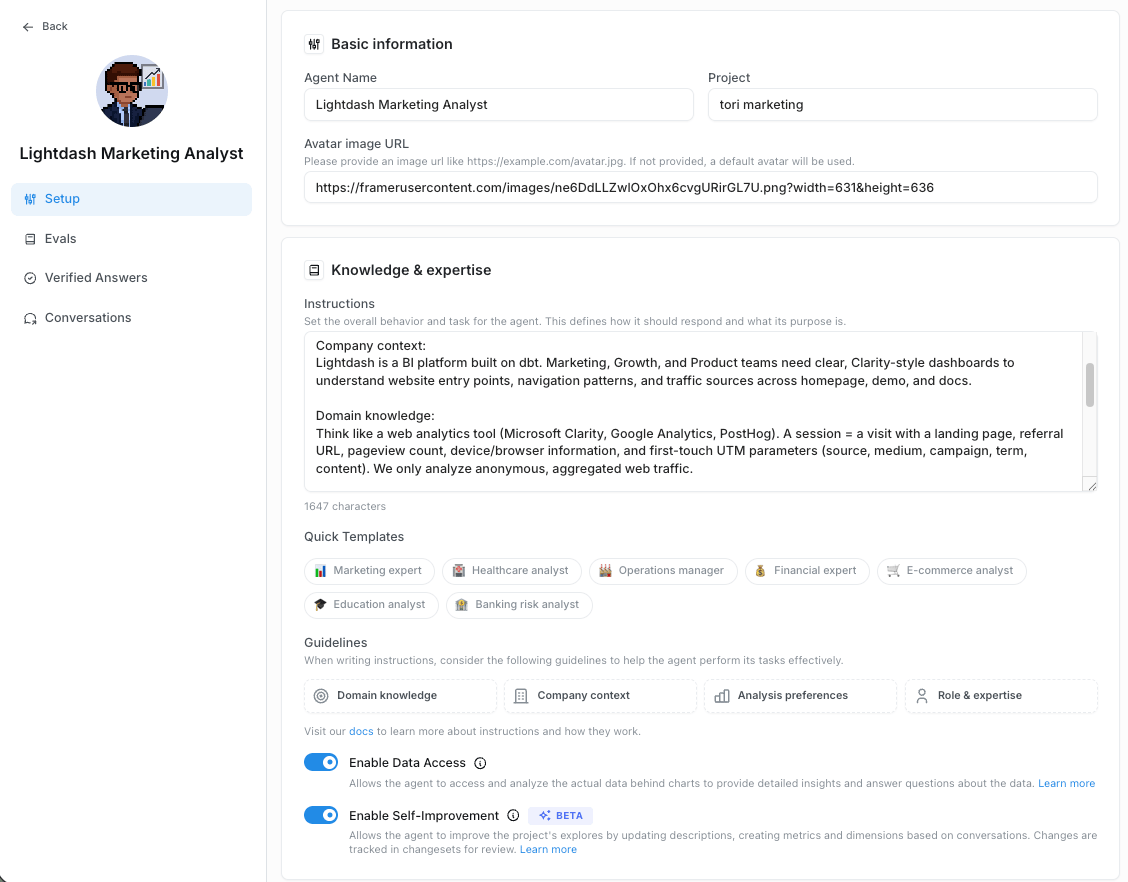
Go to Ask AI
This will be your entry point to working with the AI agent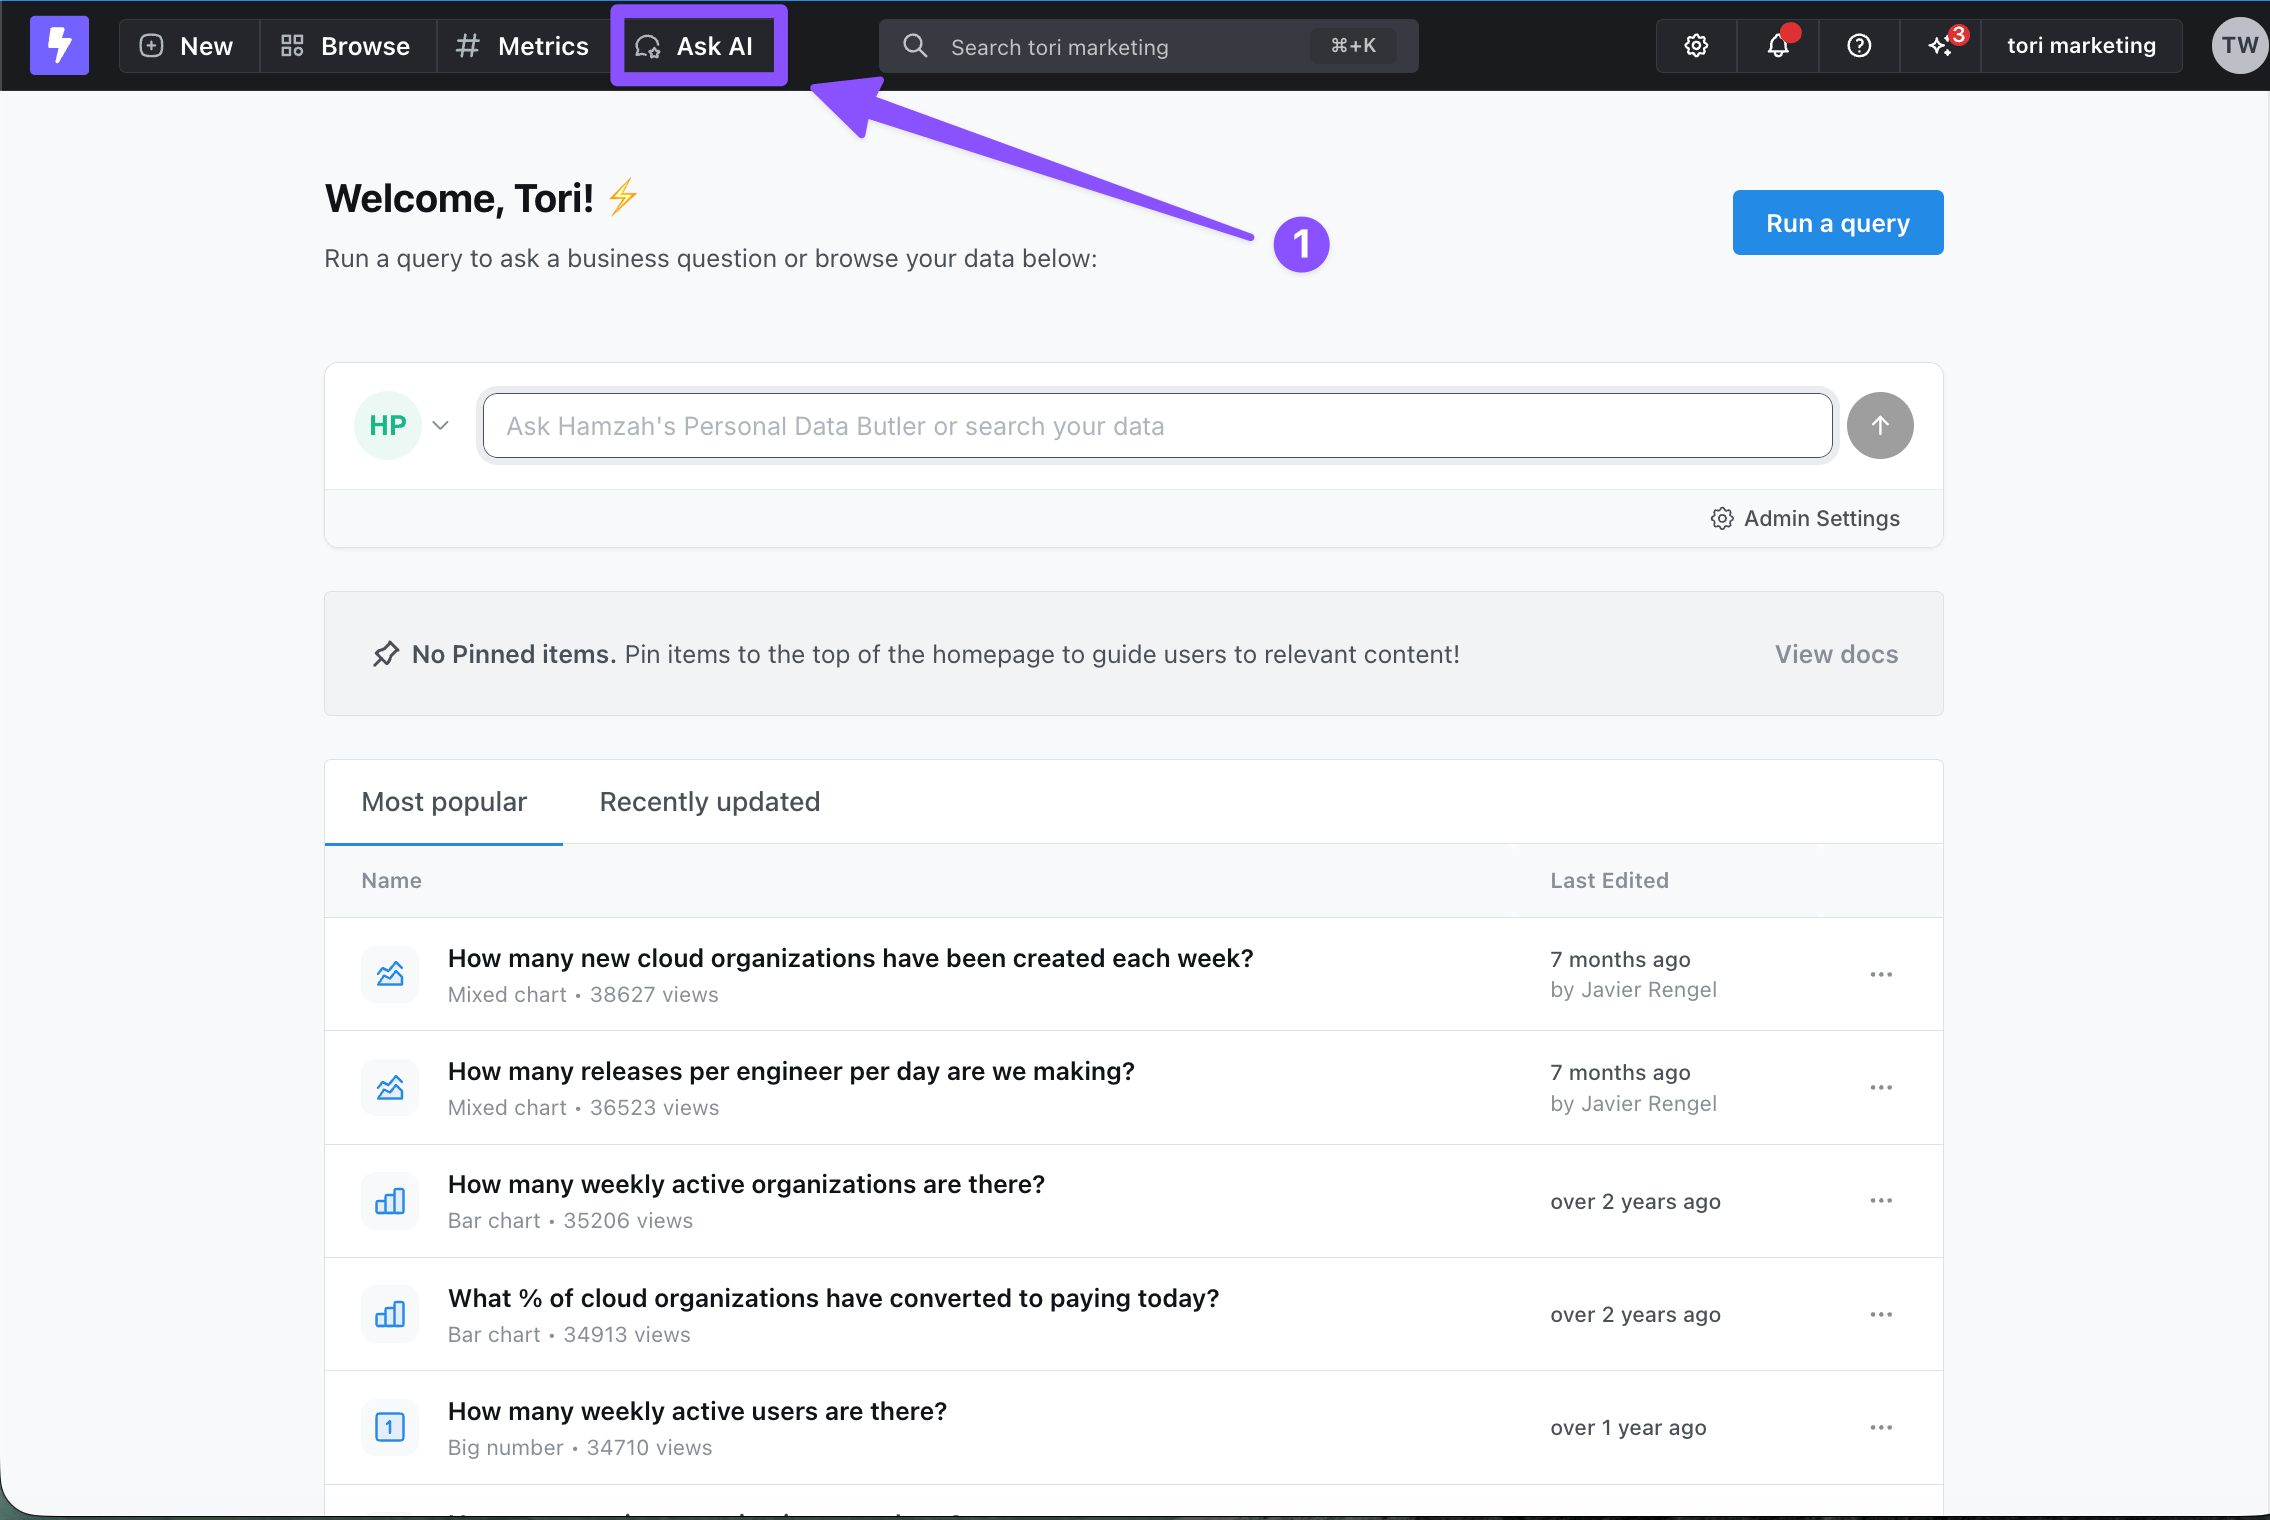
Create a new agent
Go to the agent dropdown and click Create new agent at the bottom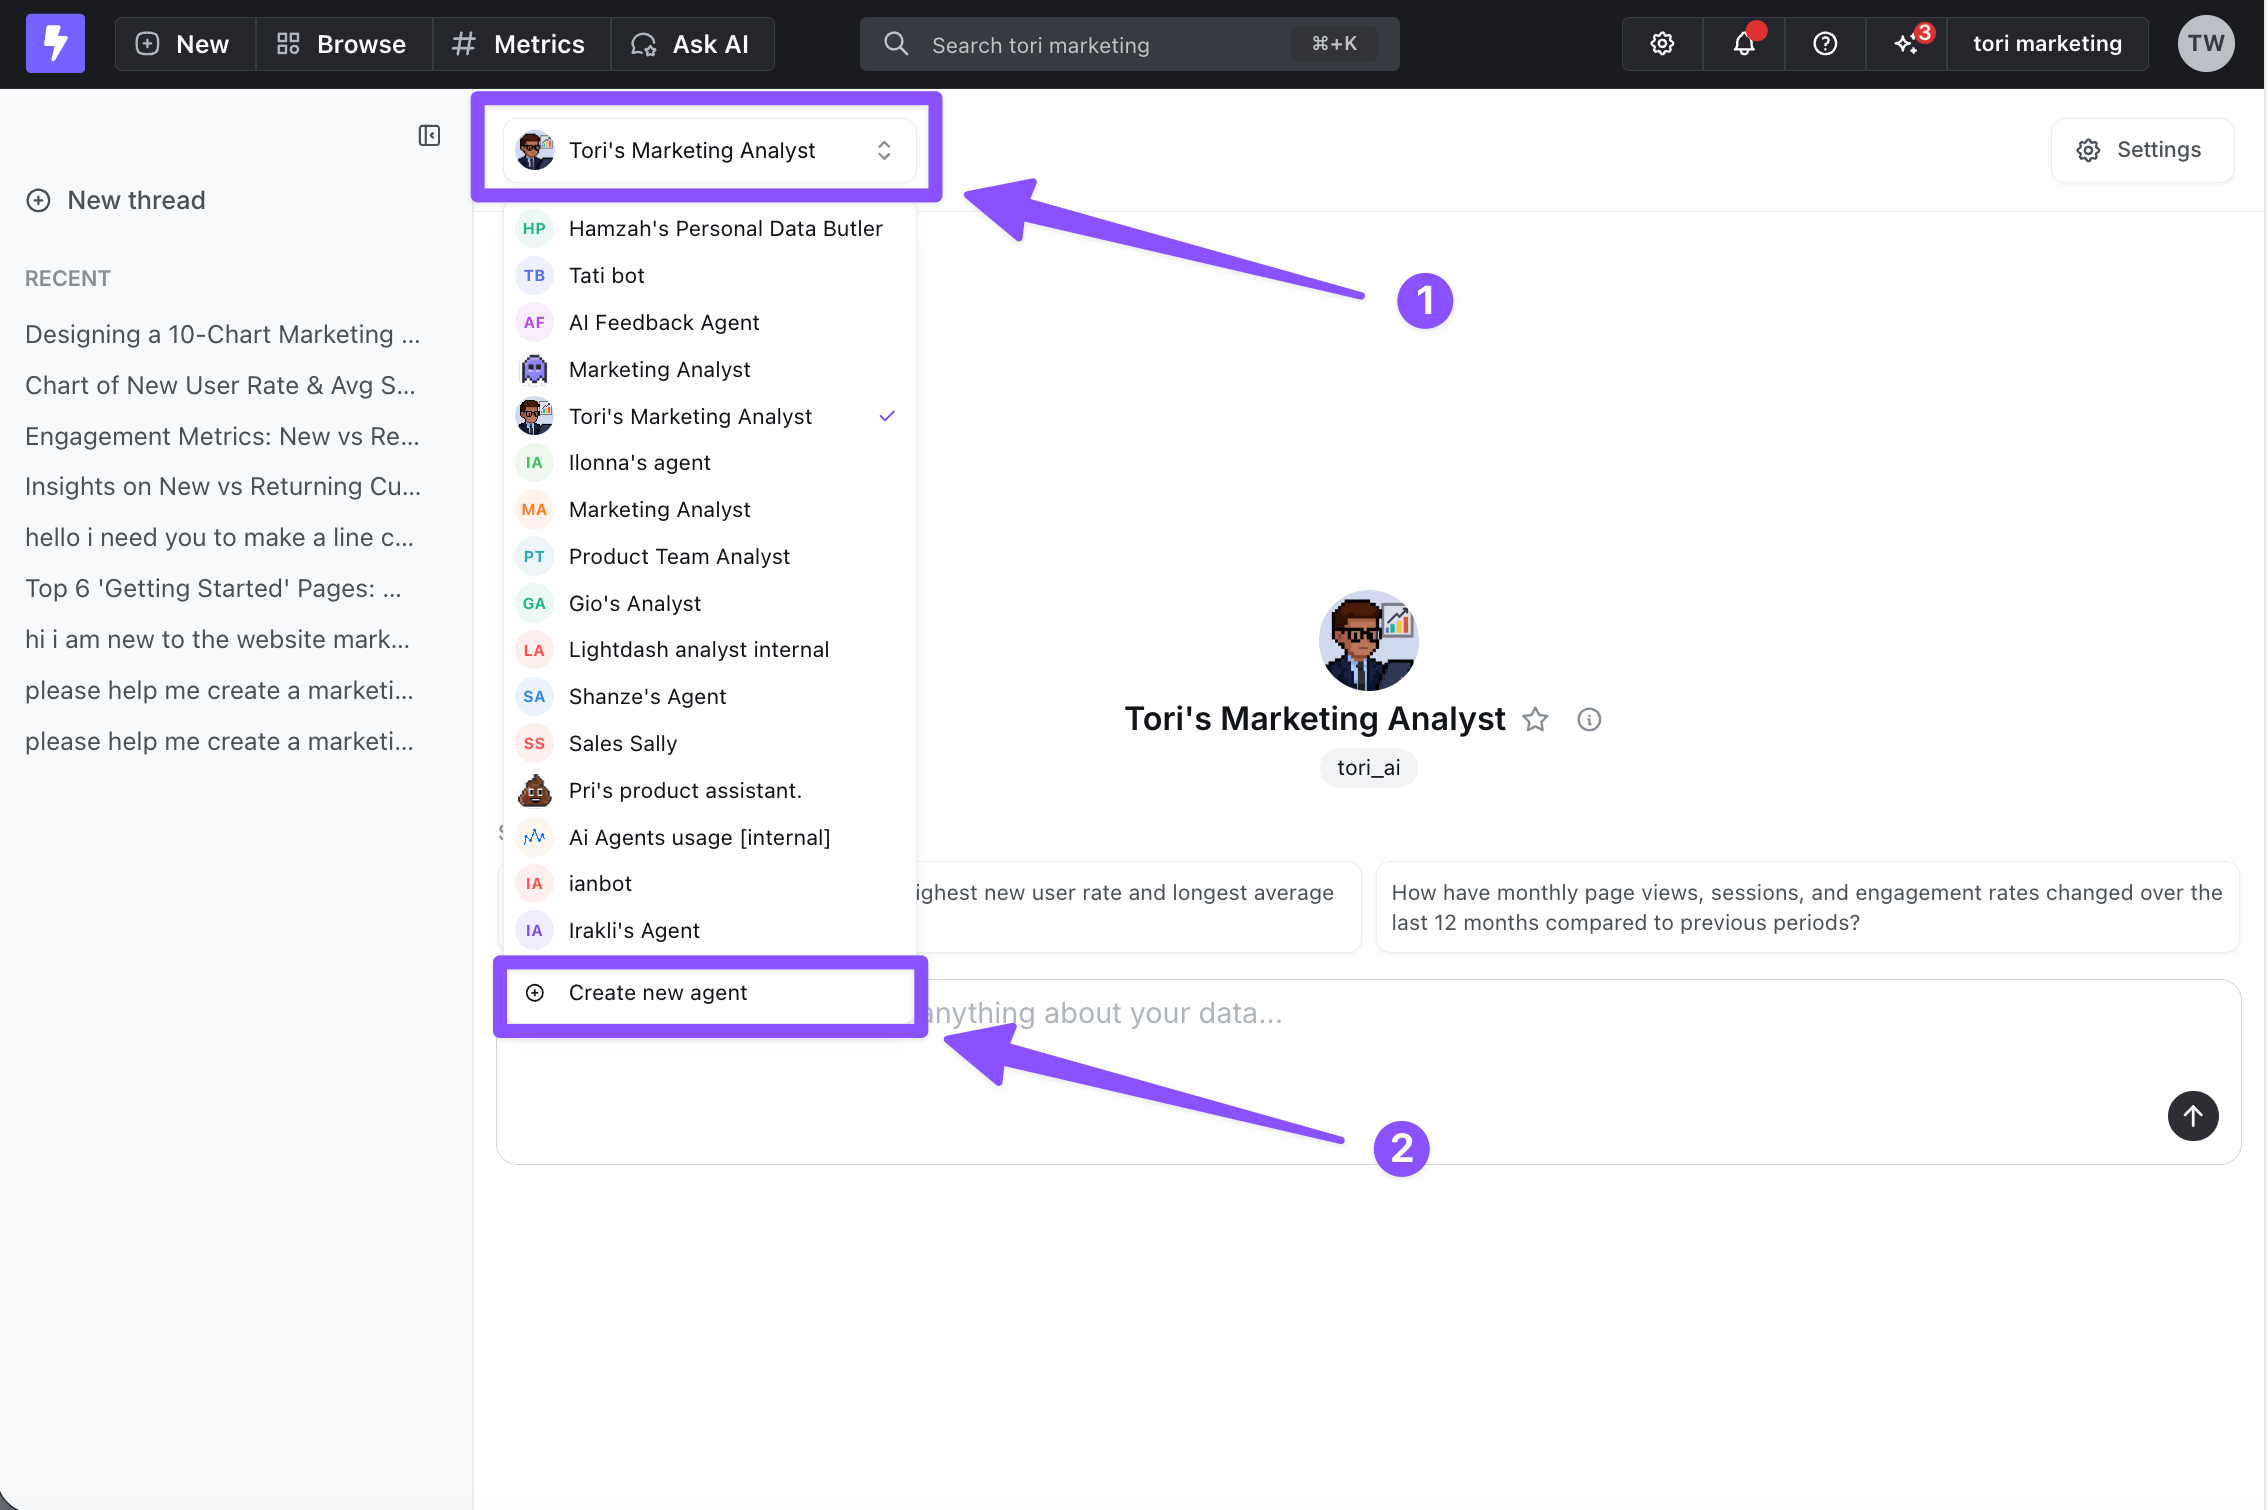
Configure your agent
Name and image
Give your agent a memorable name and visual identityInstructions
Add the role, priorities, analysis defaults, constraints, and communication style that should apply to every conversation with this agent. Keep stable model and field definitions in the semantic layer, and use knowledge documents for longer reference material. See Writing effective instructions for examples and authoring guidance. Instructions shape how the agent reasons and answers. They can’t widen what it reaches: explores, fields and rows follow the asking user’s permissions and user attributes, and raw SQL needsmanage:SqlRunner plus SQL mode on the thread.
The default agent Lightdash creates with your first project (Aurora) ends its instructions with “If no explores are available yet, use your warehouse tools to discover the schema and answer with SQL.” That line only applies in SQL mode for someone who can already use the SQL Runner. Everyone else is told there’s no data to query until you set up explores.
Default model (optional)
Choose the default model and reasoning setting used for new chats with this agent. Leave the model empty to inherit the organization default. Lightdash resolves the model for a new chat in this order:- The user’s per-chat selection
- The agent’s default model
- The organization default model
- The system default
Knowledge documents (optional)
Upload reference material — glossaries, metric definitions, business context, internal procedures — that your agent can consult while answering questions. Use this for the kind of context that doesn’t fit neatly into a dbtai_hint or your instructions. See knowledge documents guidance for guidance on what to upload.
Skills (optional)
Turn prompts you use repeatedly into skills, especially when they contain a clear sequence, checks, or output requirements for a particular task. The agent can load an attached skill automatically when a request matches, or users can run it directly with/. Keep behavior that should apply to every response in the agent’s instructions. Skills are shared through your organization’s library, so the same workflow can be used by more than one agent. Learn how to create and use custom agent skills.
Data Access
By default, agents have data access enabled so they can analyze actual query results and provide insights based on the data. You can turn it off per agent if you want metadata-only behavior. This section also holds the Pass user information toggle, which lets the agent tailor answers to who is asking. Learn more in data access control.User and Group Access (optional)
By default, your agent is available to everyone in the project. While you’re still setting it up, you can keep it to admins and developers only, then open it up — to everyone, or to specific users and groups — once it’s ready. You’ll find these options under the agent’s access settings. This controls who can use the agent, which is separate from data access control (what data the agent can query).Tags (optional)
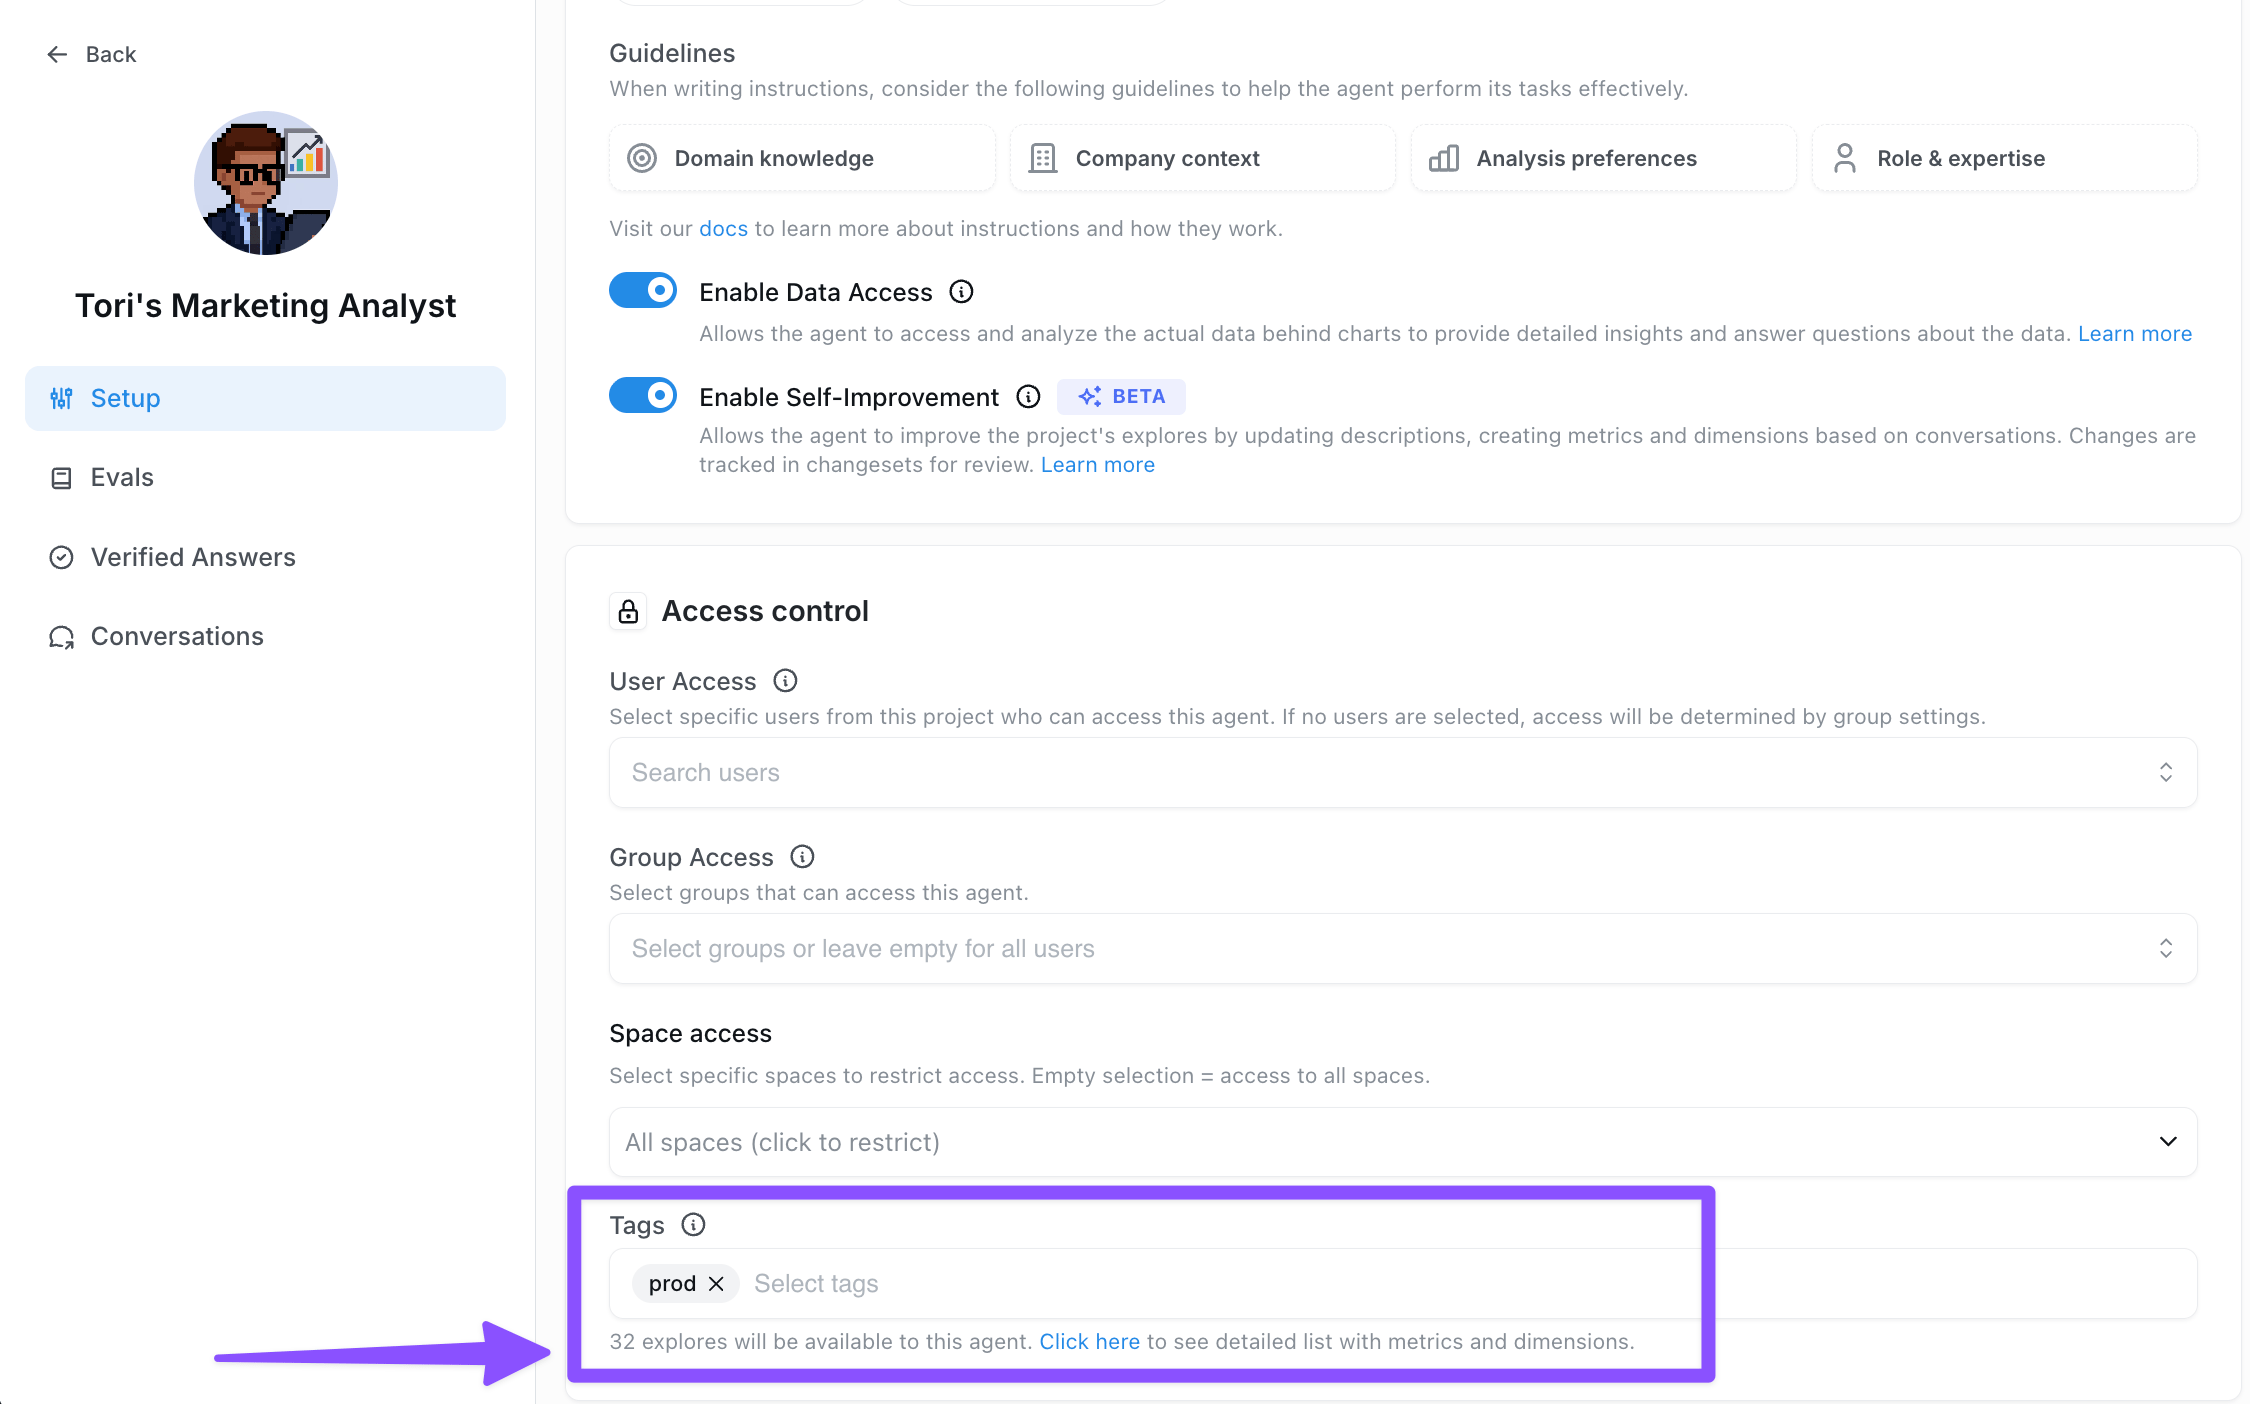
Use tags in the Lightdash metadata to control which metrics and dimensions the agent can access, restricting it to a specific slice of your semantic layer.- Tag the dbt model dimensions and metrics you want the agent to reach — it only sees fields with matching tags. See limiting access to specific explores and fields for the tagging YAML and how explore-level and field-level tags interact with permissions and schema visibility.
- Add the corresponding tags to your agent settings under the Tags field. This tells the agent which tagged dimensions and metrics it should access.
Enable AI writeback (optional)
Allow your agent to edit dbt or native Lightdash YAML models from chat — renaming metrics, adding dimensions, or updating descriptions — and open a pull request for review. See AI writeback for supported connections and setup.Setting up multiple agents
You can create multiple AI agents, each configured for different tasks, tones, languages, or teams. Each agent can have access to different datasets to focus results and give more accurate answers.Slack Integration
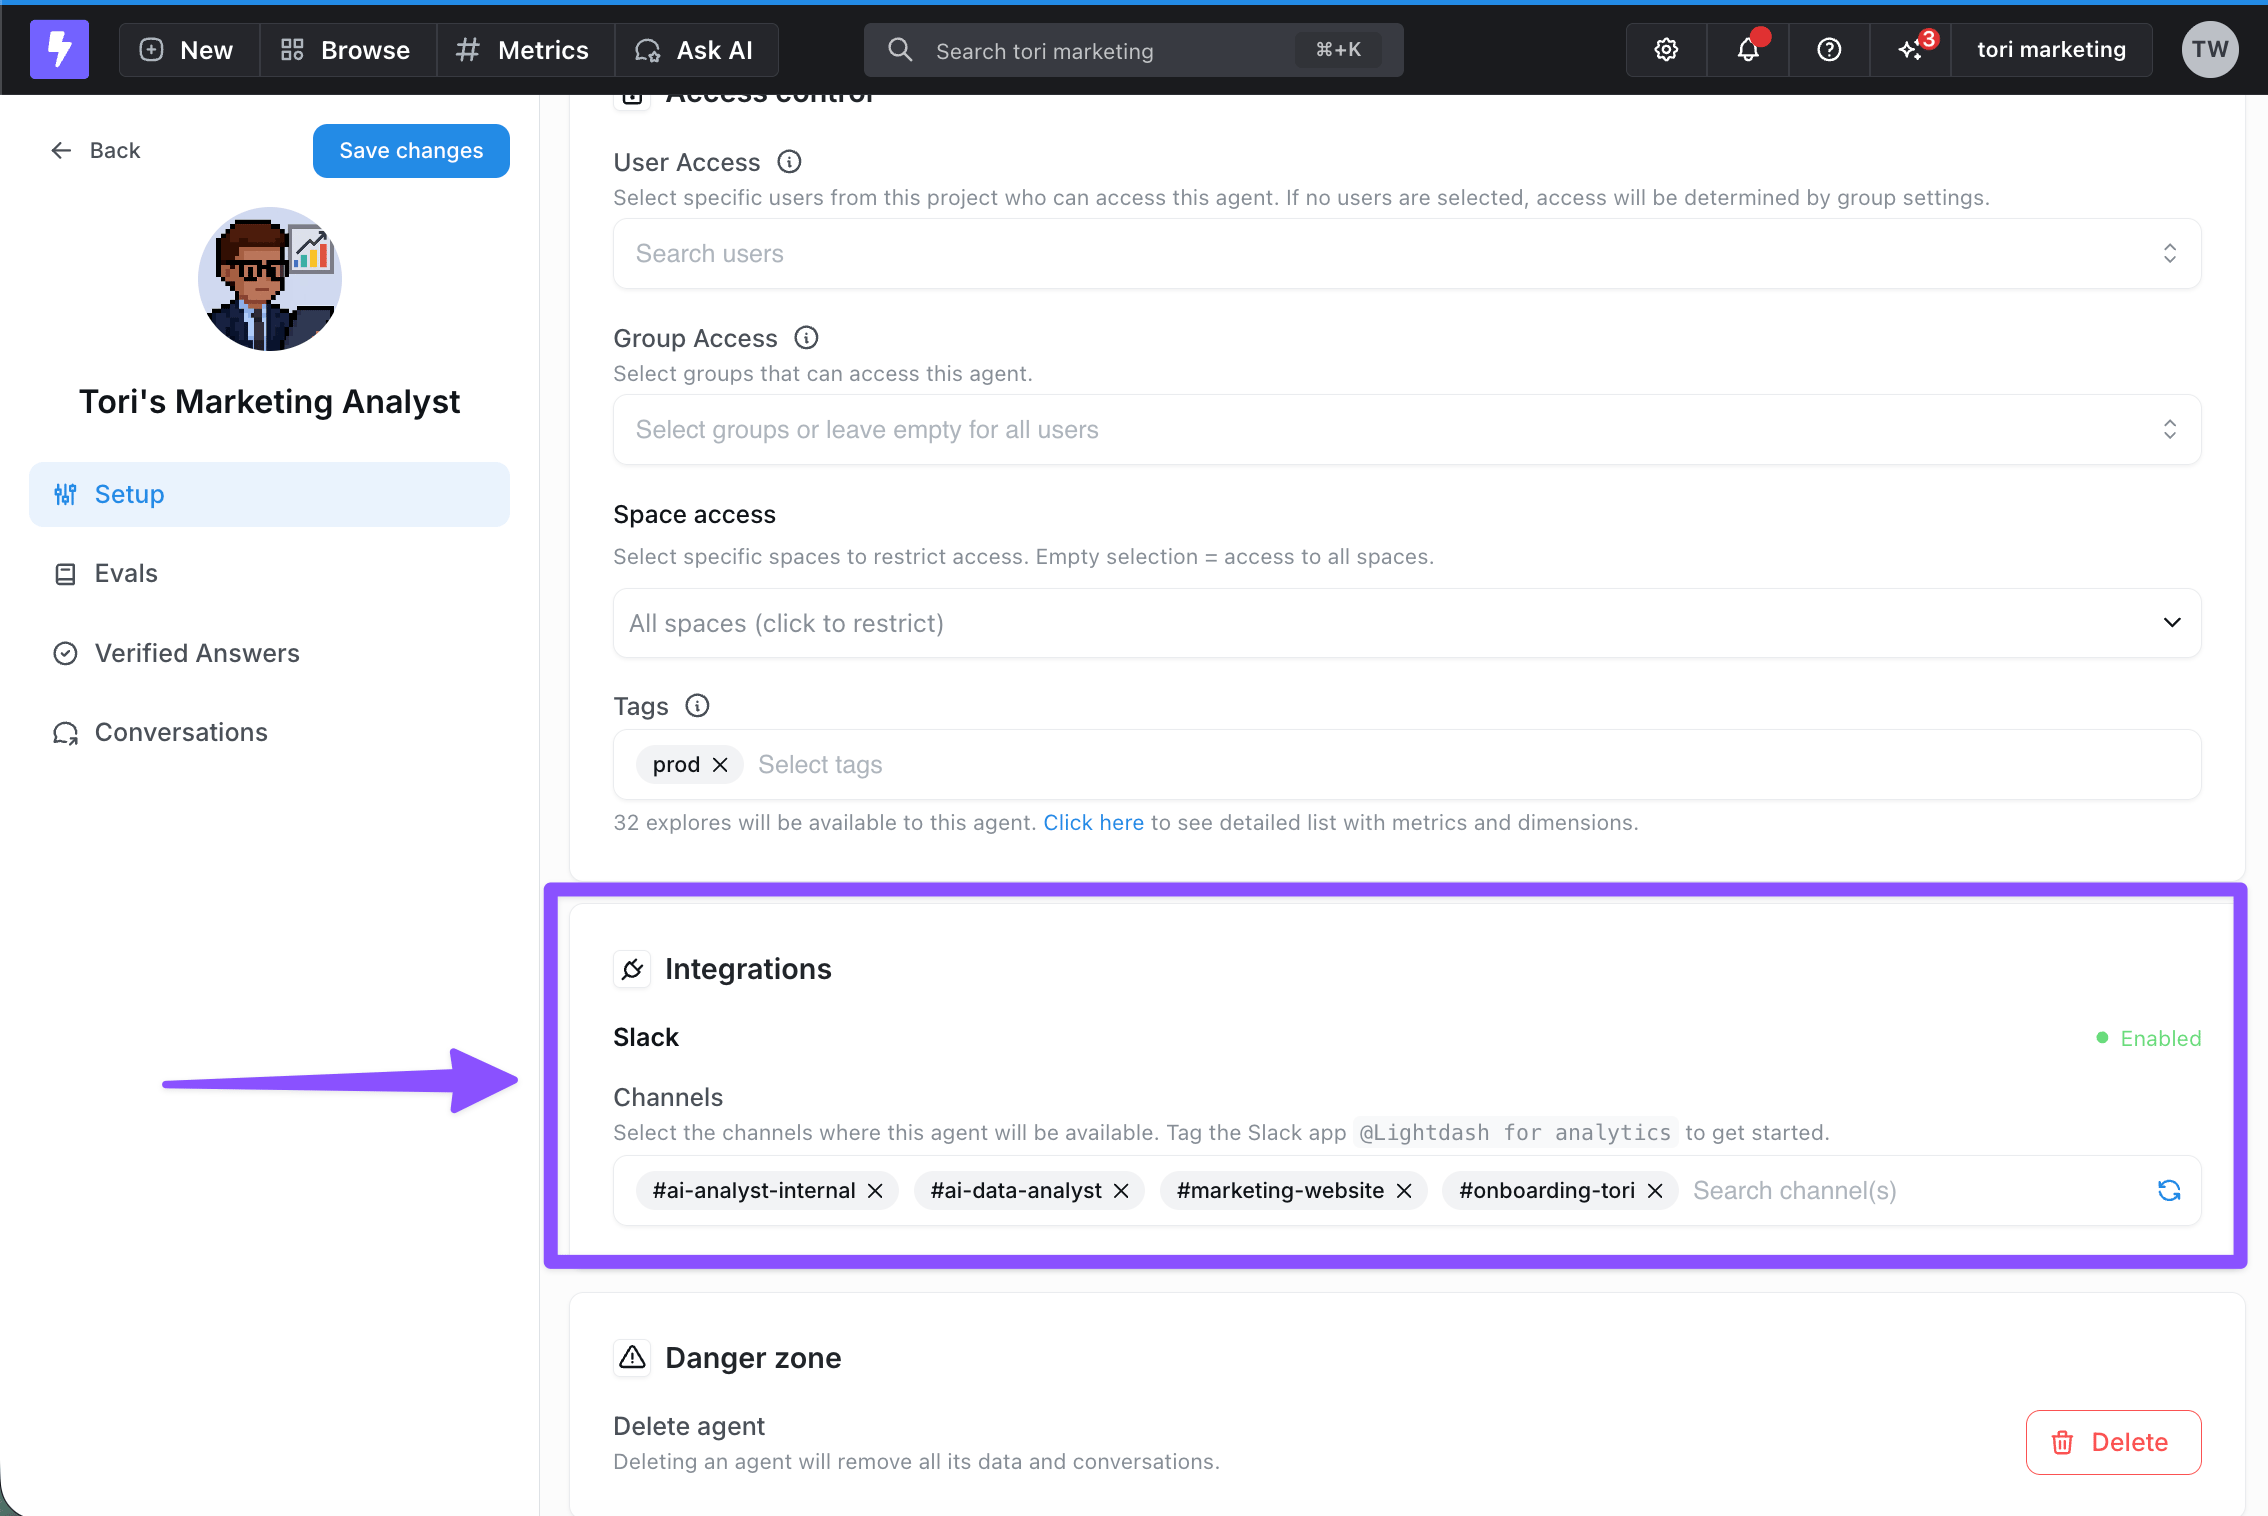
Connect your agent to Slack channels so users can interact directly from Slack. Check out all the cool ways to integrate your agent into slack here- Add Slack to your organization in organization settings. An admin needs to complete this step. See the how-to guide.
- Add the desired slack channel to your agent integration settings.
- Add the
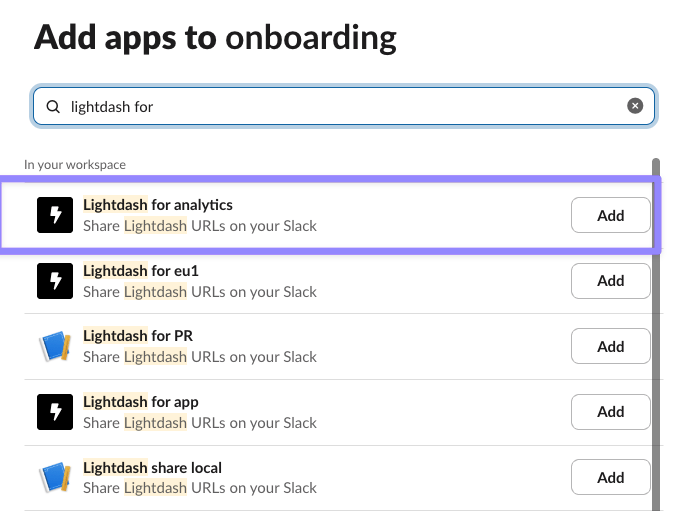
Lightdash for analyticsapp to your desired slack channel by going to #channel —> Edit settings —> Integrations:
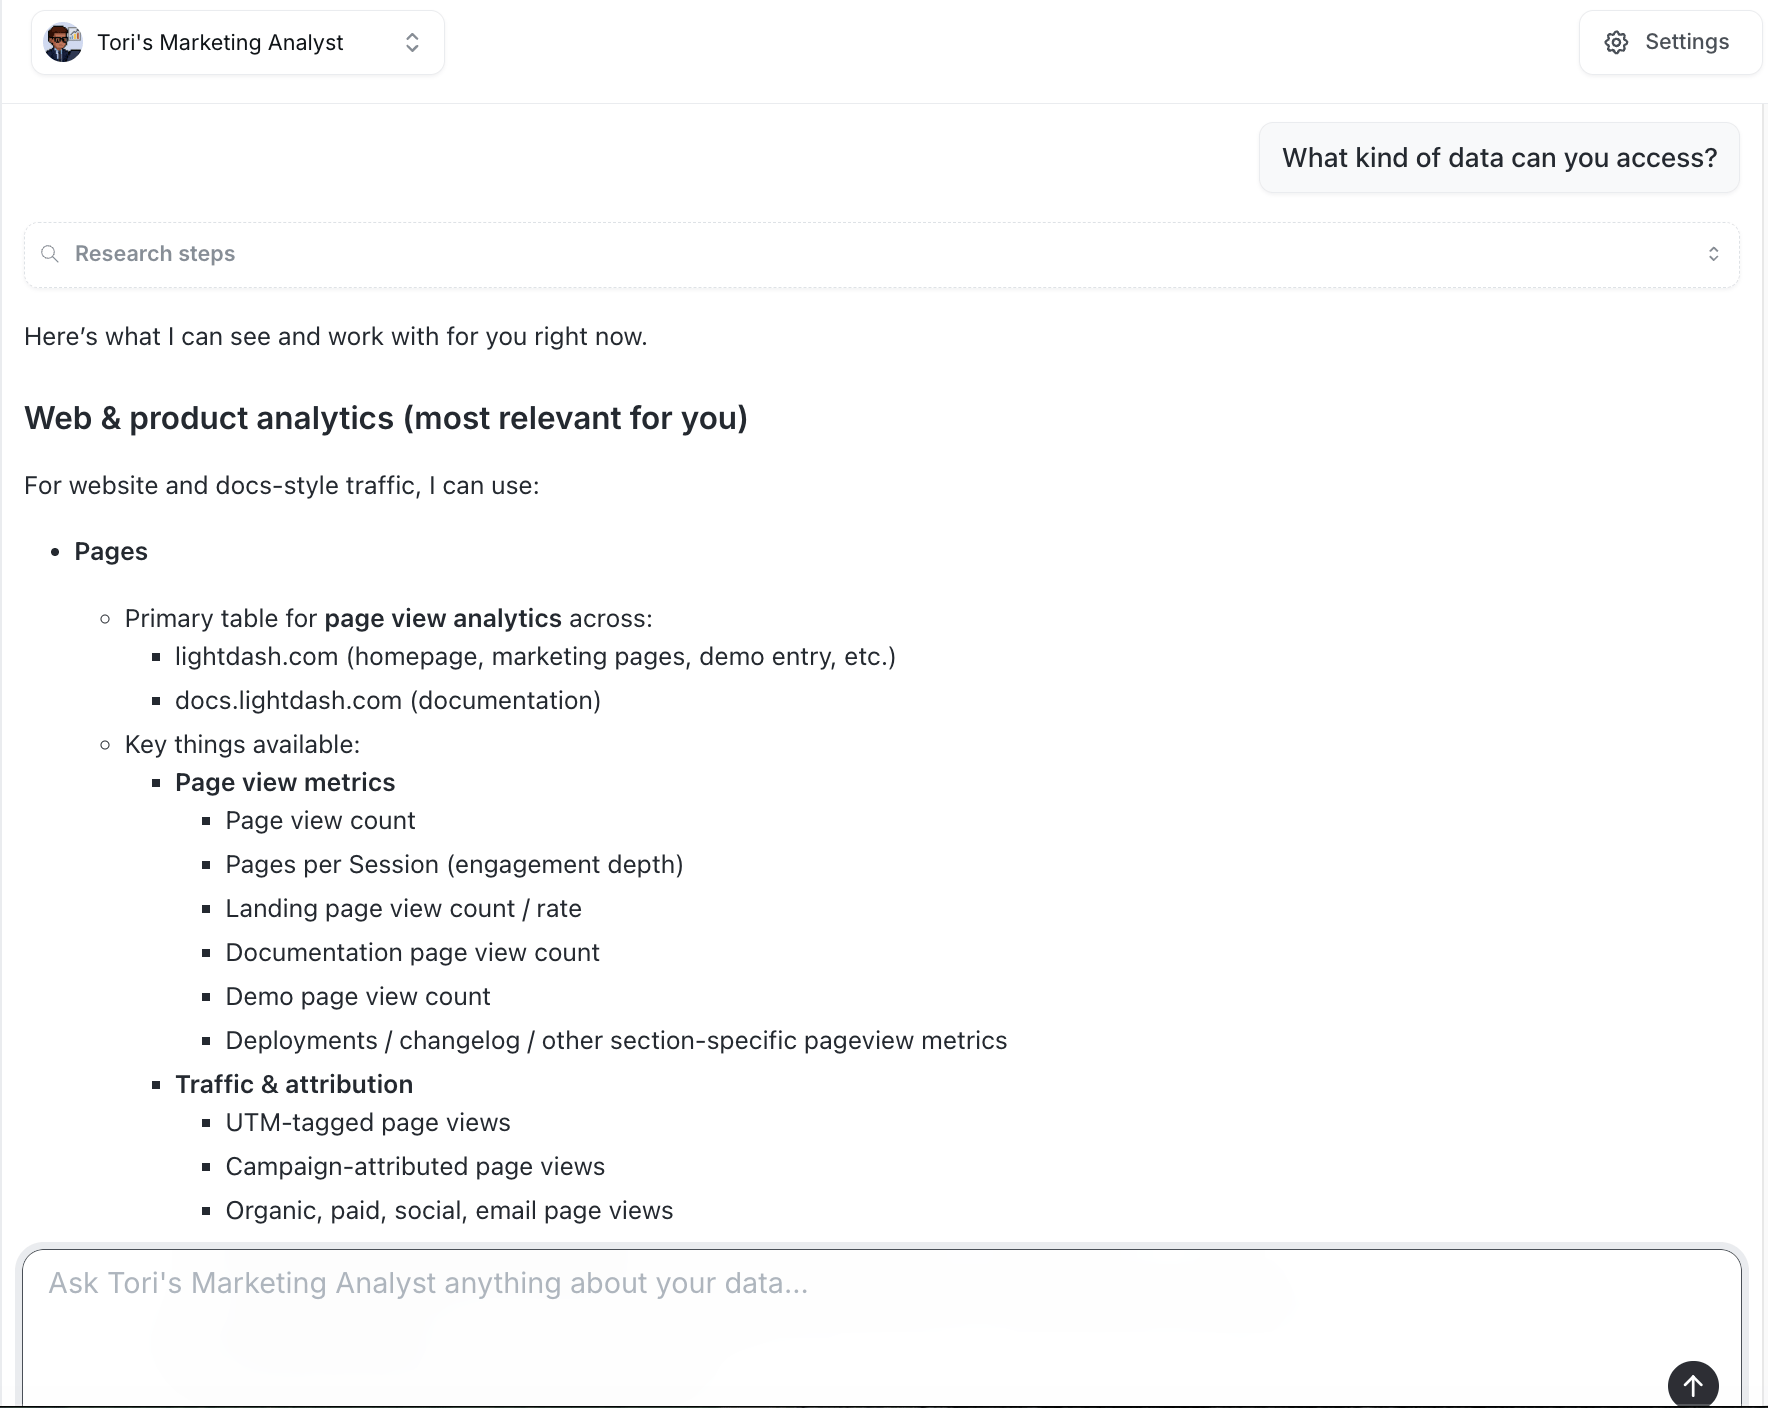
- Now you can interact with your AI agent in slack just as you would in the Lightdash UI. Start asking questions like “What kind of data can you access?” or “Show me total order amount over time”.

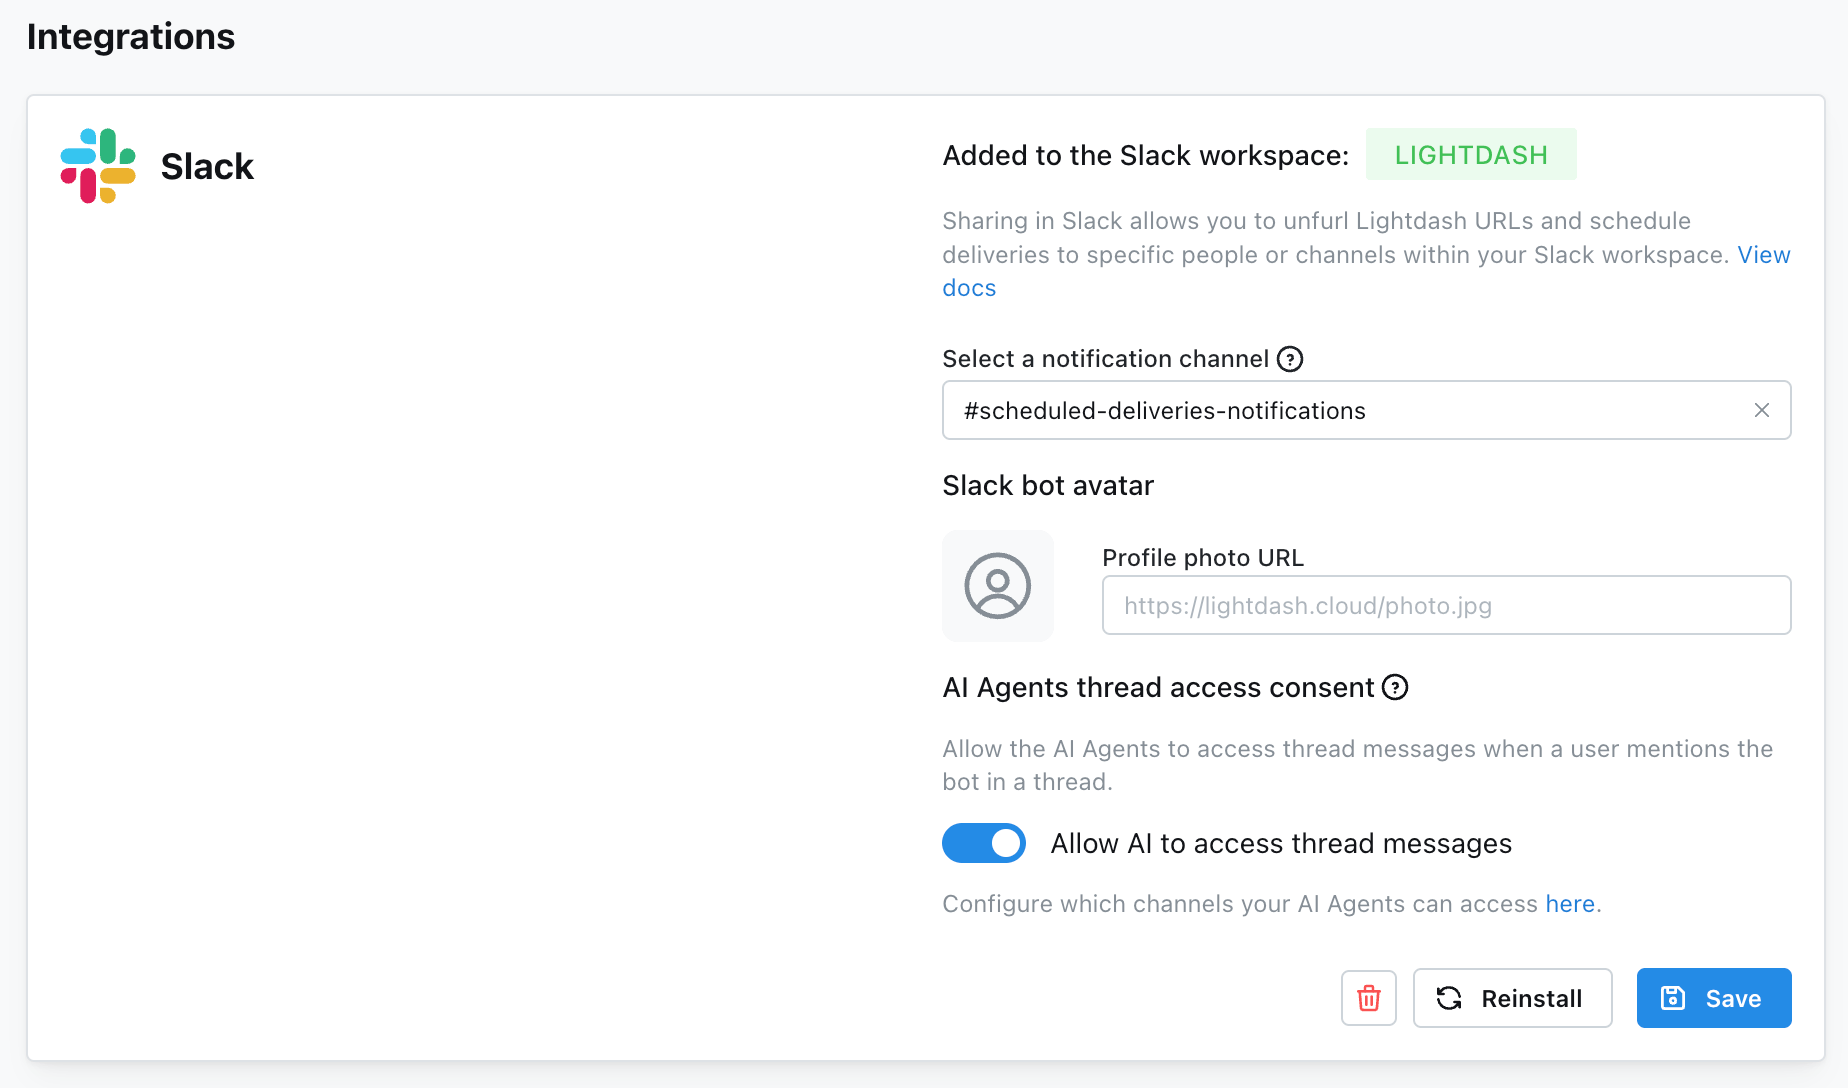
- You can also summon the bot on a thread to continue the conversation. In order for the bot to be able to respond, you need to enable this context sharing in your Lightdash Integrations settings.
Once you’re set up - whether in the UI or in Slack - you can start asking questions immediately! Try asking “What kind of data can you access?” to get started:
Slack channels: single-agent vs. multi-agent
By default, each AI agent can only be connected to one Slack channel. If you try to configure two agents in the same Slack channel via the per-agent integration path, you’ll receive an error. If you want multiple agents in the same channel, set up a multi-agent channel at the organization level instead. In a multi-agent channel, you don’t pick which agent to talk to — you interact with the single Lightdash Slack app and the AI Router automatically picks the best-fit agent for each question. How you interact with the app depends on where you’re posting:- New message in the multi-agent channel — no
@mentionneeded. Lightdash picks up the message automatically and routes it to the best-fit agent. - Reply in an existing thread —
@mentionthe Lightdash Slack app. Without the mention, Lightdash will not respond in-thread.
Setting up a multi-agent Slack channel
Multi-agent channels are configured at the organization level, not per-agent:- Go to Organization Settings → Integrations → Slack
- Find the Multi-agent channel setting in the AI Agents configuration panel
- Select the Slack channel you want to designate as the multi-agent channel
- Click Save
Linking an agent from Slack
You don’t have to go to the Lightdash UI to connect an agent to a Slack channel. When someone@mentions the Lightdash app in a channel that has no agent configured, Lightdash offers to link one right in the thread:
- One manageable agent — Lightdash auto-links it to the channel, confirms the link in-thread, and then answers the original question in the same turn.
- Multiple manageable agents — Lightdash posts an in-thread picker showing every agent the user can manage (labeled by agent and project). Selecting one links it to the channel and processes the original question.
- No manageable agents — Lightdash posts an ephemeral message asking the user to contact an admin, with a deep link to the AI agents page.
manage:AiAgent on any org agent, they see the “ask an admin” message instead of a picker.
“Manageable agent” means an agent the invoking Slack user has permission to edit. If they lack manage permission on every agent (or aren’t linked to a Lightdash account yet), no channel binding is created.