

agent-identity feature flag. On Lightdash Cloud, ask Lightdash support to turn it on for your organization. On a self-hosted instance, enable the flag. Agent sign-in on Snowflake also needs the Snowflake agent integration. What Beta means.- The person: the person. This is the default.
- The person’s agent sign-in: the person, in a session that Snowflake verifies as an agent session.
- The shared agent account: one Snowflake user, BigQuery service account, Databricks service principal, AWS identity for Athena, Postgres login role, Redshift database user, Trino user or ClickHouse user that an admin adds to the project connection.
query_tag. On BigQuery, they are job labels. Tags are not an identity: warehouse policies can’t act on them. See Find agent queries in the warehouse.
Jump to the organization rule, Snowflake agent sign-in, the Snowflake shared agent account, the BigQuery shared agent account, the Databricks shared agent account, the Athena shared agent account, the Postgres shared agent account, the Redshift shared agent account, the Trino shared agent account, the ClickHouse shared agent account, finding agent queries or what gets recorded.
Choose who agents run as
Organization admins set one rule for each warehouse type. A rule applies to every connection of that type in every project. A separate identity is always required. When you pick The person’s agent sign-in or A shared agent account, Lightdash refuses every agent query that cannot run as that identity. It never falls back to the person’s own credentials. Put the identity in place before you switch the rule:- Snowflake, agent sign-in: set up the Snowflake agent integration. After you turn it on, Lightdash asks each person who uses agents to connect their agent. See Set up the Snowflake agent integration and Connect your agent.
- Snowflake, shared agent account: an admin adds a shared agent account on every Snowflake project connection. See Set up the Snowflake shared agent account.
- BigQuery: an admin adds a shared agent account key on every BigQuery project connection. See Set up the shared agent account.
- Databricks: an admin adds a shared agent account on every Databricks project connection. See Set up the Databricks shared agent account.
- Athena: an admin adds a shared agent account on every Athena project connection. See Set up the Athena shared agent account.
- Postgres: an admin adds a shared agent account on every Postgres project connection. See Set up the Postgres shared agent account.
- Redshift: an admin adds a shared agent account on every Redshift project connection. See Set up the Redshift shared agent account.
- Trino: an admin adds a shared agent account on every Trino project connection. See Set up the Trino shared agent account.
- ClickHouse: an admin adds a shared agent account on every ClickHouse project connection. See Set up the ClickHouse shared agent account.
Open Agents
Choose the identity
Confirm the change
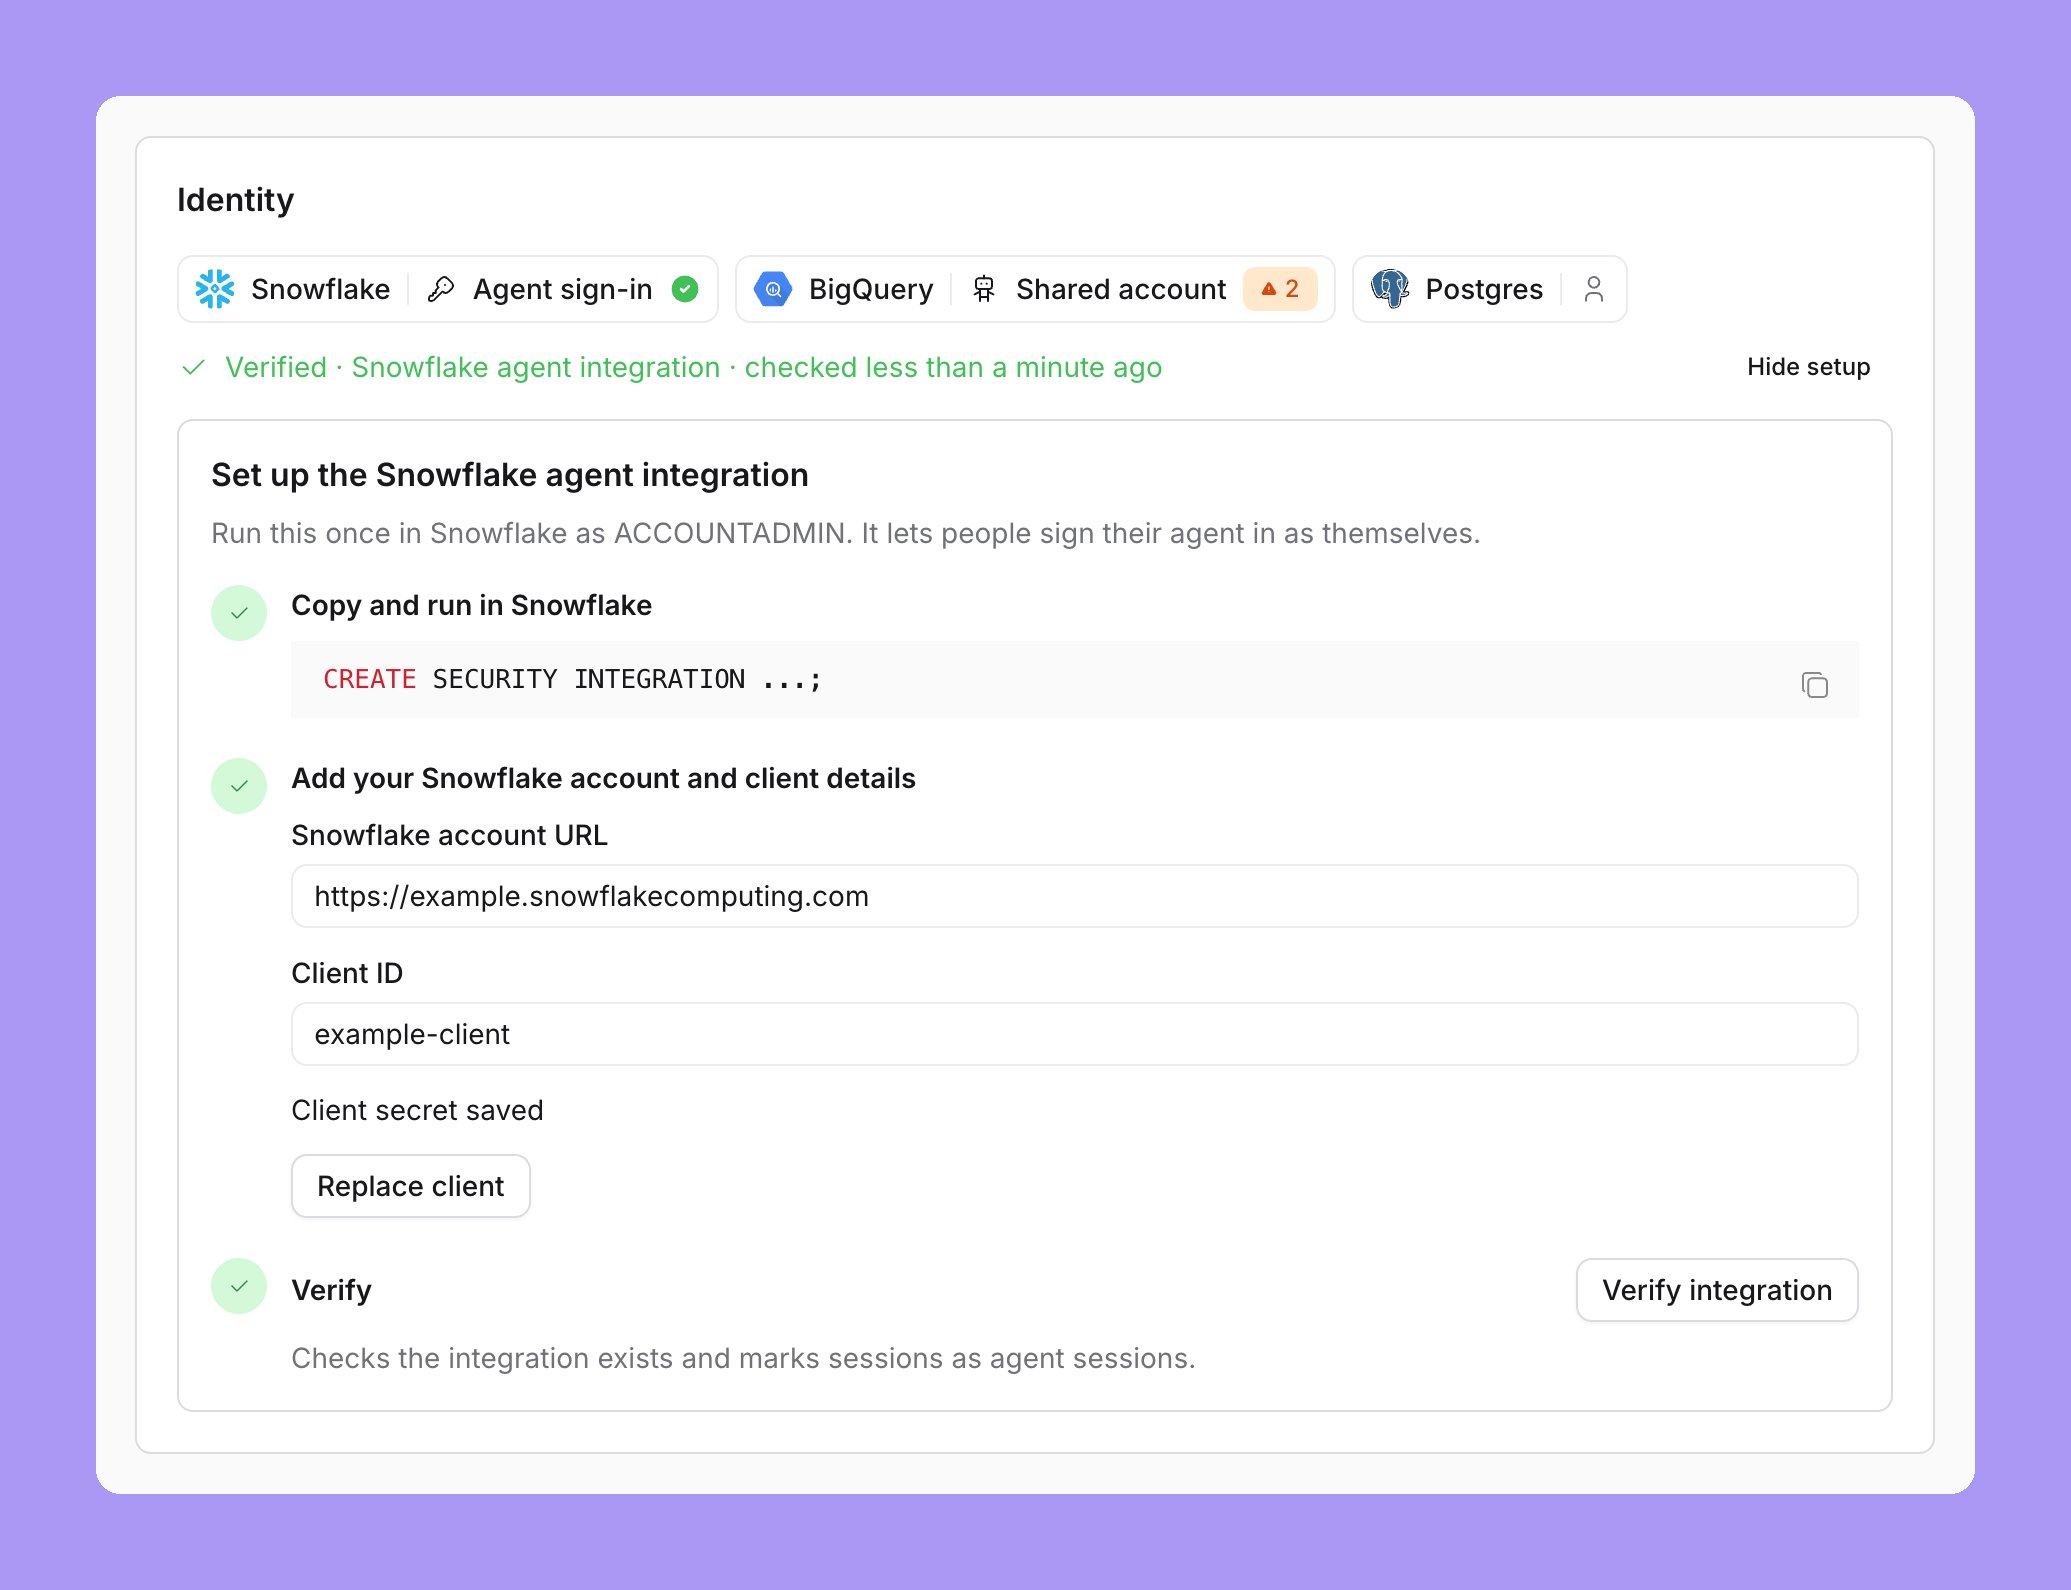
Read the chips
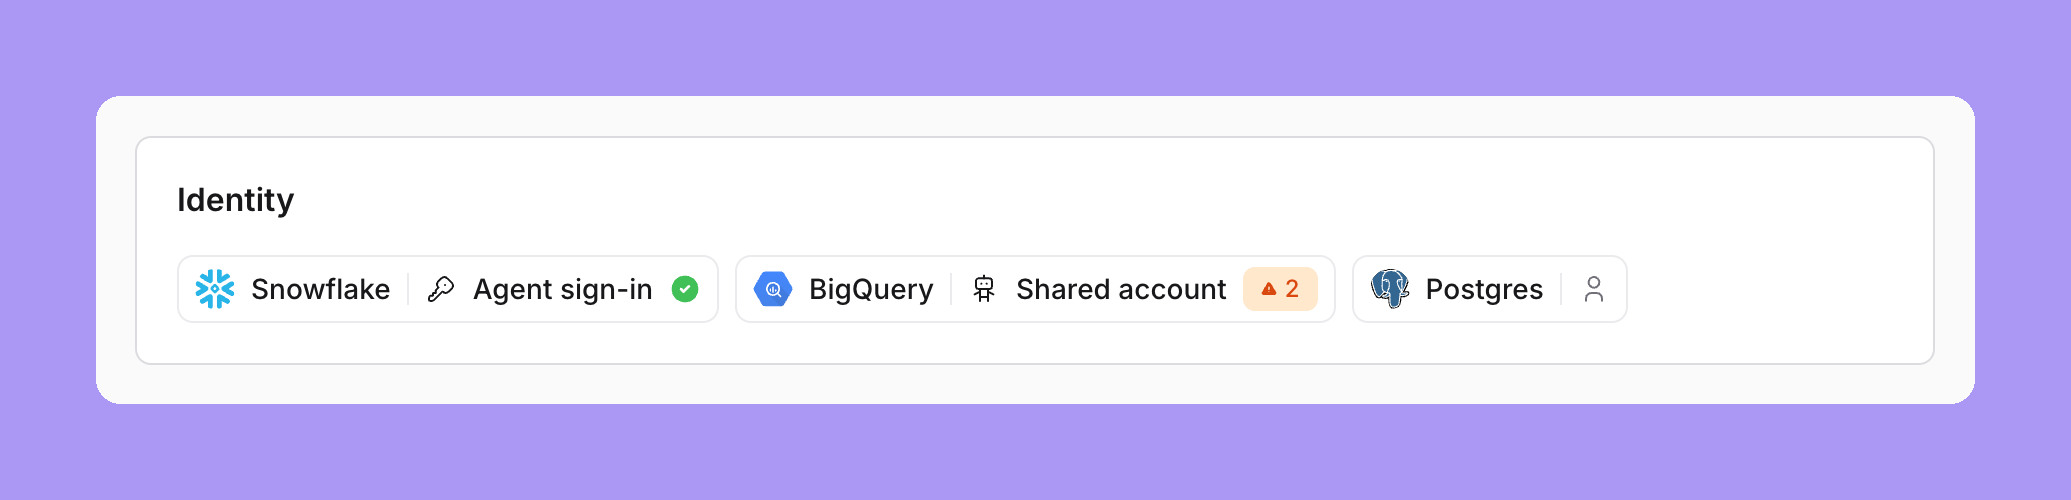
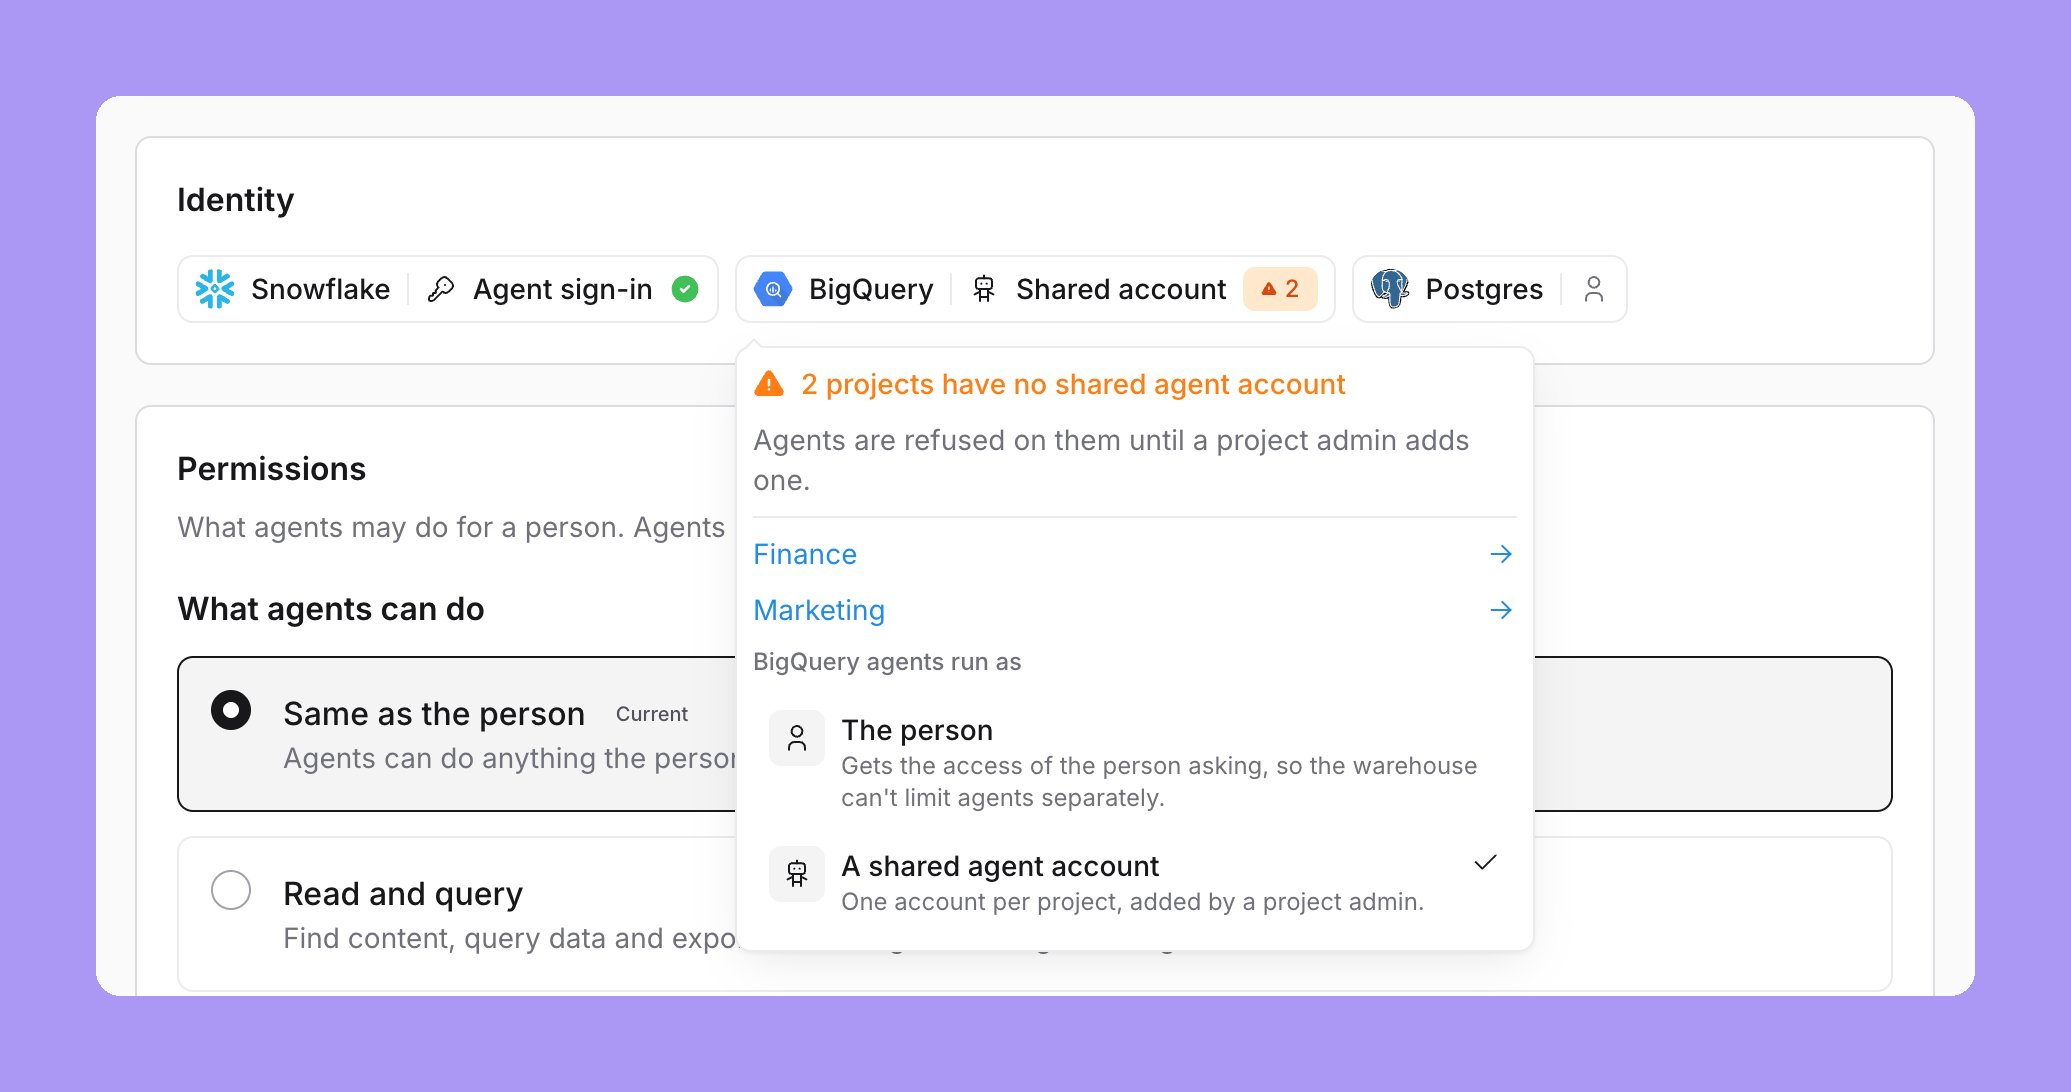
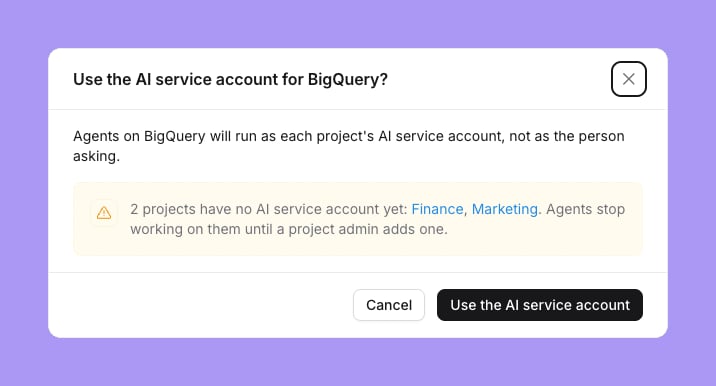
- To A shared agent account. The confirmation lists the projects on that warehouse that have no shared agent account yet, with a link to each project’s Agent identity page. Agents stop working on these projects until a project admin adds one.
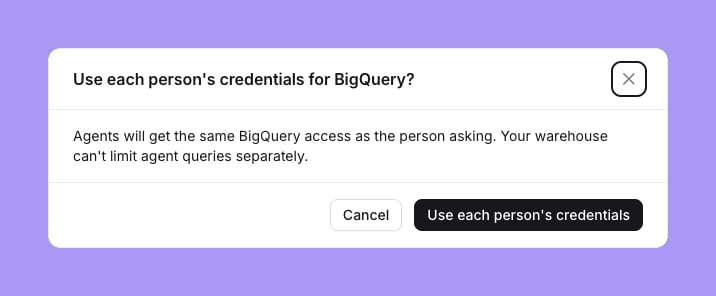
- Back to The person. The confirmation states that agents get the same warehouse access as the person who asks.
- To The person’s agent sign-in. No confirmation opens and nothing saves. The setup steps open under the chips. The rule changes when you select Turn on. See Set up the Snowflake agent integration.
When an identity changes
Lightdash checks the identity on every agent query. A change applies from the next agent query:- An admin changes the rule. The next agent query runs as the new identity.
- A person disconnects their agent sign-in. Lightdash refuses their next agent query on Snowflake until they connect again.
- Snowflake revokes an agent sign-in. Lightdash refuses the next agent query, and the person connects again.
- An admin removes the shared agent account key. Lightdash refuses the next agent query on that project.
- An admin replaces the shared agent account key. The next agent query runs with the new key.
- An admin deactivates a person. Lightdash deletes that person’s Snowflake agent sign-in. See When you take agent access away.
Who can read a saved result
While agent identity is on, Lightdash checks every read of a saved or cached query result. Both must be true:- The reader still has access to the project, the content and the fields.
- The identity that produced the result matches the reader.
- A person cannot read results that a shared agent account, an agent sign-in, or another person’s own credentials produced.
- An agent reads only results that its own agent produced.
- When a person’s user attributes or field access rules change, they cannot read their older results.
- Results saved before agent identity was turned on cannot be read.
When the shared agent account is missing or fails
While the rule for a warehouse is A shared agent account, Lightdash refuses agent queries on a project that has no working shared agent account. It never falls back to the connection’s own credentials. The refusals are:- No shared agent account: “Agents can’t run on this project yet. It needs a shared agent account.”
- The shared agent account failed to sign in: “Agents can’t query Jaffle shop right now. Its shared agent account failed to sign in. A project admin can check it in Agent identity.”
- In the app, the chat shows the refusal. People who can manage the project also see an Open project agent settings link.
- In Slack, the agent posts only the refusal message with an Open project agent settings button, and the task card says “Needs an admin”.
- In MCP, the tool result shows the refusal message.
The Lightdash CLI
While agent identity is on, the Lightdash CLI runs as the person. CLI queries use the person’s own warehouse access. Lightdash does not mark them as agent queries, and agent permissions do not limit them.lightdash agent status and lightdash agent connect say “The CLI runs as you until agent connect issues an agent credential.”
On a project where agents use a shared agent account, both commands print “Not needed: agents on this project use the shared agent account” and exit with code 0. See lightdash agent status.
Find agent queries in the warehouse
Lightdash records two identities on every agent query:- Who the agent ran for: the Lightdash user, or the Lightdash service account.
- Which agent ran it: the surface and the client.
agent_client is the client ID in lower case. When the ID has characters that a label cannot hold, or is longer than 60 characters, the value is h- followed by a 32-character hash. The same ID always gives the same hash.
On BigQuery, every agent job has the agent, agent_surface and agent_client labels. They come before the other labels, so the 64-label limit does not drop them. On Snowflake, the same keys come first in the JSON query_tag, so the 2,000-character limit does not cut them.
agent_surface filter, or filter on agent_client to find one client, for example one Slack app. On BigQuery, replace region-us with the region of your datasets. For the account each query ran as, read user_email on BigQuery and user_name on Snowflake. Other Lightdash query tags are listed in Query tags.
Agent queries skip the warehouse’s own result cache on BigQuery, Snowflake, Databricks, Redshift and ClickHouse. Each agent query runs in the warehouse with the current identity, and the warehouse applies its policies at that time.
What gets recorded
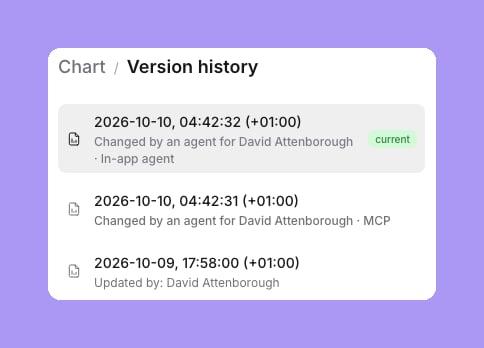
When an agent changes content, Lightdash records that an agent made the change and for which person. The record has the surface (in-app agent, MCP or Slack agent), the client and the agent. It comes only from the signed-in credential and the agent runtime. Request headers and tool arguments cannot set it.- Content with versions. New versions of charts, dashboards, SQL charts, documents and data apps record the agent. Chart and dashboard version history show “Changed by an agent for” followed by the person and the surface. When you restore a version, the new version does not copy the agent of the restored version.
- Other writes and refusals. Agent writes that make no version, and agent refusals, go to the agent action log. Examples are spaces, scheduled deliveries, content verification, access changes, share links and dbt write-back commits. Each entry has the organization, project, time, agent, object, action, outcome (allowed or denied), the policy that decided and a reason code. It never has data, tool arguments, SQL, recipients, URLs or secrets.
QUERY_HISTORY_RETENTION_DAYS).
Snowflake: agent sign-in for each person
With this identity, each person connects their agent through a separate Snowflake OAuth sign-in. Snowflake then knows that the session is an agent session. Your row access policies, masking policies, session policies and views can act on that. The result: Snowflake, not Lightdash, enforces what agents may read. A person can see a value in a dashboard while their agent seesREDACTED.
Who sees what
agent_type do.
Before you start
- The Snowflake agent integration is set up for your organization. See Set up the Snowflake agent integration. Until it is set up, the option The person’s agent sign-in shows “Needs a one-time Snowflake setup”.
- Your project uses the same Snowflake account as the integration. An organization has one agent integration for one Snowflake account. A project on a second Snowflake account cannot complete the agent connection.
- Each person has an allowed default role. Snowflake blocks the
ACCOUNTADMIN,SECURITYADMIN,ORGADMINandGLOBALORGADMINroles from OAuth sessions. The agent sign-in uses the person’s default role. Each person who uses agents needs a default role outside that list.
Set up the Snowflake agent integration
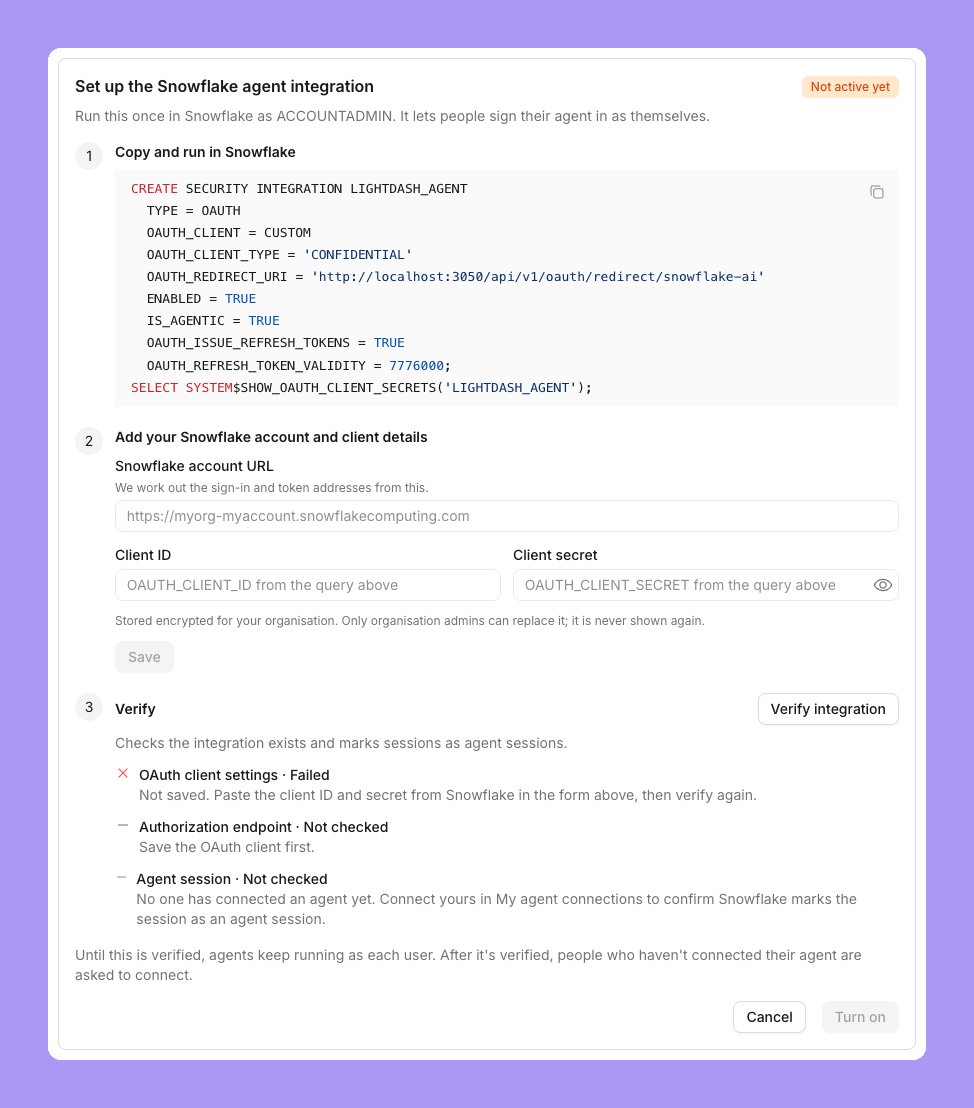
An organization admin sets up the integration once, from Organization settings → Agents. The setup shows only after you choose The person’s agent sign-in in the Snowflake row. The rule does not change until you select Turn on, so agents keep running as each person during the setup.Choose agent sign-in
Copy and run in Snowflake
CREATE SECURITY INTEGRATION SQL and run it in Snowflake as ACCOUNTADMIN. The SQL has the redirect URL of your instance. The second statement returns the client ID and the client secret.Add your Snowflake account and client details
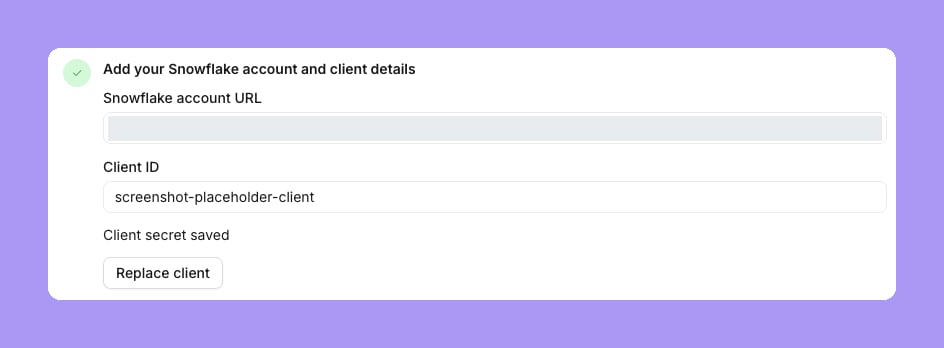
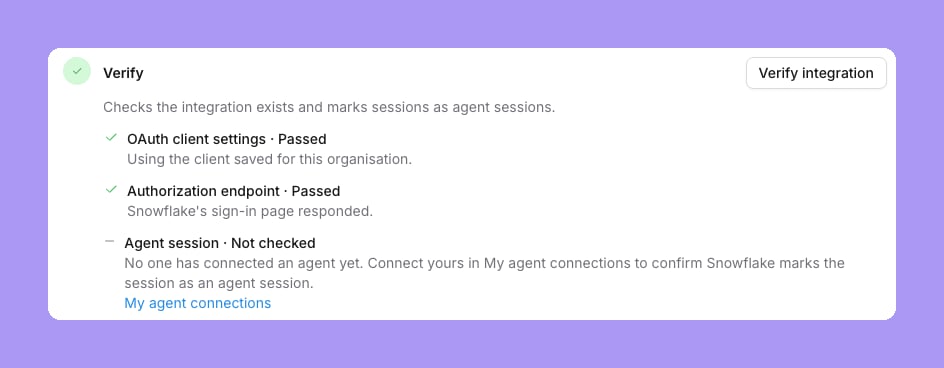
https://myorg-myaccount.snowflakecomputing.com. Paste the OAUTH_CLIENT_ID and OAUTH_CLIENT_SECRET values from the query in step 1 into Client ID and Client secret. Select Save. A “Snowflake client saved.” notification confirms it. Lightdash works out the sign-in and token addresses from the account URL.Verify
Turn on
Connect your agent
Each person who uses agents connects their own agent once, after an admin turns on agent sign-in.Open My agent identity
Select Connect agent
Approve the sign-in
My agent identity
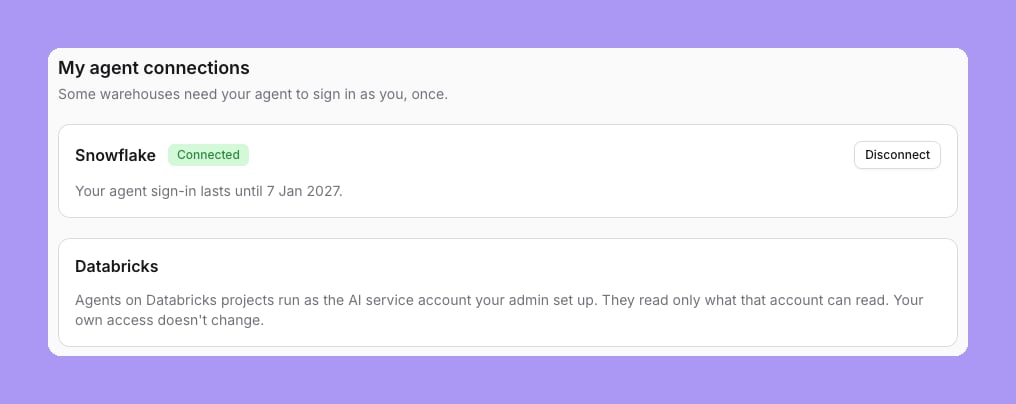
Settings → My agent identity shows when the organization’s rule for at least one warehouse is not The person. The page has one card for each warehouse where the person has a project and the rule needs one:- The person’s agent sign-in (Snowflake): a card with the person’s sign-in status and a button.
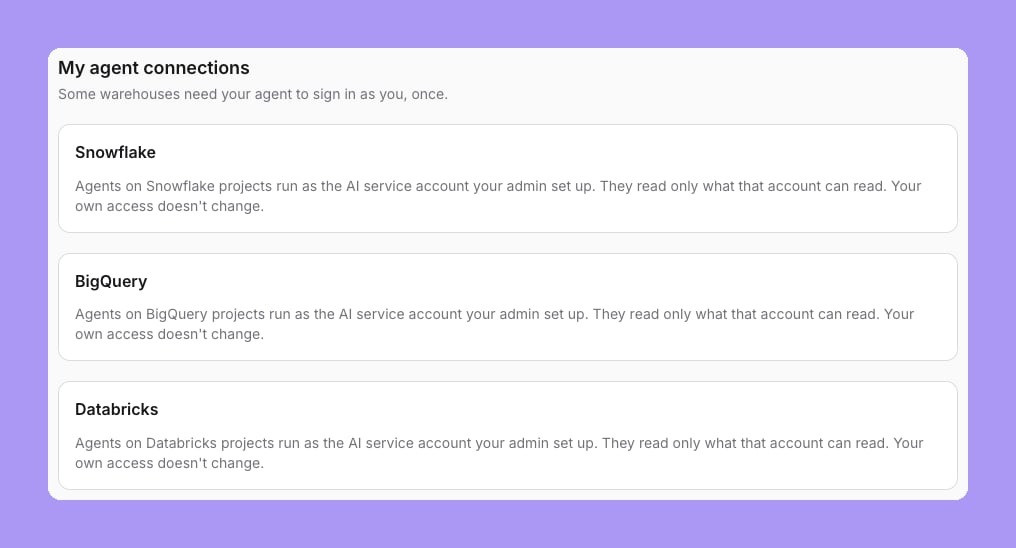
- A shared agent account (Snowflake, BigQuery, Databricks, Athena, Postgres, Redshift, Trino or ClickHouse): a card that says, for example, “Agents on Databricks projects run as the shared agent account your admin set up. They read only what that account can read. Your own access doesn’t change.” There is nothing to do.
How long the agent connection lasts
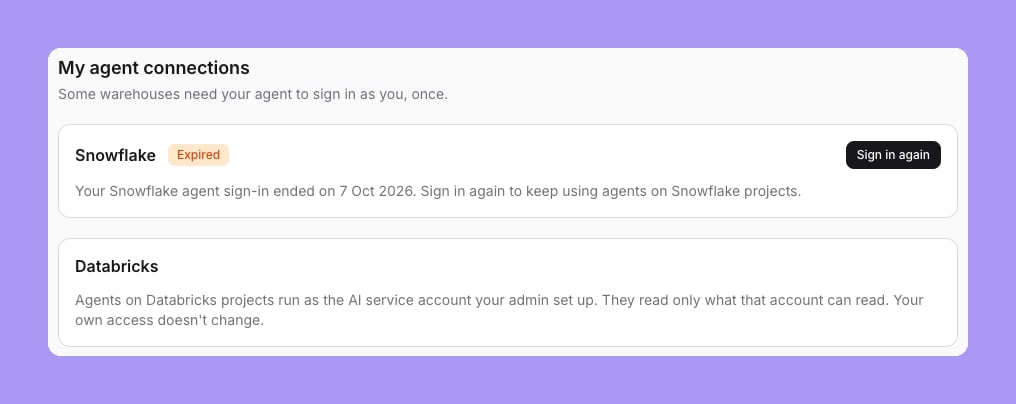
Lightdash refreshes the agent sign-in in the background while the Snowflake grant lasts, so people do not sign in again for each session. The length of the grant comes fromOAUTH_REFRESH_TOKEN_VALIDITY on the Snowflake security integration. Settings → My agent identity shows “Your agent sign-in lasts until” followed by the date.
Snowflake decides when the connection ends:
- The grant ended or Snowflake revoked it. Snowflake returns
invalid_grant. Lightdash refuses the agent query with “Your agent connection expired. Connect again.” The person connects again. - Snowflake is not available for a short time. For example, a network error, a timeout, a rate limit or a server error. The agent query fails with an error that you can retry. The agent connection stays in place.
- Snowflake rejects the Lightdash OAuth client. Lightdash refuses the agent query with “The warehouse OAuth client was rejected. Ask an administrator to check the agent sign-in settings.” Connecting again does not help. An admin checks the security integration in Snowflake and the client on Organization settings → Agents. See Set up the Snowflake agent integration.
Set the Snowflake rule
An organization admin selects Turn on for The person’s agent sign-in on Organization settings → Agents. See Set up the Snowflake agent integration. Tell people before you turn it on: until each person connects, Lightdash refuses their agent queries on Snowflake. While the rule is set:- Every AI query on a Snowflake connection must run through the person’s agent connection. Lightdash refuses queries from people who have not connected.
- This covers chat, MCP, Slack and data app sample queries.
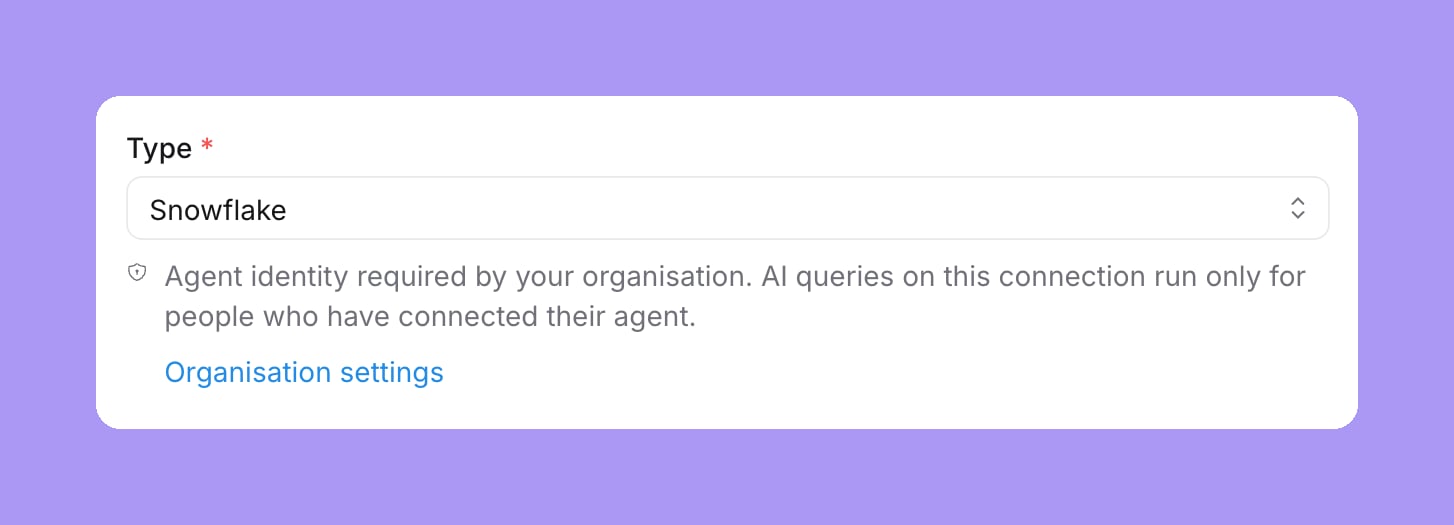
- Every Snowflake connection form shows “Agent identity required by your organisation”, with a link to the organization settings.
Until a person connects
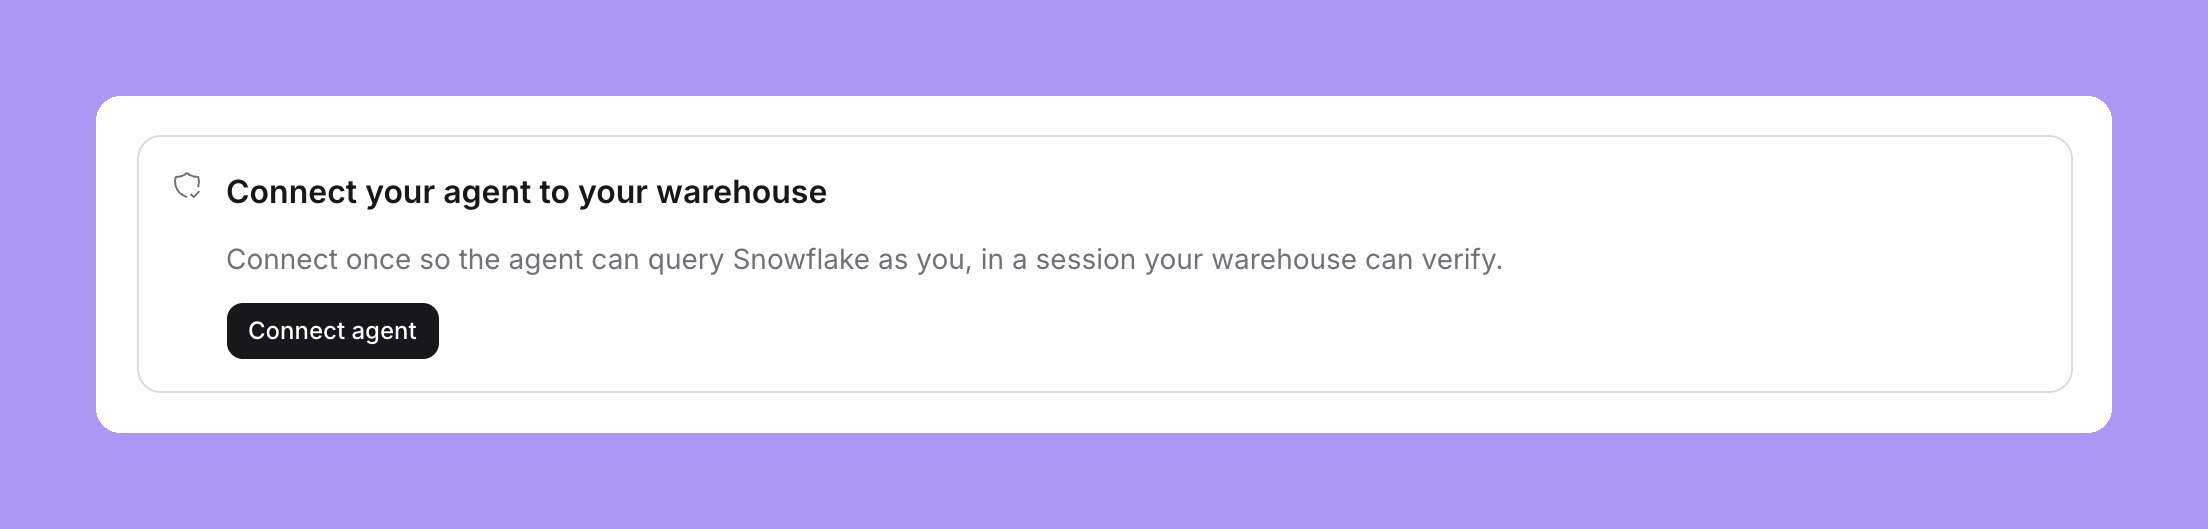
While the Snowflake rule is The person’s agent sign-in and a person has not connected their agent, Lightdash refuses their AI queries on Snowflake projects. The refusal message is “Connect your agent to the warehouse once so it can run as you.” When the agent connection has expired, the message is “Your agent connection expired. Connect again.” Each surface shows the person how to connect:- In the app, AI composers are hidden for Snowflake projects. This includes the Ask AI launcher, the homepage ask box and AI help in other parts of the app. The agent chat shows a Connect your agent to your warehouse card with a Connect agent button and a Manage agent connections link.
- In Slack, the agent posts only the refusal: “I need you to sign in to Snowflake before I can run this. It takes about 30 seconds. Then ask me again.” It has a Connect agent button, and the task card says “Needs your sign-in”.
- In MCP, the tool result shows the refusal message and a link to connect, and tells the agent to run the same call again after the person connects. The
connect_agenttool returns the person’s connection status and the same link, so an MCP client can offer it before the first query. - In the CLI,
lightdash agent statusshows the refusal message and the link.lightdash agent connectprints the link, opens it in the browser and counts down while it waits for the person to approve. When the person approves, it shows who agents now run as and until when, and asks them to run their last command again. Seelightdash agent connect.
Write Snowflake policies for agent sessions
Snowflake owns the data rules. Your policies decide what agent sessions may read. Each example readsSYS_CONTEXT('SNOWFLAKE$CURRENT', 'IS_AGENT_ACTIVATED'). The value is true only in a verified agent session.
Hide rows from agents
A row access policy can exclude sensitive rows from agent sessions:Mask values from agents
A masking policy can hide a value from agent sessions:Use a view on Snowflake Standard Edition
Row access and masking policies need Snowflake Enterprise Edition. On Standard Edition, a view gives the same result for the columns it covers:Limit what an agent session can do
A session policy can limit the privileges of an agent session:Verify on Snowflake
Run the same check in an agent session and in a normal session for the same person. For the agent session, ask an agent to run the SQL, for example in SQL mode or through the MCPrun_sql tool. For the normal session, run it in a Snowflake worksheet as that person.
agent_activated is true only in the agent session.
Then inspect recent query history with a role that can read account usage:
agent_type = 'EXTERNAL_AGENT' and the Lightdash agent tag in query_tag. QUERY_HISTORY has an ingestion delay, so new queries can take a while to appear. See QUERY_HISTORY.
Finally, query a protected table through an agent and as the person. Check that your row access, masking and session policies give the restrictions you expect.
Snowflake: the shared agent account
With this identity, agent queries on a Snowflake project run as one Snowflake user that signs in with a key pair. An admin adds the user, its private key, a role and a warehouse to the project connection. Snowflake then applies that role’s grants and your policies to every agent query. Use this identity when every agent user may see the same data. To let Snowflake apply each person’s own access to their agent, use the person’s agent sign-in instead. The shared agent account replaces only the identity of the connection: the user, key, role and warehouse. The account, database and schema stay from the connection. The connection’s custom query tag does not carry over. Lightdash still tags each agent query with the person it ran for. See Find agent queries in the warehouse.Set up the Snowflake shared agent account
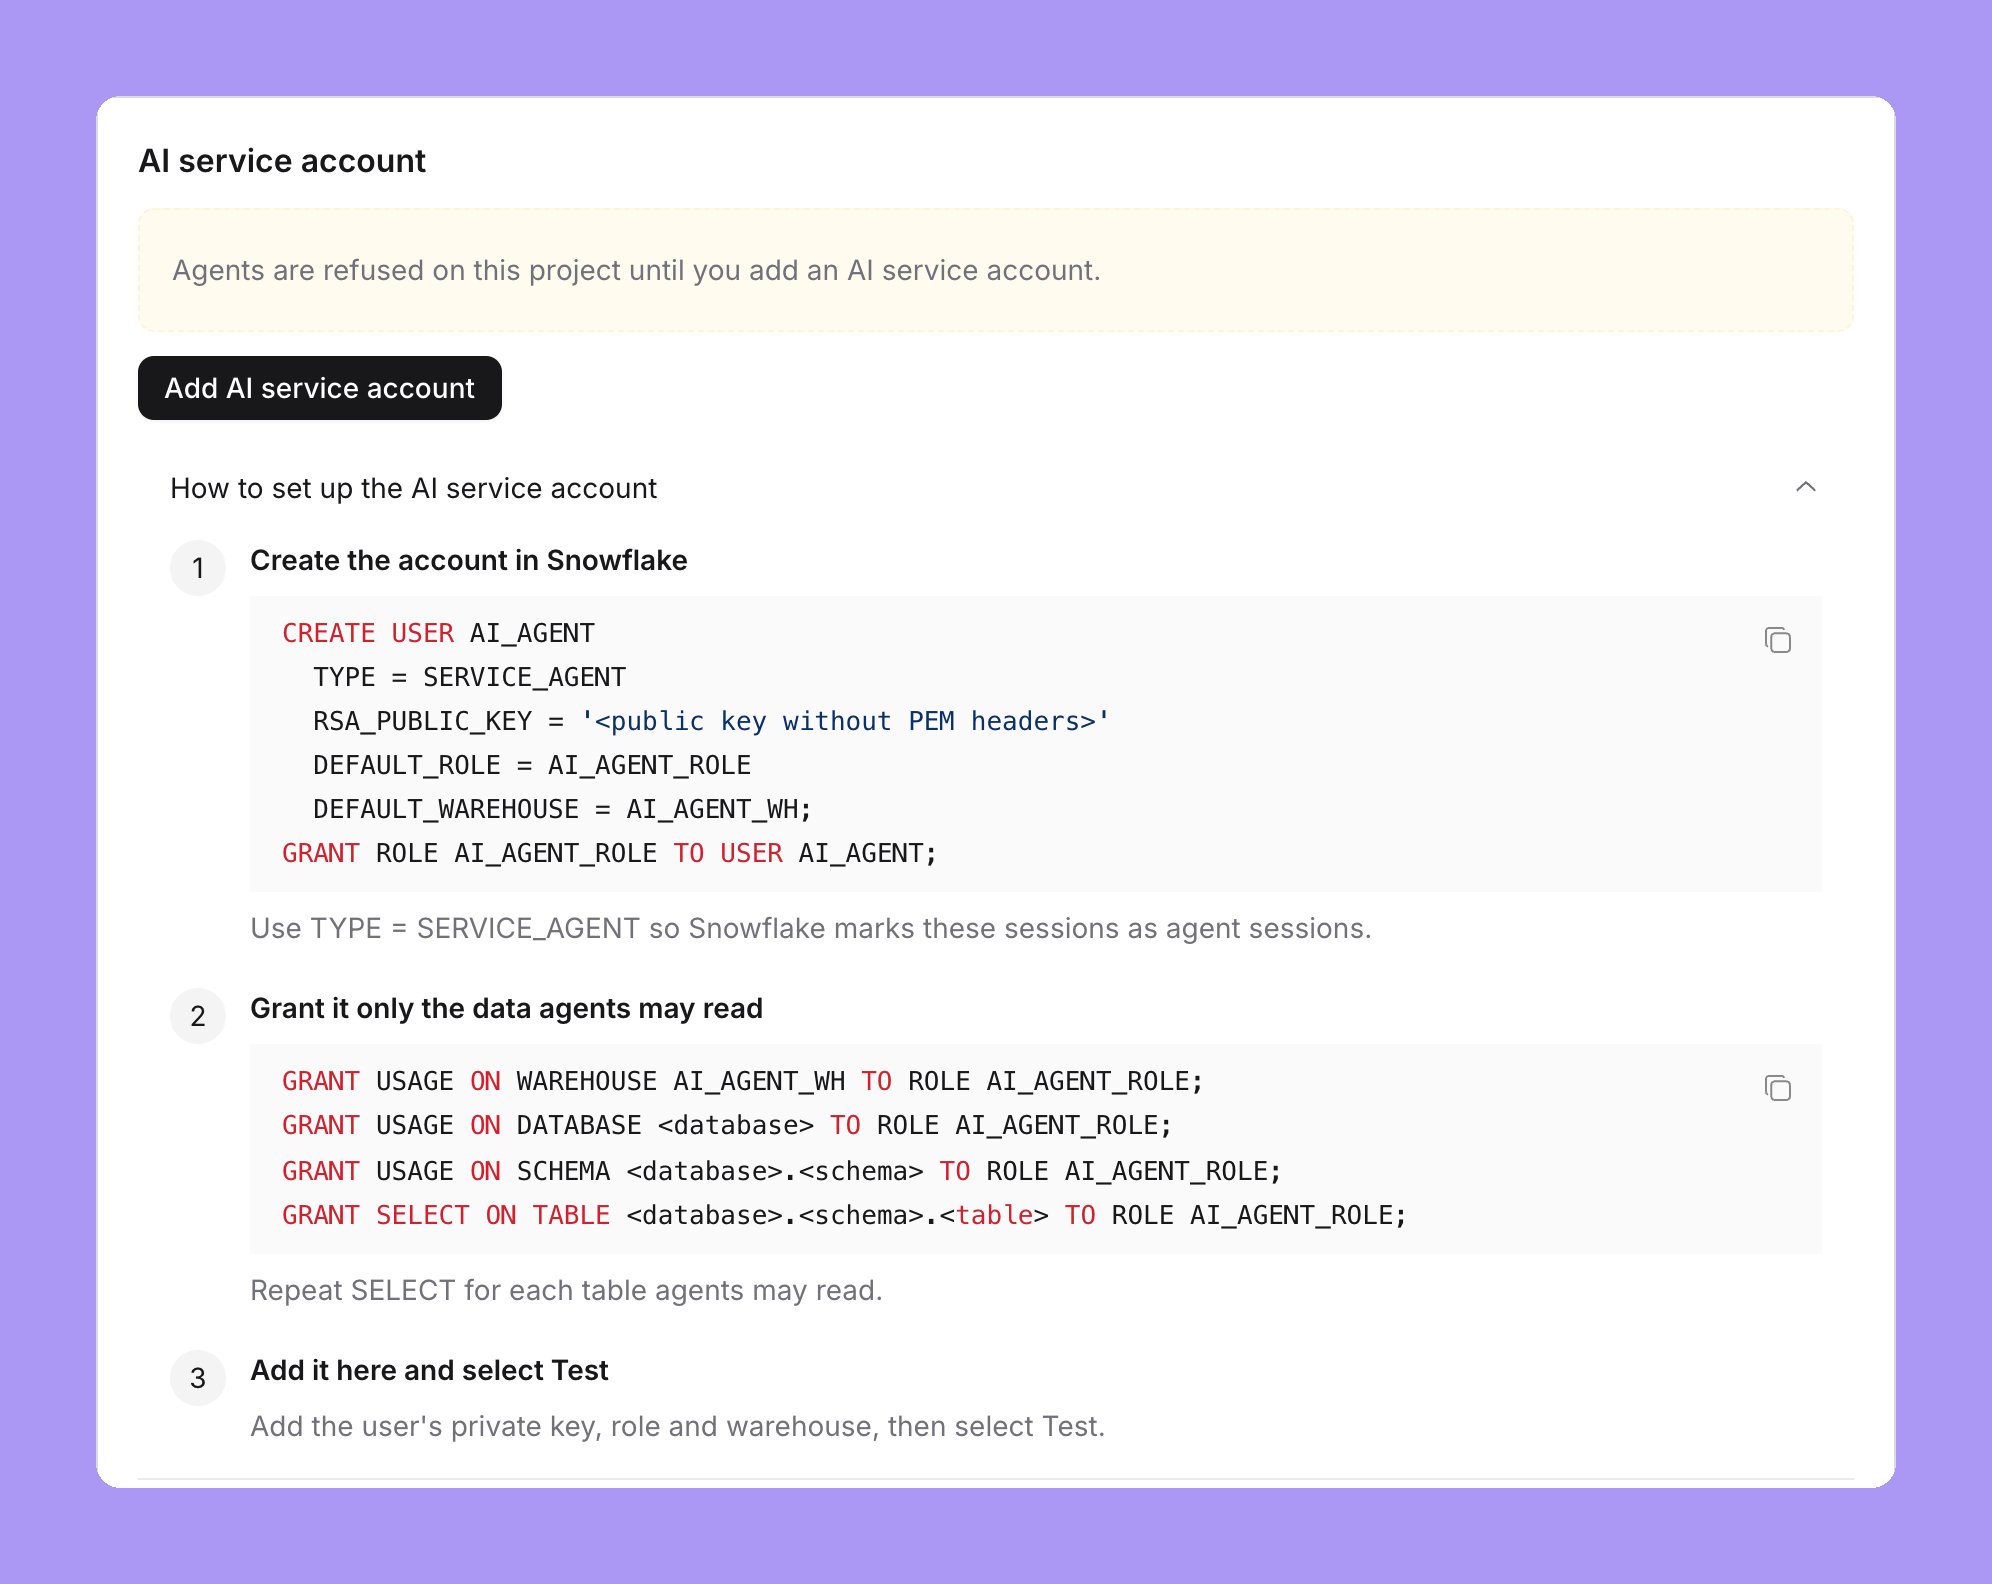
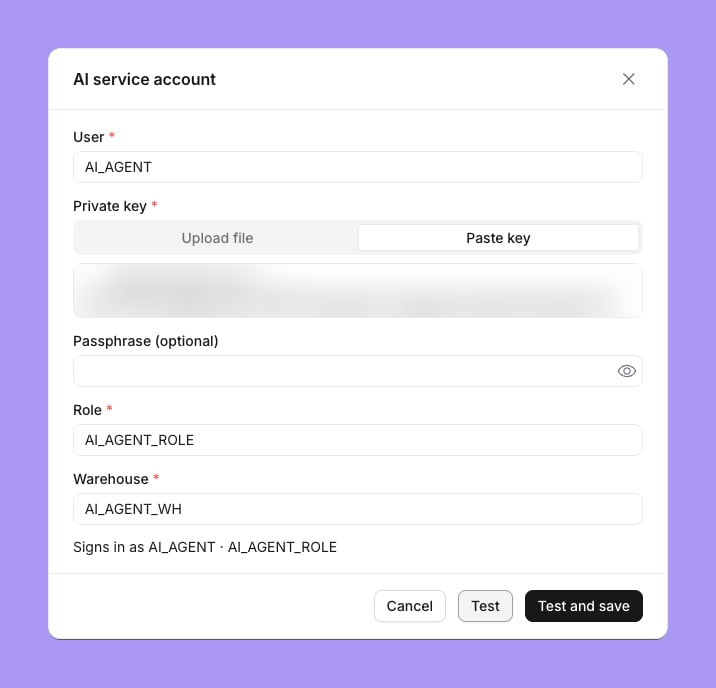
While the project has no shared agent account, the Shared agent account card on Project settings → Agent identity shows three setup steps: create the account in Snowflake, grant it only the data agents may read, and add it here and select Test. Each step has its SQL and a copy button.Create a key pair
Create the account in Snowflake
TYPE = SERVICE_AGENT is recommended, not required. With it, Snowflake marks every session of the user as an agent session.Grant it only the data agents may read
USAGE on the warehouse, database and schema, and SELECT on each table that agents may read:Add the shared agent account
Set the Snowflake rule
Agent sessions and your policies
WithTYPE = SERVICE_AGENT, SYS_CONTEXT('SNOWFLAKE$CURRENT', 'IS_AGENT_ACTIVATED') is true in every session of the shared agent account. The row access, masking and session policies in Write Snowflake policies for agent sessions then apply to agent queries. With another user type, Snowflake does not mark the sessions, and only the role’s grants restrict agents. See SERVICE_AGENT users.
Test, replace and remove
Test signs in with the key pair. The card then shows “Signs in as” followed by the user and role that Snowflake returns, for example “AI_AGENT with role AI_AGENT_ROLE”, the method Key pair, and when it was tested and added. Test proves that the key pair, role and warehouse work. It does not check what the role can read.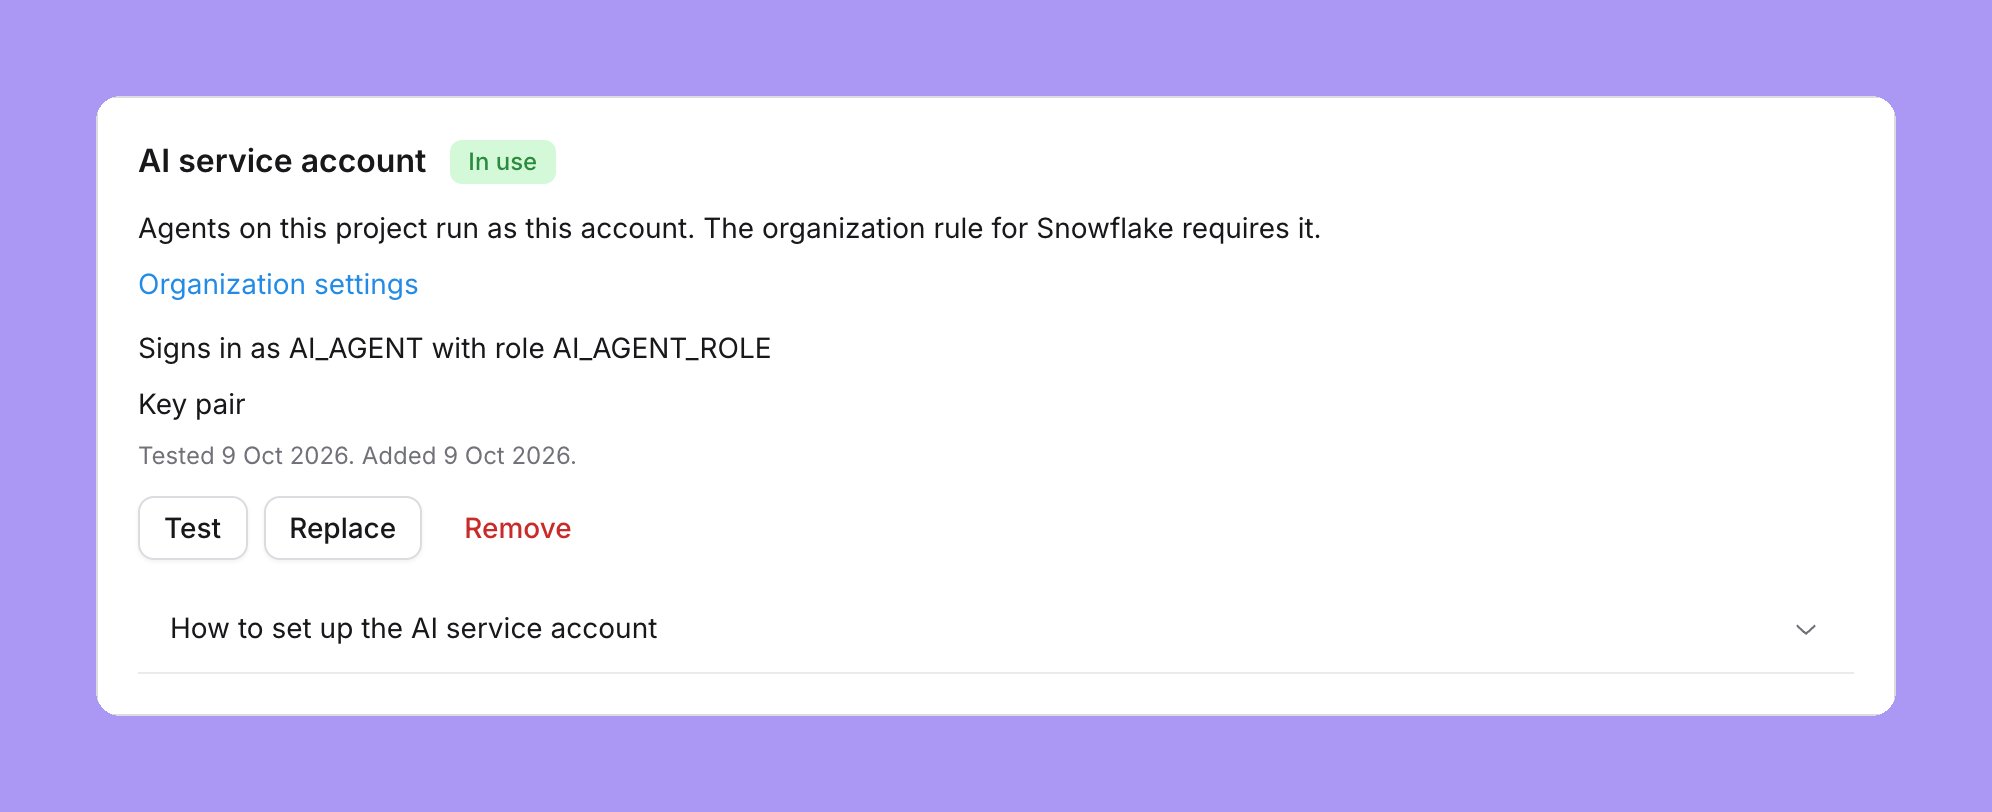
- To change the user, key, role or warehouse, select Replace. A failed sign-in keeps the saved account.
- To remove the shared agent account, select Remove and confirm. Agent queries on that project are refused until an admin adds one again.
What agents and people see on Snowflake
When the Snowflake rule is A shared agent account:- Chat, MCP, Slack and data app sample queries on Snowflake run as the shared agent account.
- Agent sessions turn off the Snowflake result cache, and Lightdash does not reuse cached results for these queries.
- People have nothing to set up. They do not connect an agent.
Verify the Snowflake shared agent account
Ask an agent to run this SQL, for example in SQL mode or through the MCPrun_sql tool:
TYPE = SERVICE_AGENT, agent_activated is true.
BigQuery: the shared agent account
With this identity, agent queries on a BigQuery project run as a separate Google Cloud service account. An admin adds the account’s key to the project connection. BigQuery then applies that account’s grants to every agent query, so you decide what agents can read with ordinary BigQuery permissions. The shared agent account replaces only the credentials of the connection. The project, dataset and location stay from the connection.Set up the BigQuery shared agent account
While the project has no shared agent account, the Shared agent account card on Project settings → Agent identity shows three setup steps: create the account in BigQuery, grant it only the data agents may read, and add it here and select Test. The commands create the account, grantroles/bigquery.jobUser on the project that runs the jobs, and grant roles/bigquery.dataViewer on the dataset of the connection. The project, the execution project and the dataset come from the connection. Select the copy button to copy the commands.
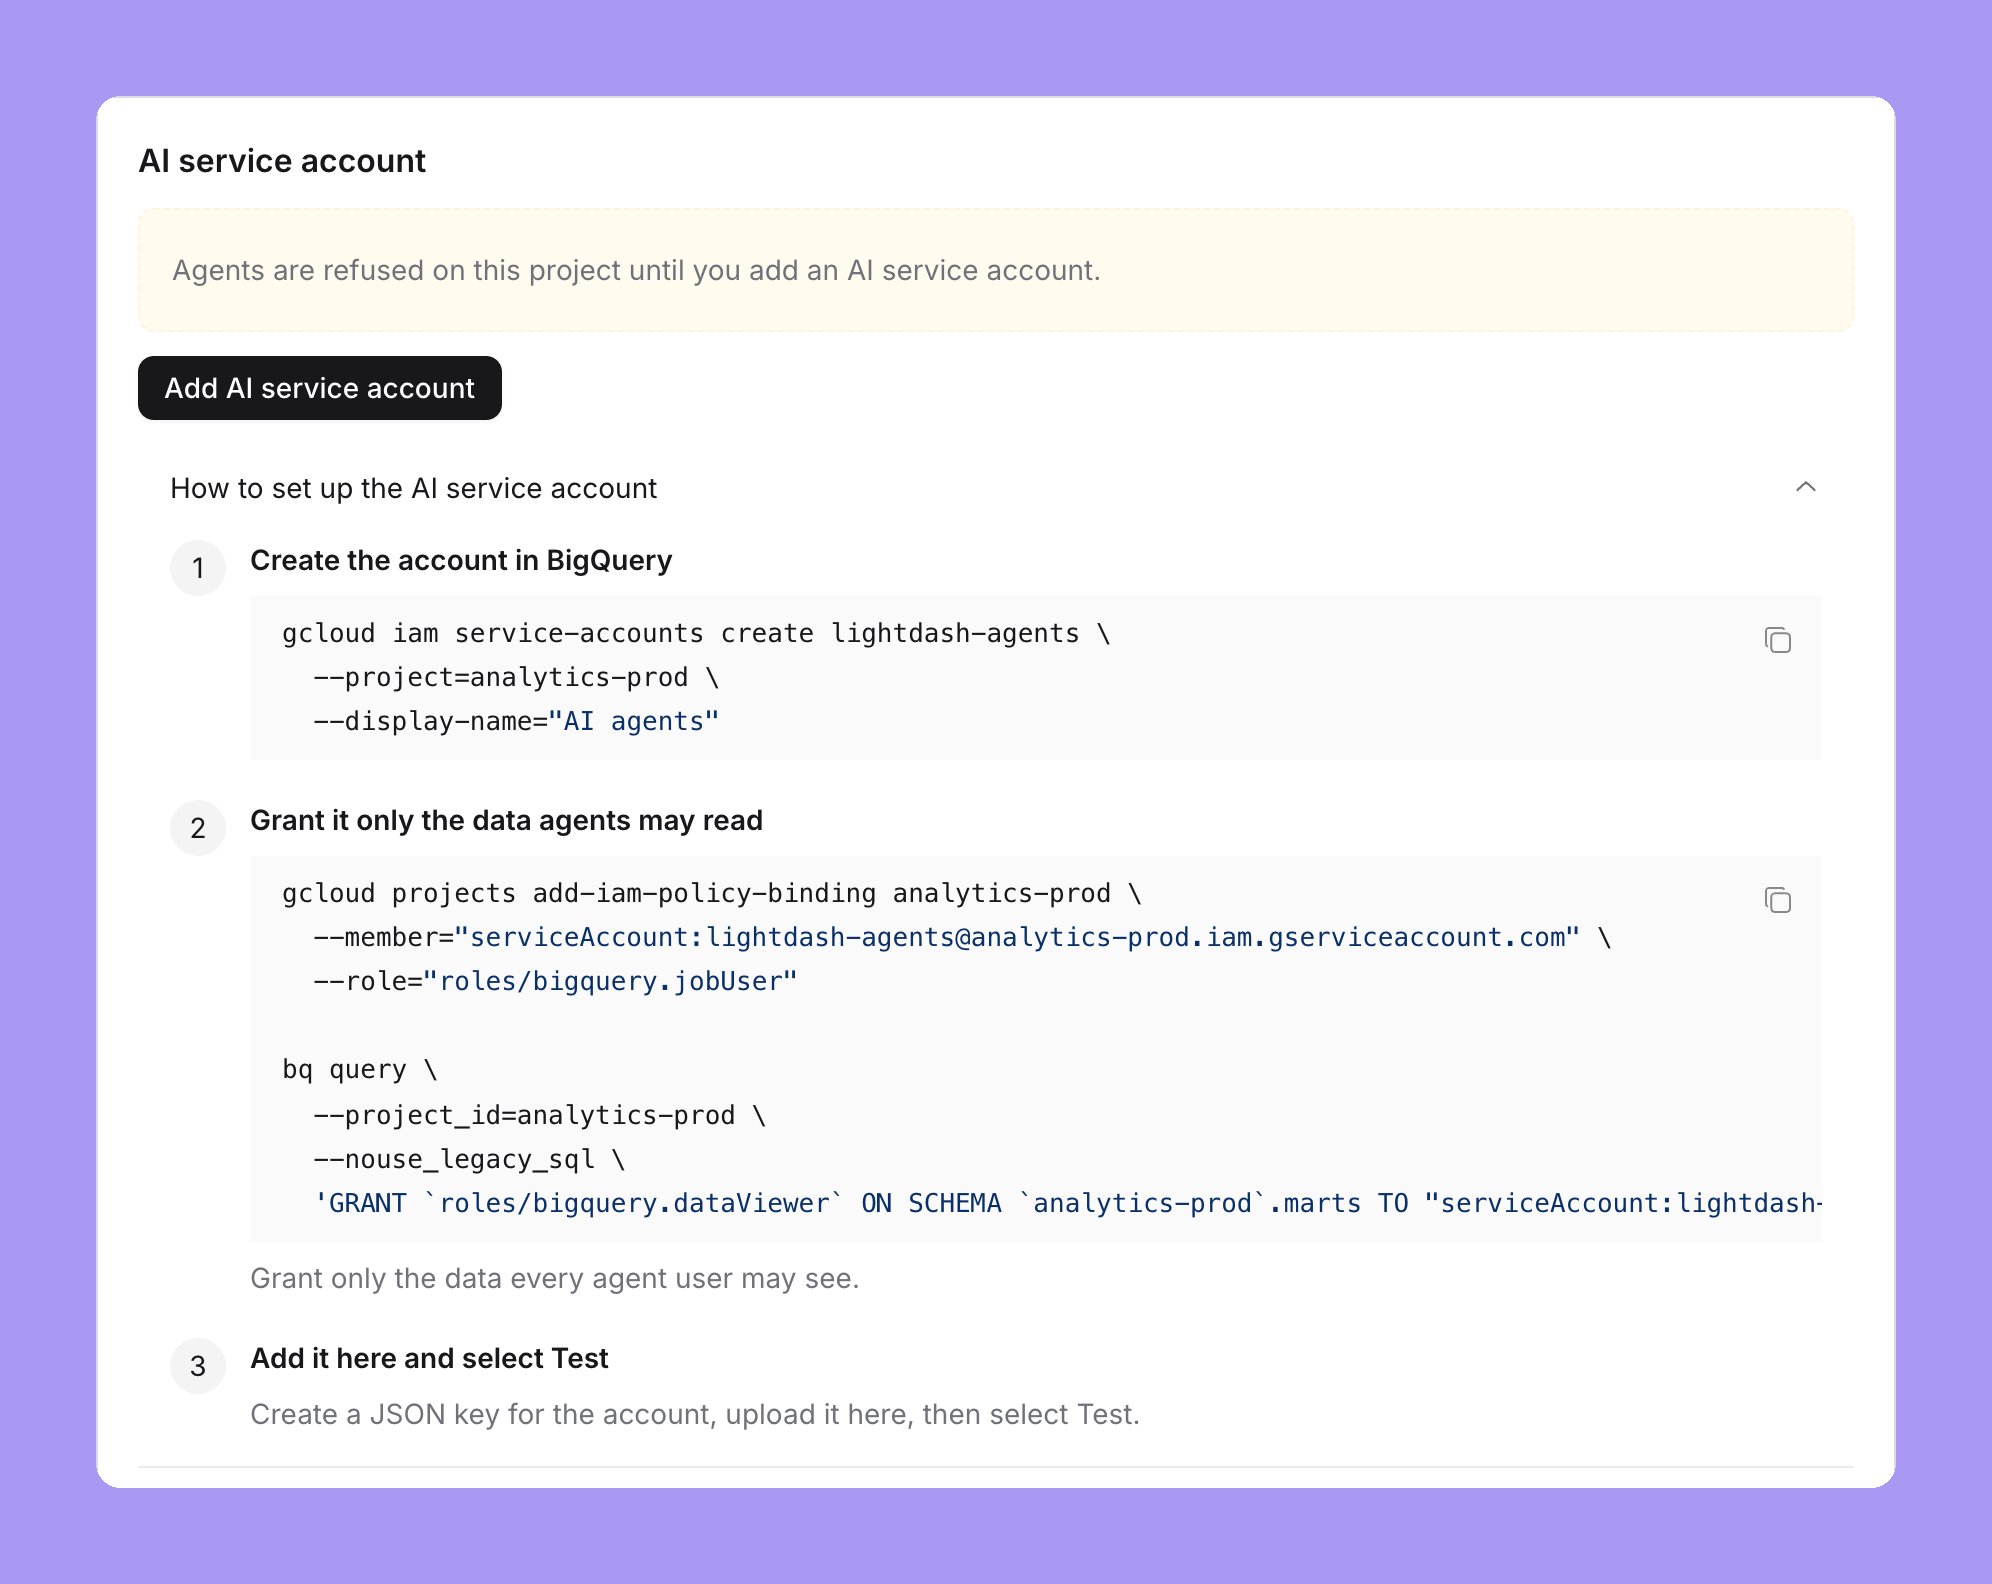
lightdash-agents. Change it if your organization uses a different name.
Create a service account
Grant read access
roles/bigquery.jobUser on the Google Cloud project of the connection, so that it can run queries. Then grant it read access only to the data that agents may use, for example roles/bigquery.dataViewer on each dataset. Do not grant data roles on the whole project unless agents may read every dataset in it. See Decide what agents can read and BigQuery IAM roles.Create a JSON key
Add the key in Lightdash
Test the key
SELECT SESSION_USER() with the key and shows “Signs in as” followed by the account that BigQuery returns. Check that this is the shared agent account and not the connection’s own account. Test saves nothing.Save
Set the BigQuery rule
The project Agent identity page
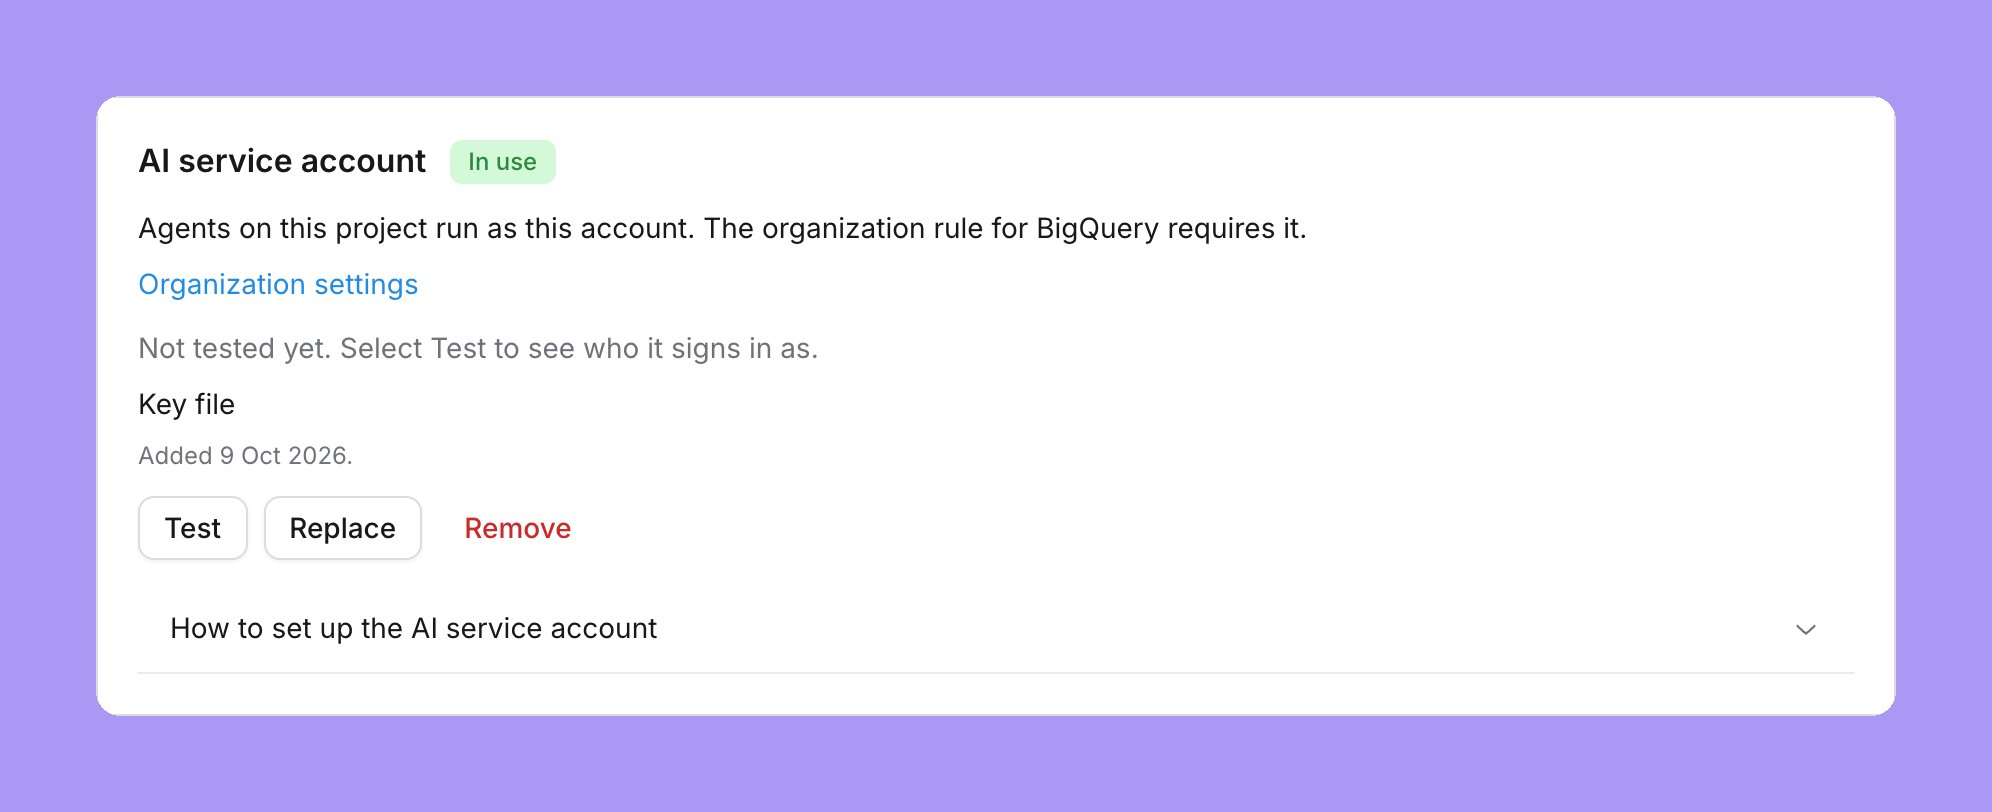
People who can manage a project find Agent identity in the project settings sidebar, after Tables configuration. The page has one Shared agent account card, with the same layout on Snowflake, BigQuery, Databricks, Athena, Postgres, Redshift, Trino and ClickHouse:- Status. A badge says In use or Not in use, and one line gives the reason from the organization rule, for example “Agents on this project run as this account. The organization rule for BigQuery requires it.” An Organization settings link opens the rule. Only an organization admin can change it.
- Missing. When the rule requires a shared agent account and the project has none, an alert says “Agents are refused on this project until you add a shared agent account.” The card has an Add shared agent account button.
- Summary. After you save an account, the card shows “Signs in as” followed by the account, the method (Key file, Key pair or Client ID and secret), and when it was tested and added. Before the first Test, it says “Not tested yet. Select Test to see who it signs in as.”
- Buttons. Test, Replace and Remove. A failed Test shows the error in an alert.
- Setup steps. While the project has no shared agent account, the card shows three setup steps for the warehouse. After you save an account, the card does not show them. A preview project never shows them, because its account comes from the parent project.
Decide what agents can read
The shared agent account reads only what you grant it. BigQuery checks those grants on every agent query, so you restrict agents with BigQuery permissions and policies on the shared agent account. You can combine the levels below. The examples uselightdash-agents@my-project.iam.gserviceaccount.com for the shared agent account and lightdash@my-project.iam.gserviceaccount.com for the connection’s own account. Replace them with your accounts.
Datasets
Grantroles/bigquery.dataViewer only on the datasets that agents may use:
Tables
To give agents only some tables in a dataset, grant Data Viewer on each table instead of on the dataset:Columns
Policy tags protect individual columns. You create a taxonomy with a policy tag, for examplepii, and attach it to the sensitive columns. Then you choose what the shared agent account sees in those columns:
- Masked values. Add a data policy with a masking rule to the policy tag. Grant the shared agent account the Masked Reader role,
roles/bigquerydatapolicy.maskedReader, on the data policy. The account then reads masked values: for exampleNULLwith the Nullify rule, or an empty string for aSTRINGcolumn with the Default masking value rule. This is the BigQuery equivalent of the SnowflakeREDACTEDexample. - No access. Do not grant the shared agent account the Fine-Grained Reader role,
roles/datacatalog.categoryFineGrainedReader, or the Masked Reader role. A query that selects the column fails with an error. Agent questions that do not use the column still work.
email column of protected_records:
Rows
A row access policy limits the rows that the shared agent account can read. The account still needs Data Viewer on the table:TRUE filter.
Column-level access control, dynamic data masking and row-level security need BigQuery Enterprise or Enterprise Plus edition, or on-demand pricing. See BigQuery editions.
One key for each project connection
Each project connection holds its own shared agent account. While the BigQuery rule is A shared agent account, agents are refused on every BigQuery project that has no key. A preview project uses the key of its parent, see Preview projects. Add a key on every BigQuery project connection. You can use the same key file on more than one project. Each chip on Organization settings → Agents that uses A shared agent account shows the number of projects that have no shared agent account yet. When every project has one, the chip shows a green tick. See Read the chips.Preview projects
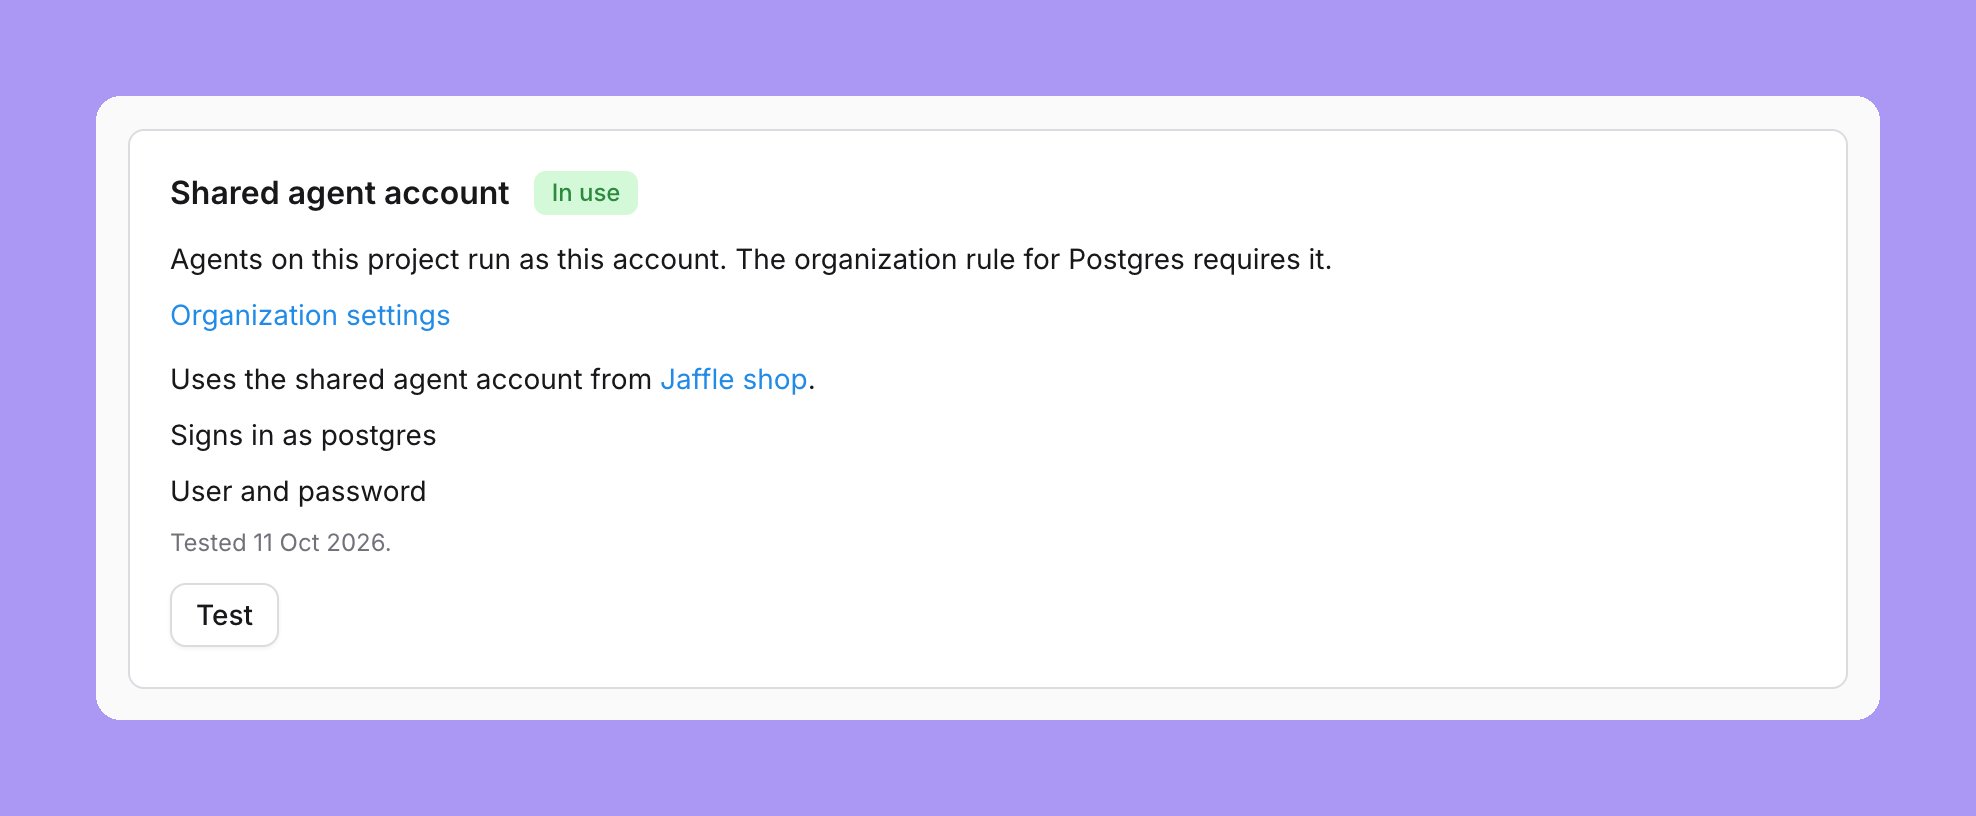
A preview project always uses the shared agent account of its parent project for the matching connection. A preview has no shared agent account of its own, and you cannot add one on a preview. Developers can ask agents about a preview with no extra setup. Lightdash does not copy the account: it reads the account of the parent on each query. When an admin replaces or removes the account of the parent, previews use the new state on their next query. The Shared agent account card on the preview’s Agent identity page is read-only. To add or change the account, go to the parent project.- The parent has an account. The card says “Uses the shared agent account from” followed by a link to the parent. It shows “Signs in as” followed by the account, the method, and when it was tested. Select Test to test the parent’s account on the preview’s connection.
- The parent has no account, and the rule requires one. A warning says “Agents are refused on this preview until the parent project has a shared agent account for this connection. Ask an admin to add one on the parent project.” The last words link to the parent project.
- The parent has no account, and the rule does not require one. The card says “The parent project has no shared agent account. Add one on the parent project.”
- Lightdash can’t read the parent’s account. An alert says that agents are refused on the preview. Ask an admin of the parent project to replace the parent’s account.
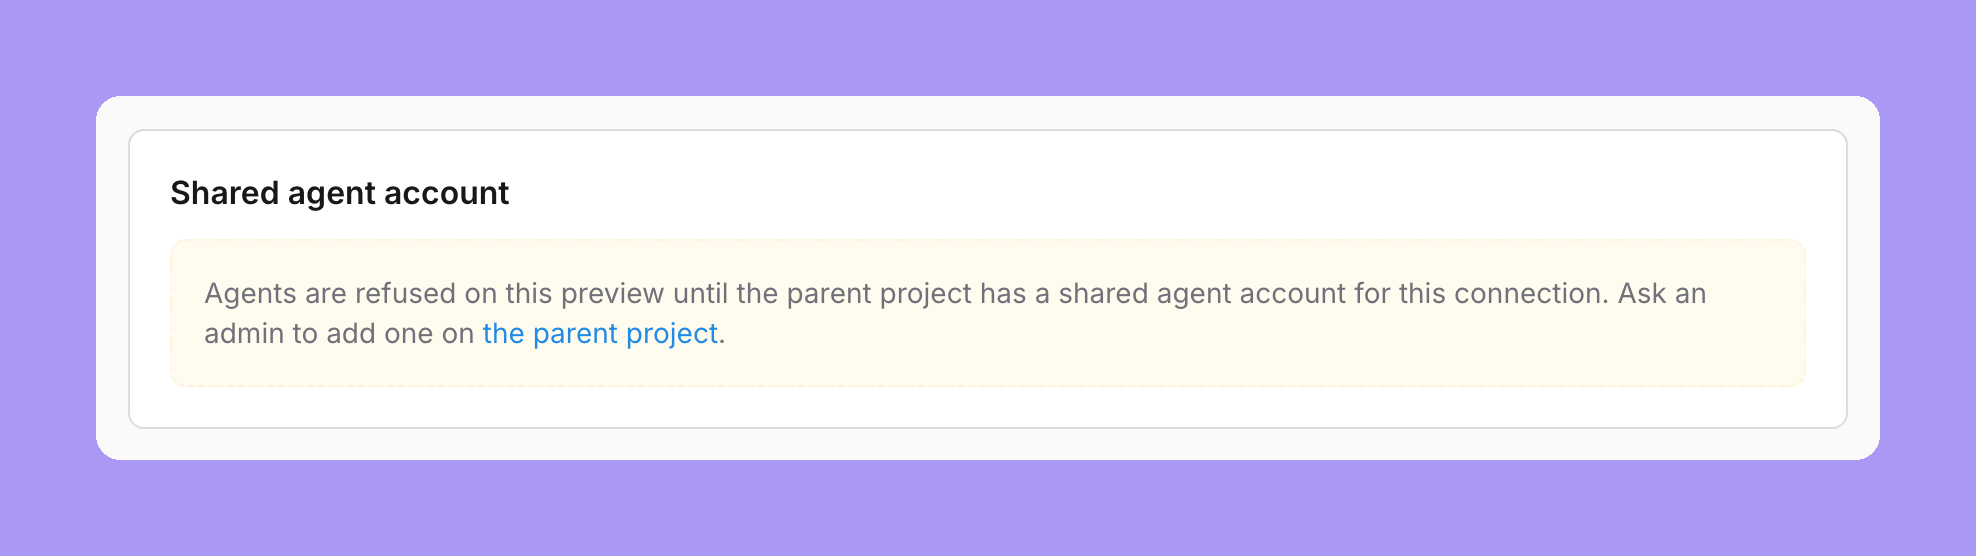
- Postgres, Redshift, Trino and ClickHouse: the error starts with “This preview uses the parent’s shared agent account, which can’t read this preview’s data. Ask an admin to grant it access.”, followed by the warehouse error.
- BigQuery, Snowflake, Databricks and Athena: the person sees the warehouse error only.
What agents and people see
When the BigQuery rule is A shared agent account:- Chat, MCP, Slack and data app sample queries on BigQuery run as the shared agent account.
- BigQuery agent jobs carry the label
agent: trueand skip the BigQuery query cache. Lightdash does not reuse cached results for these queries. - Settings → My agent identity shows a BigQuery card that says agents run as the shared agent account your admin set up. People have nothing to set up. See My agent identity.
Verify on BigQuery
Ask an agent to run this SQL, for example in SQL mode or through the MCPrun_sql tool:
region-us with the region of your datasets. Agent jobs show the shared agent account in user_email. See JOBS view.
Finally, ask an agent about an explore whose table the shared agent account cannot read. BigQuery refuses the query with an access denied error.
Databricks: the shared agent account
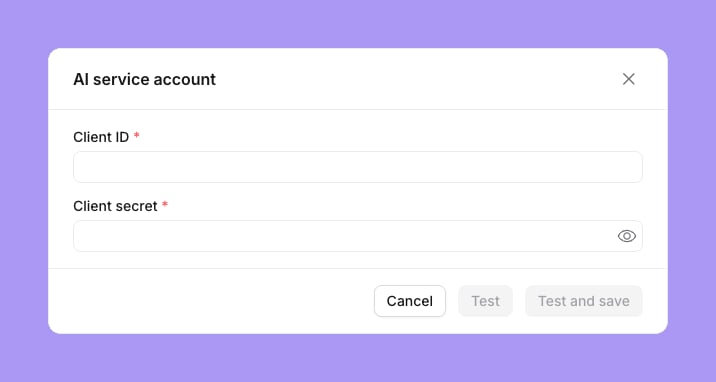
With this identity, agent queries on a Databricks project run as a separate Databricks service principal. An admin adds the service principal’s OAuth client ID and secret (OAuth machine-to-machine) to the project connection. Unity Catalog then applies that service principal’s grants, row filters and column masks to every agent query. Databricks does not offer The person’s agent sign-in, and has no service principal for each group. The shared agent account replaces only the sign-in of the connection. The host, HTTP path, catalog, schema and compute stay from the connection.Before you start
- The
agent-identityfeature flag is on. See the note at the top of this page. - You are an admin of the Lightdash project, and an organization admin sets the rule.
- The project connection uses a Databricks SQL warehouse in the workspace.
Set up the Databricks shared agent account
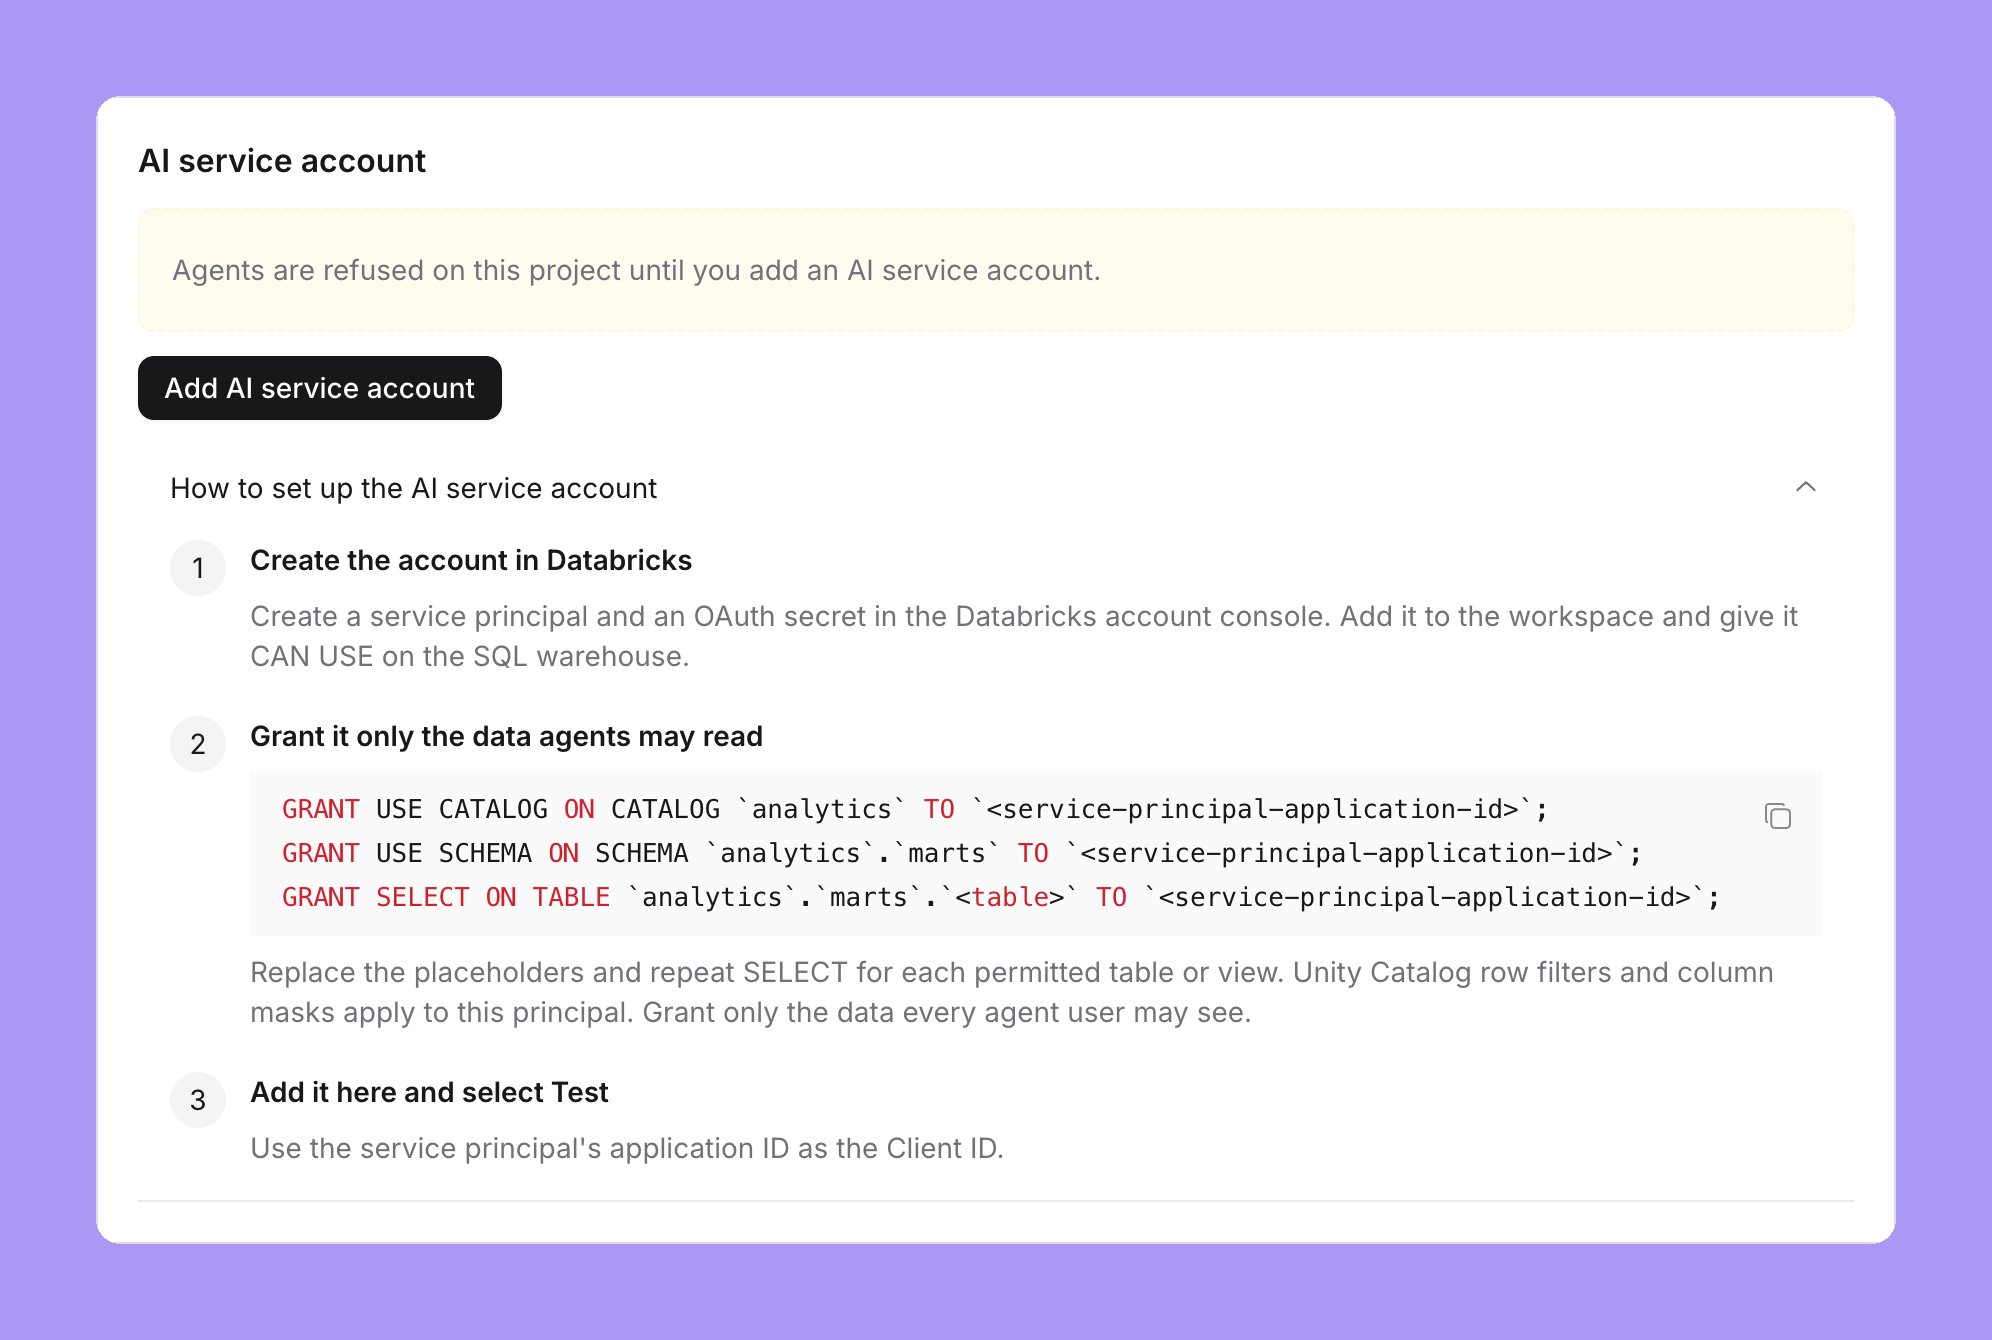
While the project has no shared agent account, the Shared agent account card on Project settings → Agent identity shows three setup steps: create the account in Databricks, grant it only the data agents may read, and add it here and select Test.Create the service principal and an OAuth secret
CAN USE permission on the SQL warehouse of the connection. The application ID of the service principal is the client ID. See Service principals and OAuth machine-to-machine authentication.Grant access to the data agents may read
USE CATALOG, USE SCHEMA and SELECT. The card has the statements with the catalog and schema of the connection, and a copy button. Replace the placeholders, and repeat SELECT for each table or view that agents may read:Add the client ID and secret
Set the Databricks rule
Test, replace and remove
Test signs in as the service principal and runsSELECT current_user(). The card then shows “Signs in as” followed by the application ID, the method Client ID and secret, and when it was tested and added. Test proves that the client ID and secret work. It does not check what the service principal can read.
- To change the service principal or the secret, select Replace.
- Databricks OAuth secrets expire. Create a new secret before the old one expires, then select Replace and enter it.
- To remove the shared agent account, select Remove and confirm. Agent queries on that project are refused until an admin adds one again.
What agents and people see on Databricks
When the Databricks rule is A shared agent account:- Chat, MCP, Slack and data app sample queries on Databricks run as the service principal.
- Agent queries skip the Databricks result cache.
- People have nothing to set up.
Verify on Databricks
Ask an agent to run this SQL, for example in SQL mode or through the MCPrun_sql tool:
Athena: the shared agent account
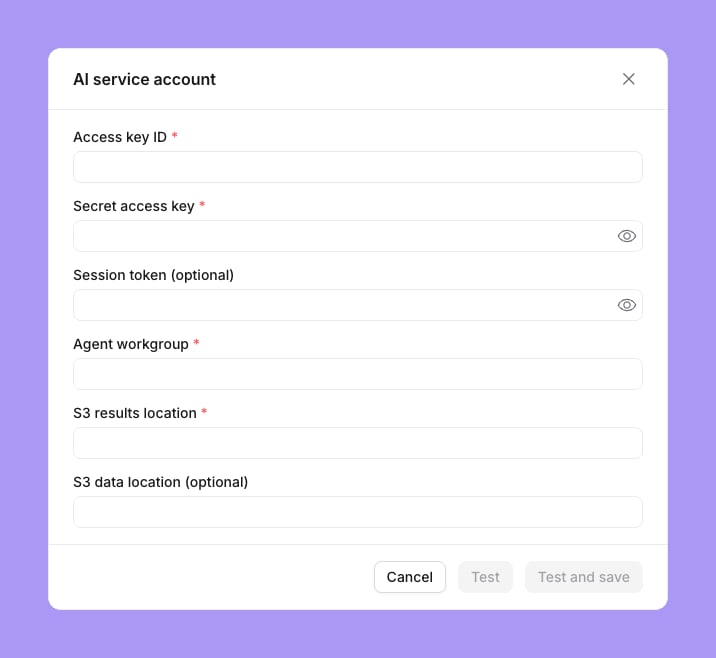
With this identity, agent queries on an Athena project run as a separate AWS identity, with its own Athena workgroup and its own S3 results location. An admin adds the identity’s access keys to the project connection. Lake Formation grants and data filters on that identity then decide what agents can read. The shared agent account takes only the region, catalog, database and query settings from the connection. The keys, workgroup and S3 locations come from the shared agent account. The connection’s own role, web identity, keys, workgroup and S3 locations never apply to agent queries.Choose the AWS identity
Lightdash signs in with access keys. It cannot renew keys yet.- A dedicated IAM user for agents (recommended for now). Give the user only the permissions agents need, and use its long-lived access keys. Rotate the keys on your normal schedule, and select Replace to add the new keys.
- An IAM role. The setup steps in the card create a role. Keys from an assumed role expire within hours. When they expire, Lightdash refuses agent queries until an admin adds new keys.
Set up the Athena shared agent account
While the project has no shared agent account, the Shared agent account card on Project settings → Agent identity shows three setup steps. It has copy buttons for each policy and grant, built from the connection’s region, catalog and database.Create the AWS identity
Grant it only the data agents may read
Add the shared agent account
Set the Athena rule
Test, replace and remove
Test checks the AWS identity withGetCallerIdentity, then runs a simple query through the agent workgroup. The card then shows “Signs in as” followed by the identity’s ARN, the method Access keys, and when it was tested and added. Test proves that the keys, workgroup and results location work. It does not check table grants. Test gives a specific message for rejected keys, denied access, a results location problem and a missing workgroup.
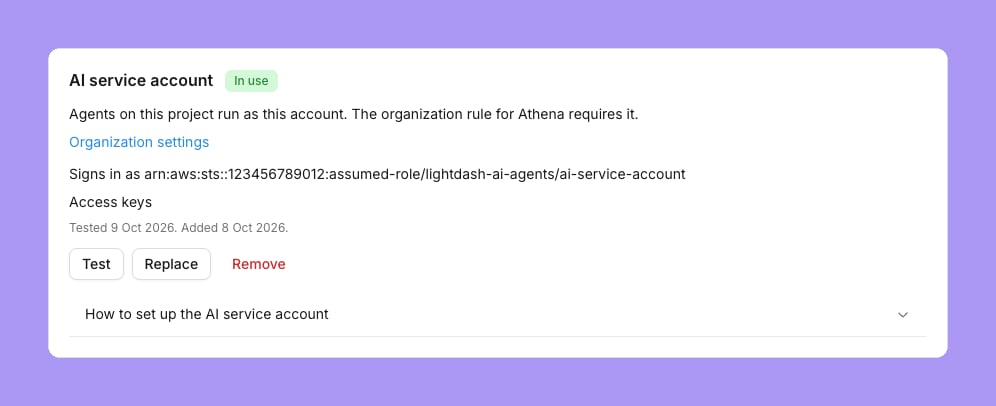
- To add new keys, select Replace.
- To remove the shared agent account, select Remove and confirm. Agent queries on that project are refused until an admin adds one again.
What agents and people see on Athena
When the Athena rule is A shared agent account:- Chat, MCP, Slack and data app sample queries on Athena run as the shared agent account, through its workgroup.
- Settings → My agent identity shows an Athena card. People have nothing to set up. See My agent identity.
Postgres: the shared agent account
With this identity, agent queries on a Postgres project sign in as a separate Postgres login role, with its own user and password. Postgres then applies that role’s grants and row-level security policies to every agent query. The shared agent account replaces only the user and password of the connection. The host, port, database, schema, SSL mode, root certificate and SSH tunnel stay from the connection. The connection’s client certificates and itsrole setting never apply to agent queries.
Set up the Postgres shared agent account
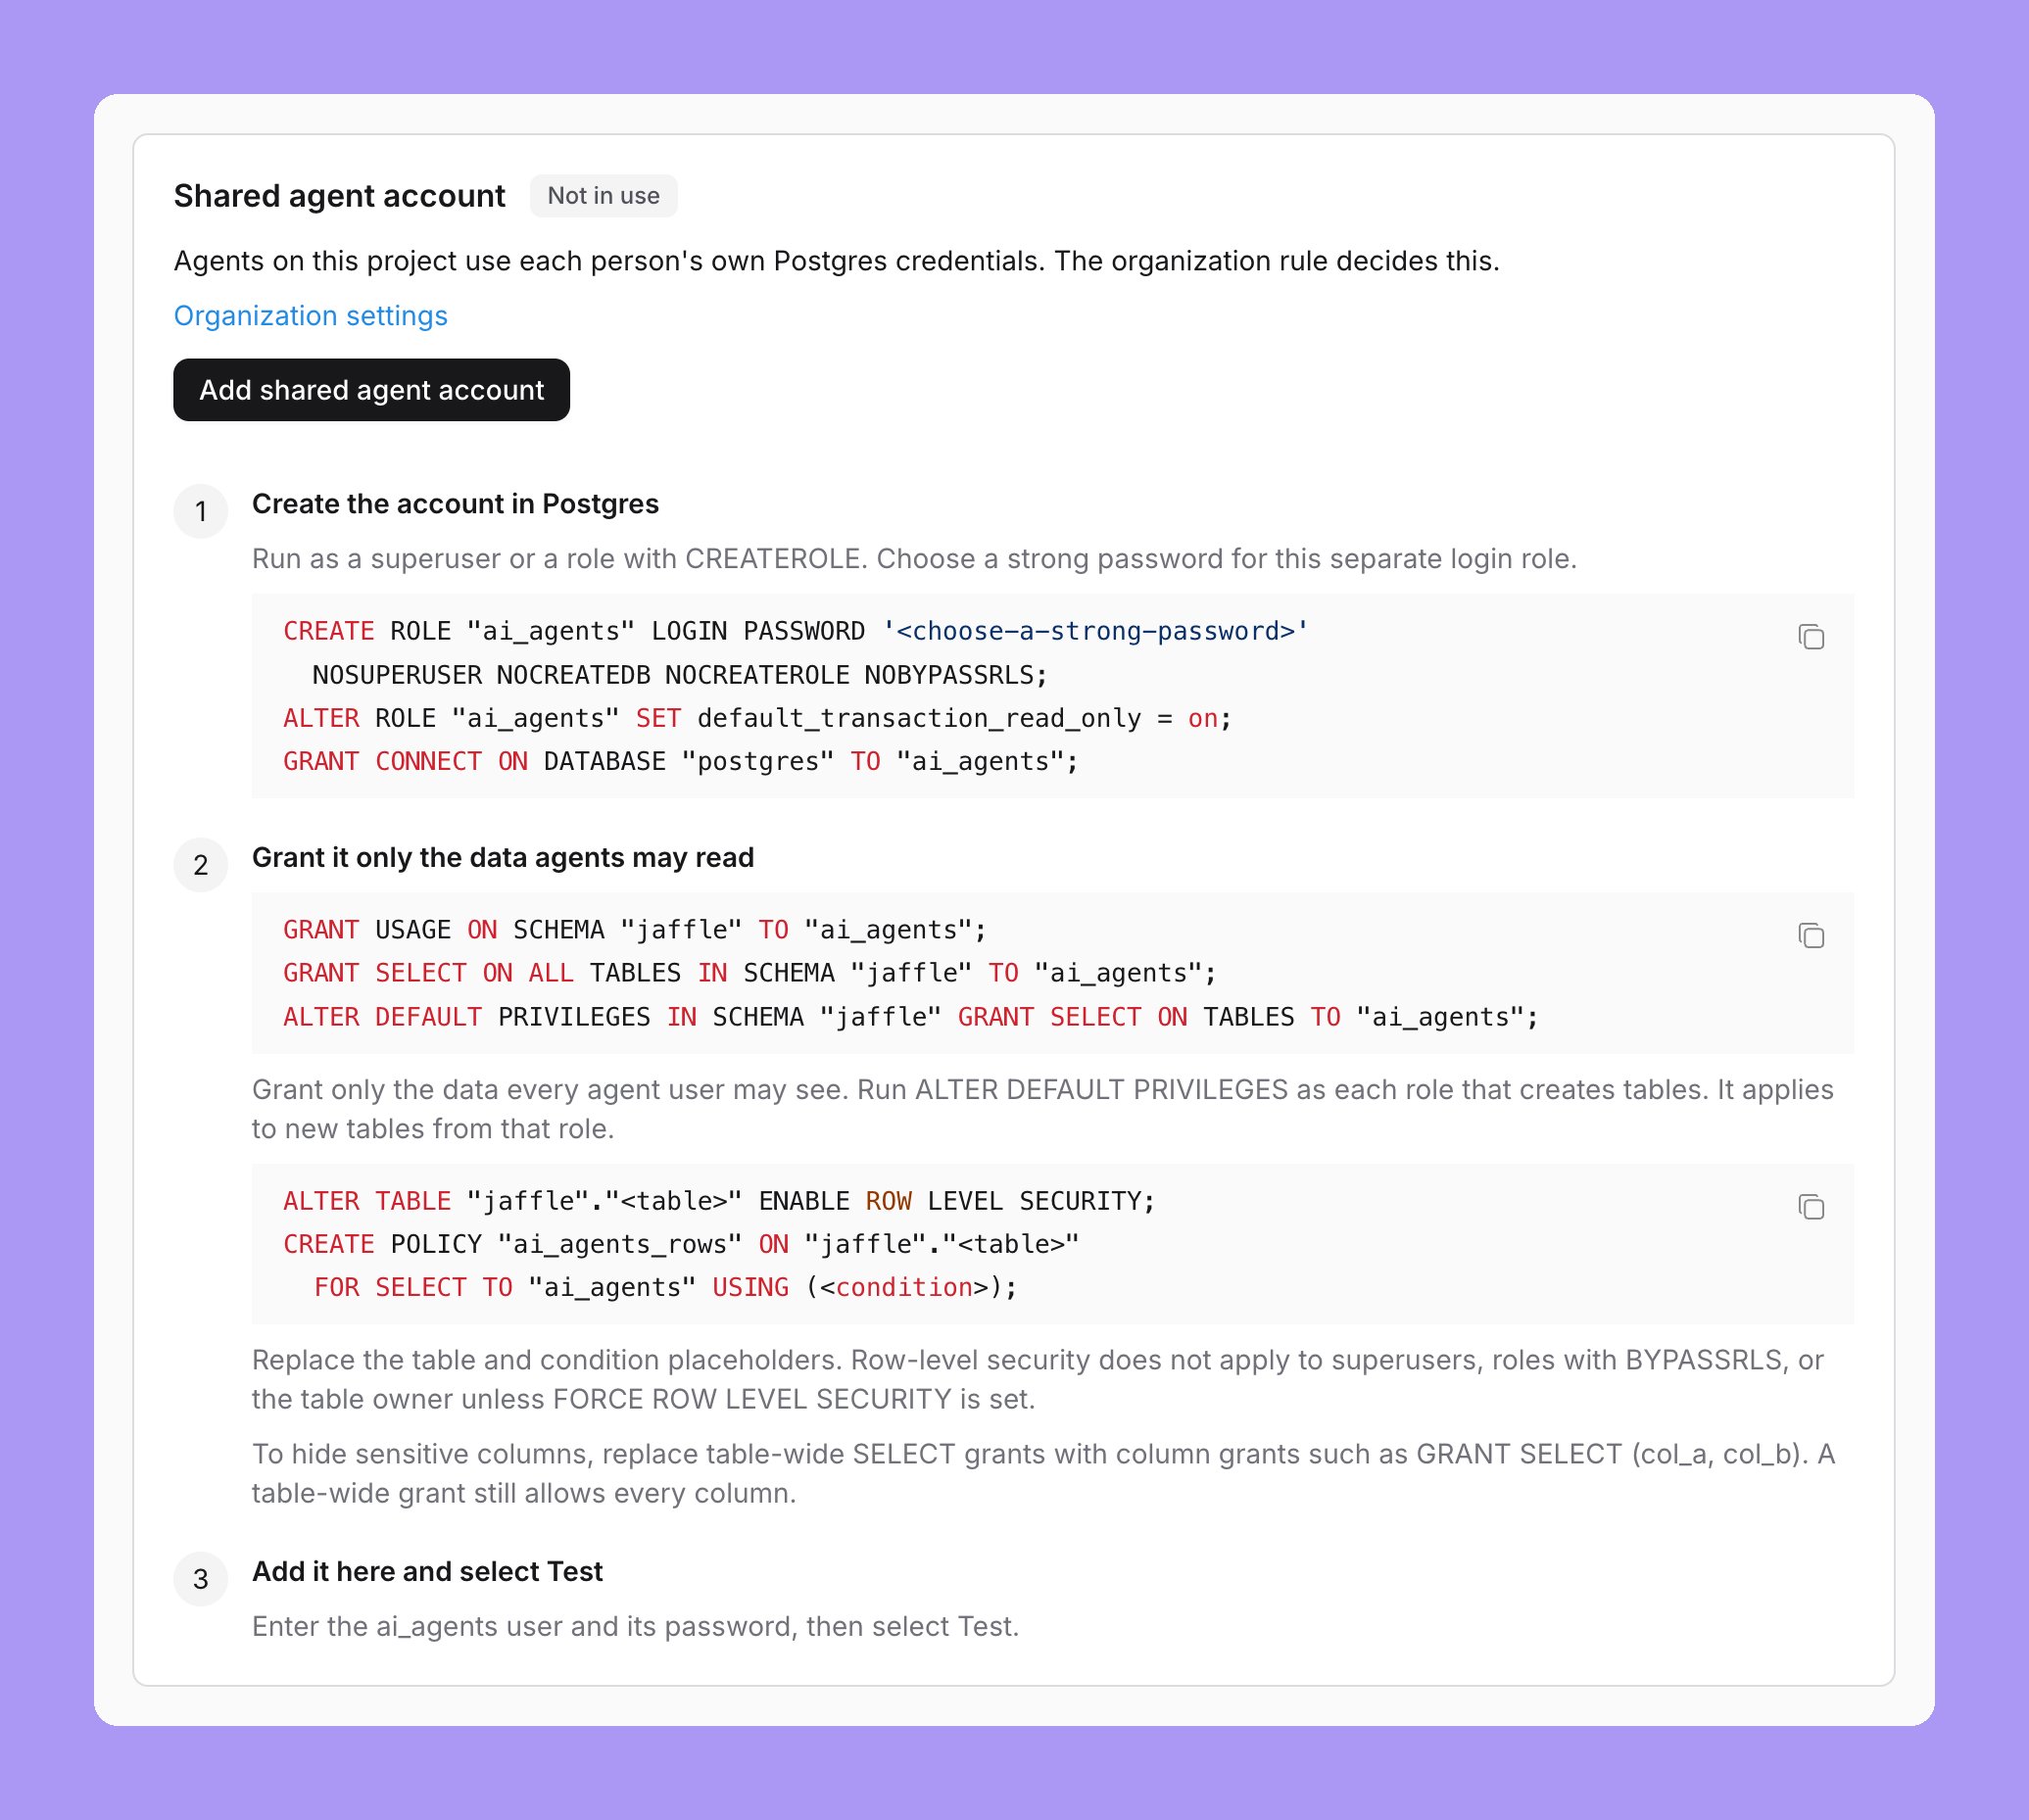
While the project has no shared agent account, the Shared agent account card on Project settings → Agent identity shows three setup steps, with a Copy SQL button for each block. The SQL uses the database and schema of the connection.Create a read-only login role
CREATEROLE, create a separate login role for agents. Choose a strong password:Grant the schemas that agents may read
ALTER DEFAULT PRIVILEGES applies only to new tables that the role running it creates. Run it as each role that creates tables.Add the shared agent account
Set the Postgres rule
Limit rows and columns
To limit the rows that agents read, add a row-level security policy for the role. Replace the table and condition placeholders:BYPASSRLS, or to the table owner unless the table has FORCE ROW LEVEL SECURITY. See Row security policies.
To hide sensitive columns, replace the table-wide SELECT grant with a column grant, for example GRANT SELECT (col_a, col_b) ON "<schema>"."<table>" TO "ai_agents";. A table-wide grant still allows every column.
Test, replace and remove
Test signs in as the login role and runsSELECT current_user, session_user. Test fails when either value differs from the saved user. The card then shows “Signs in as” followed by the user, and when it was tested and added. Test proves that the user and password work. It does not check what the role can read.
When Test fails, the card gives a fixed message for each cause: rejected credentials, a role without LOGIN, a pg_hba.conf rule that blocks the user, no CONNECT on the database, or a database that does not exist. Lightdash never shows the driver message, so a password never reaches the page or the logs.
- To change the user or password, select Replace.
- To remove the shared agent account, select Remove and confirm. Agent queries on that project are refused until an admin adds one again.
What agents and people see on Postgres
When the Postgres rule is A shared agent account:- Chat, MCP, Slack and data app sample queries on Postgres sign in as the shared agent account. On a connection with an SSH tunnel, they use the same tunnel.
- Settings → My agent identity shows a Postgres card. People have nothing to set up. See My agent identity.
Redshift: the shared agent account
With this identity, agent queries on a Redshift project sign in as a separate Redshift database user, with its own user and password. Redshift then applies that user’s grants, row-level security and masking policies to every agent query. The shared agent account always signs in with a user and password, also when the project connection uses IAM. The host, port, database, schema, SSL settings and SSH tunnel stay from the connection. No IAM, SSO or personal sign-in fields apply to agent queries.Set up the Redshift shared agent account
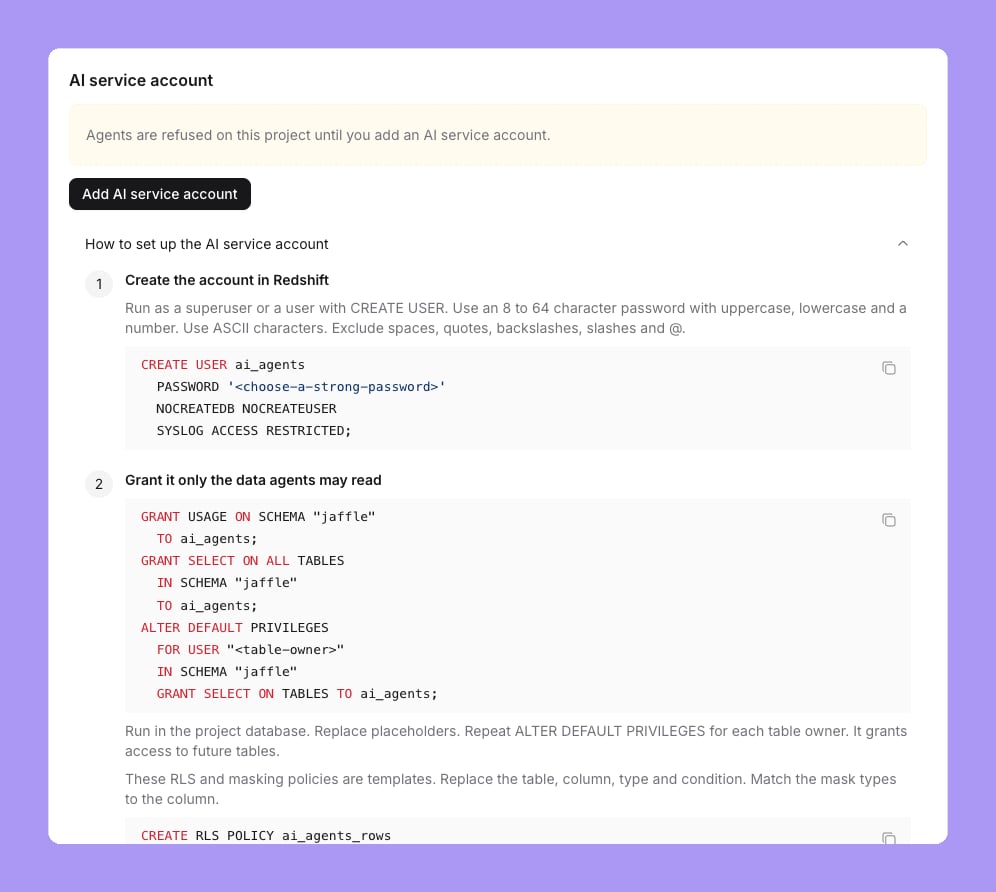
While the project has no shared agent account, the Shared agent account card on Project settings → Agent identity shows three setup steps, with a Copy SQL button for each block. The SQL uses the schema of the connection.Create the database user
CREATE USER, create a separate user for agents. Use a password of 8 to 64 ASCII characters, with an uppercase letter, a lowercase letter and a number. Do not use spaces, quotes, backslashes, slashes or @:Grant the schemas that agents may read
ALTER DEFAULT PRIVILEGES grants access to future tables of one owner. Repeat it for each table owner.Add the shared agent account
Set the Redshift rule
Limit rows and columns on Redshift
The setup steps have templates for a row-level security policy and a masking policy. Replace the table, column, type and condition, and match the mask type to the column:Test, replace and remove
Test signs in as the user and runsSELECT current_user, session_user. Both values must be the same, and must match the saved user. Redshift folds unquoted user names to lower case, so the lower-case form of the saved user also matches. The card then shows “Signs in as” followed by the user, and when it was tested and added. Test proves that the user and password work. It does not check what the user can read.
When Test fails, the card gives a fixed message: rejected credentials, a missing database, missing grants, or a general message. Lightdash never shows the driver message.
- To change the user or password, select Replace.
- To remove the shared agent account, select Remove and confirm. Agent queries on that project are refused until an admin adds one again.
What agents and people see on Redshift
When the Redshift rule is A shared agent account:- Chat, MCP, Slack and data app sample queries on Redshift sign in as the shared agent account. On a connection with an SSH tunnel, they use the same tunnel.
- Agent queries skip the Redshift result cache.
- Settings → My agent identity shows a Redshift card. People have nothing to set up. See My agent identity.
Trino: the shared agent account
With this identity, agent queries on a Trino project sign in as a separate Trino user, with its own user and password. Trino access control then decides what agents read. The shared agent account replaces only the user and password of the connection. The host, port, scheme, catalog, schema and source stay from the connection. Lightdash signs in to Trino with password (basic) authentication only, so the shared agent account has no JWT, OAuth 2.0, Kerberos or certificate sign-in. A Starburst Galaxy service account works, because it signs in with a user name and password.Set up the Trino shared agent account
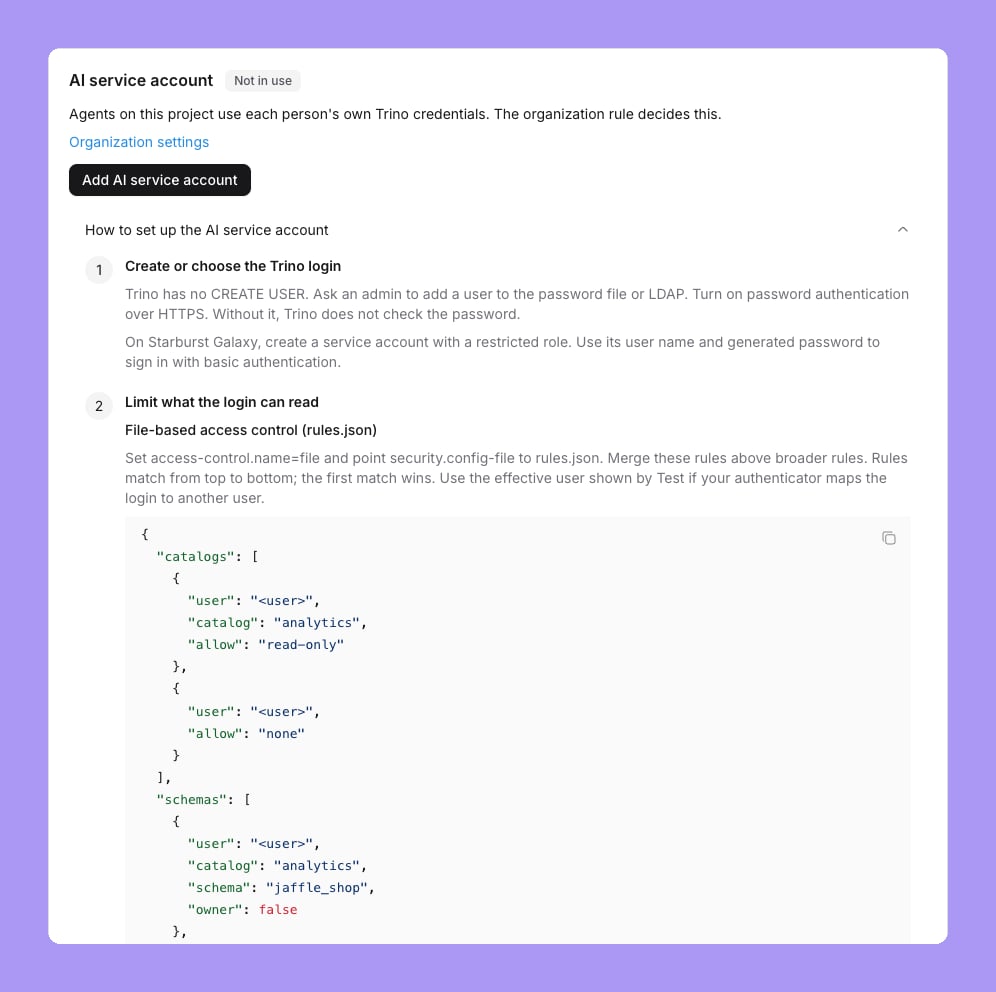
While the project has no shared agent account, the Shared agent account card on Project settings → Agent identity shows three setup steps, with copy buttons. The templates use the catalog and schema of the connection.Create or choose the Trino login
CREATE USER. Ask a Trino admin to add a user to the password file or LDAP. Turn on password authentication over HTTPS. Without it, Trino does not check the password. On Starburst Galaxy, create a service account with a restricted role, and use its user name and generated password.Limit what the login can read
Add the shared agent account
Set the Trino rule
Limit what the Trino login can read
File-based access control. Setaccess-control.name=file, and point security.config-file to a rules.json file. The setup steps have a template. It allows read-only access to one catalog, schema and table for the agent user, with an optional row filter and column mask, and denies everything else to that user:
filter and columns fields are optional. If your authenticator maps the login to another user, use the user that Test shows. See File-based access control.
SQL roles and grants. Use this only with a system access control that supports SQL roles and grants:
IN "<catalog>" on CREATE ROLE and on the role grant. Check inherited and public grants.
Test, replace and remove
Test signs in and runsSELECT current_user. The card then shows “Signs in as” followed by the user that Trino returns, and when it was tested and added. Lightdash does not compare that user with the login, because Trino user mapping can change it. Test proves that the user and password work. It does not check what the user can read.
When Test fails, the card gives a fixed message: rejected credentials, missing access, or a general message. Lightdash never shows the driver message.
- To change the user or password, select Replace.
- To remove the shared agent account, select Remove and confirm. Agent queries on that project are refused until an admin adds one again.
What agents and people see on Trino
When the Trino rule is A shared agent account:- Chat, MCP, Slack and data app sample queries on Trino sign in as the shared agent account.
- Agent queries skip the Lightdash results cache and pre-aggregates. Trino has no result cache setting.
- Settings → My agent identity shows a Trino card. People have nothing to set up. See My agent identity.
ClickHouse: the shared agent account
With this identity, agent queries on a ClickHouse project sign in as a separate read-only ClickHouse user, with its own user and password. ClickHouse then applies that user’s grants and row policies to every agent query. The shared agent account replaces only the user and password of the connection. The host, port, database,secure setting and timezone stay from the connection.
Set up the ClickHouse shared agent account
While the project has no shared agent account, the Shared agent account card on Project settings → Agent identity shows three setup steps, with a Copy SQL button for each block. The SQL uses the database of the connection.Create the account in ClickHouse
CREATE USER permission, create a separate user for agents. Replace the password placeholder:readonly = 2 keeps the user read-only, and lets agent queries set the query settings they need. Every agent query sends query tags and a session timezone. ClickHouse rejects these settings for a readonly = 1 user, unless its profile allows them.Grant it only the data agents may read
SELECT on the project database, or limit the grant to specific tables:Add the shared agent account
Set the ClickHouse rule
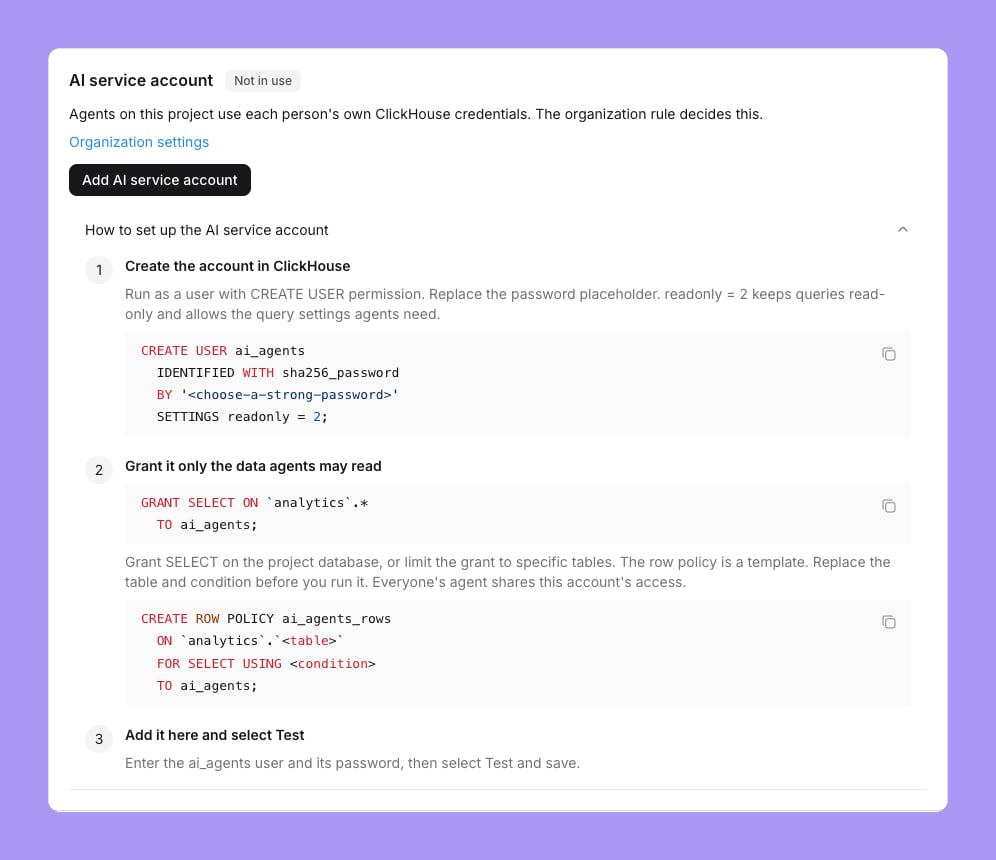
Limit rows on ClickHouse
The setup steps have a row policy template. Replace the table and condition before you run it:Test, replace and remove
Test signs in and runsSELECT currentUser(), getSetting('readonly'), getSetting('use_query_cache'), with the same query tags and timezone as an agent query. Test fails when:
- The user is not the saved user. The match is exact, including case.
readonlyis 0, so the user can write.- The query cache is on.
- ClickHouse blocks the query settings.
- To change the user or password, select Replace.
- To remove the shared agent account, select Remove and confirm. Agent queries on that project are refused until an admin adds one again.
What agents and people see on ClickHouse
When the ClickHouse rule is A shared agent account:- Chat, MCP, Slack and data app sample queries on ClickHouse sign in as the shared agent account.
- Agent queries turn the ClickHouse query cache off.
- Settings → My agent identity shows a ClickHouse card. People have nothing to set up. See My agent identity.